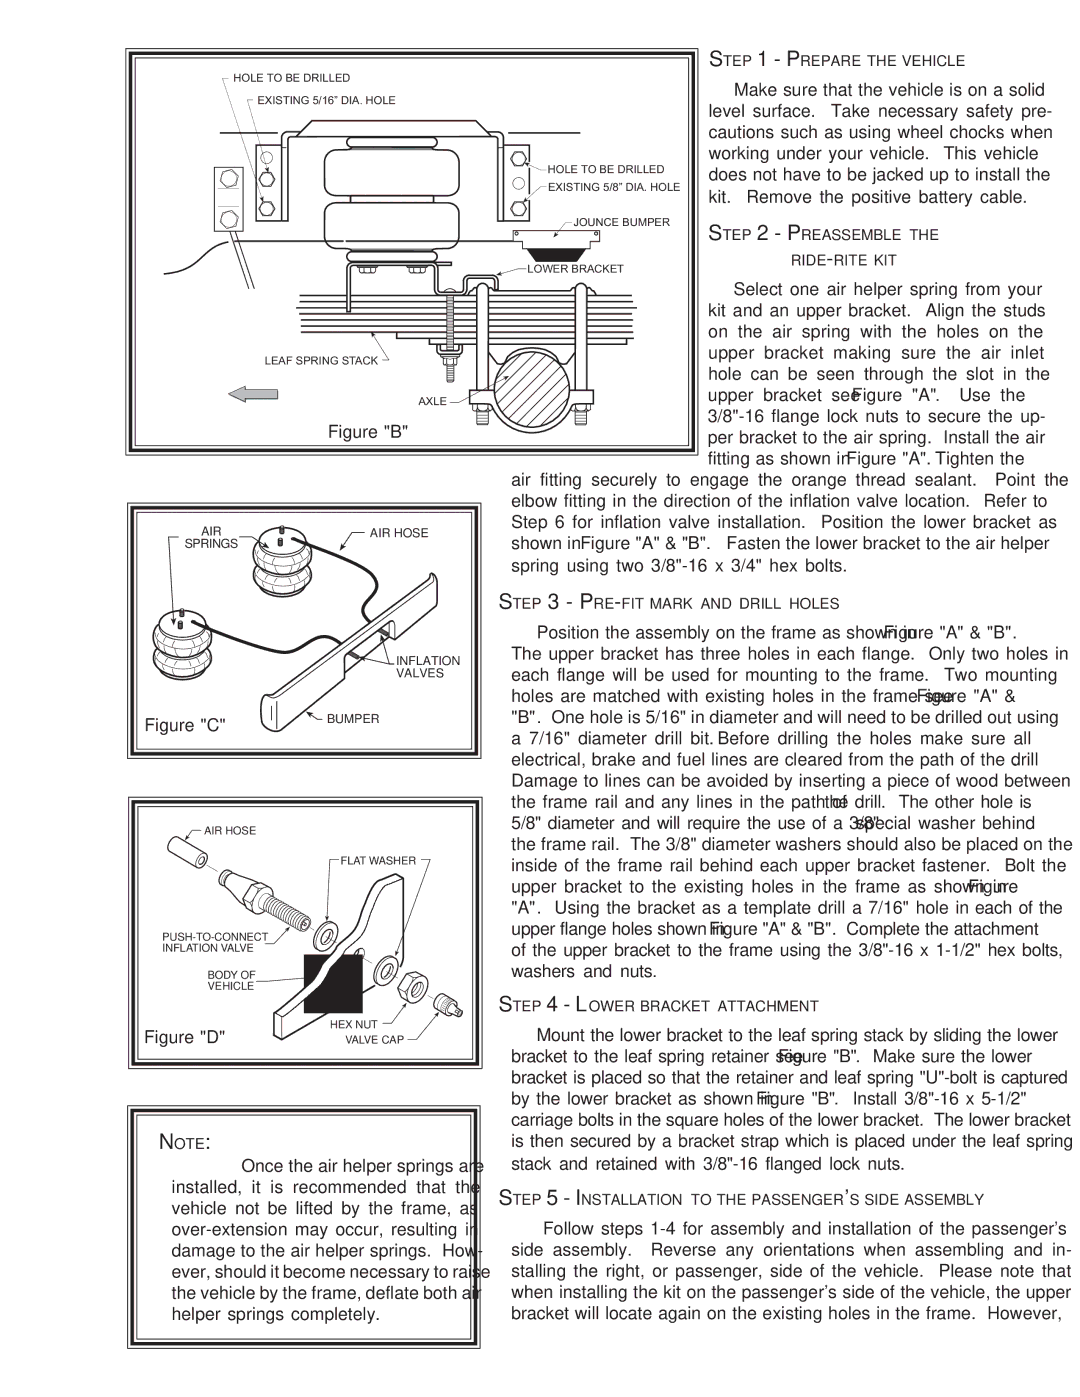
| HOLE TO BE DRILLED |
|
| STEP 1 - PREPARE THE VEHICLE | |||
|
|
| Make sure that the vehicle is on a solid | ||||
| EXISTING 5/16” DIA. HOLE |
|
| ||||
|
|
| level surface. Take necessary safety pre- | ||||
|
|
|
| ||||
|
|
|
| cautions such as using wheel chocks when | |||
|
|
| HOLE TO BE DRILLED | working under your vehicle. This vehicle | |||
|
|
| does not have to be jacked up to install the | ||||
|
|
| EXISTING 5/8” DIA. HOLE | ||||
|
|
| kit. Remove the positive battery cable. | ||||
|
|
|
| ||||
|
|
| JOUNCE BUMPER | STEP | 2 - PREASSEMBLE THE |
| |
|
|
|
|
| |||
|
|
| LOWER BRACKET |
|
| ||
|
|
|
| Select one air helper spring from your | |||
Left side shown |
|
| kit and an upper bracket. Align the studs | ||||
(Driver’s side) |
|
| on the air spring with the holes on the | ||||
|
|
|
| ||||
| LEAF SPRING STACK |
|
| upper | bracket making sure the | air inlet | |
|
|
| hole can be seen through the slot in the | ||||
|
|
|
| ||||
| FRONT | AXLE |
| upper | bracket see Figure "A". | Use the | |
|
|
| |||||
| Figure "B" |
|
| per bracket to the air spring. Install the air | |||
|
|
|
| fitting as shown in Figure "A". Tighten the | |||
|
|
| air fitting securely to engage the orange thread sealant. Point the | ||||
|
|
| elbow fitting in the direction of the inflation valve location. Refer to | ||||
AIR | AIR HOSE | Step 6 for inflation valve installation. Position the lower bracket as | |||||
shown in Figure "A" & "B". Fasten the lower bracket to the air helper | |||||||
SPRINGS |
| ||||||
|
|
| spring using two |
| |||
|
| STEP 3 - |
| |
|
| Position the assembly on the frame as shown in Figure "A" & "B". | ||
| INFLATION | The upper bracket has three holes in each flange. Only two holes in | ||
| VALVES | each flange will be used for mounting to the frame. | Two mounting | |
|
| holes are matched with existing holes in the frame see Figure "A" & | ||
Figure "C" | BUMPER | "B". One hole is 5/16" in diameter and will need to be drilled out using | ||
| a 7/16" diameter drill bit. Before drilling the holes make sure all | |||
|
| |||
|
| electrical, brake and fuel lines are cleared from the path of the drill. | ||
|
| Damage to lines can be avoided by inserting a piece of wood between | ||
|
| the frame rail and any lines in the path of the drill. The other hole is | ||
AIR HOSE |
| 5/8" diameter and will require the use of a 3/8" special washer behind | ||
| the frame rail. The 3/8" diameter washers should also be placed on the | |||
| FLAT WASHER | |||
| inside of the frame rail behind each upper bracket fastener. Bolt the | |||
|
|
| ||
|
| upper bracket to the existing holes in the frame as shown in Figure | ||
|
| "A". Using the bracket as a template drill a 7/16" hole in each of the | ||
| upper flange holes shown in Figure "A" & "B". Complete the attachment | |||
| of the upper bracket to the frame using the | |||
INFLATION VALVE |
| |||
|
|
| ||
BODY OF |
| washers and nuts. |
| |
VEHICLE |
| STEP 4 - LOWER BRACKET ATTACHMENT |
| |
| HEX NUT |
| ||
Figure "D" | Mount the lower bracket to the leaf spring stack by sliding the lower | |||
VALVE CAP | ||||
|
| bracket to the leaf spring retainer see Figure "B". Make sure the lower | ||
|
| bracket is placed so that the retainer and leaf spring | ||
|
| by the lower bracket as shown in Figure "B". Install | ||
NOTE: |
| carriage bolts in the square holes of the lower bracket. The lower bracket | ||
| is then secured by a bracket strap which is placed under the leaf spring | |||
Once the air helper springs are | stack and retained with | |
installed, it is recommended that the | STEP 5 - INSTALLATION TO THE PASSENGER'S SIDE ASSEMBLY | |
vehicle not be lifted by the frame, as | ||
Follow steps | ||
damage to the air helper springs. How- | side assembly. Reverse any orientations when assembling and in- | |
ever, should it become necessary to raise | stalling the right, or passenger, side of the vehicle. Please note that | |
the vehicle by the frame, deflate both air | when installing the kit on the passenger's side of the vehicle, the upper | |
helper springs completely. | bracket will locate again on the existing holes in the frame. However, |
