Installation Instructions for Pre-Rinse Units
BE SURE TO CHECK WITH YOUR LOCAL DEPARTMENT HAVING JURISDICTION REGARDING BACKFLOW PREVENTION
Installation Notes:
•Be sure to shut off water supply before beginning.
•Use pipe thread sealant such as PST on all threaded joints.
•Check the packaging for missing items BEFORE beginning installation. If items are missing, contact your supplier.
Tools Required for Installation
• Medium Sized Crescent Wrench |
| |
• | Pipe Thread Sealant |
|
• | Phillips Screwdriver | PST |
• | 7/16” Drill Bit |
|
Installation Instructions Continued
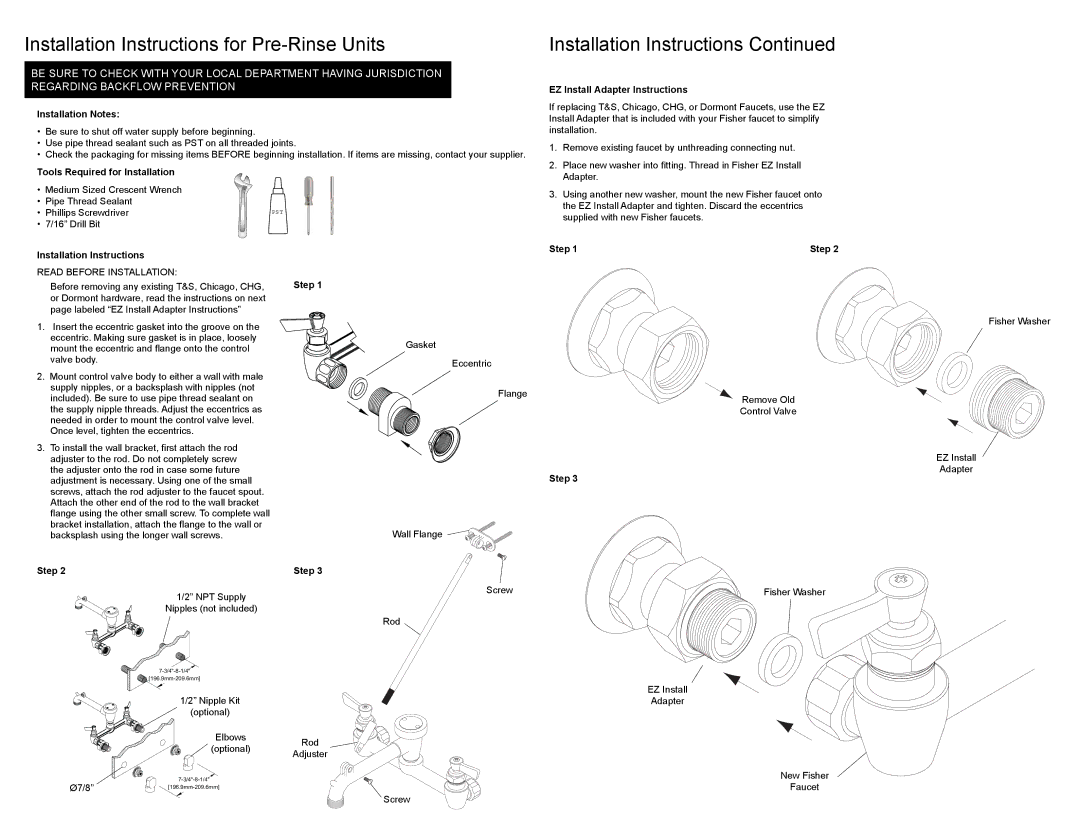
EZ Install Adapter Instructions
If replacing T&S, Chicago, CHG, or Dormont Faucets, use the EZ Install Adapter that is included with your Fisher faucet to simplify installation.
1.Remove existing faucet by unthreading connecting nut.
2.Place new washer into fitting. Thread in Fisher EZ Install Adapter.
3.Using another new washer, mount the new Fisher faucet onto the EZ Install Adapter and tighten. Discard the eccentrics supplied with new Fisher faucets.
Installation Instructions
READ BEFORE INSTALLATION:
Before removing any existing T&S, Chicago, CHG, or Dormont hardware, read the instructions on next page labeled “EZ Install Adapter Instructions”
1.Insert the eccentric gasket into the groove on the eccentric. Making sure gasket is in place, loosely mount the eccentric and flange onto the control valve body.
2.Mount control valve body to either a wall with male supply nipples, or a backsplash with nipples (not included). Be sure to use pipe thread sealant on the supply nipple threads. Adjust the eccentrics as needed in order to mount the control valve level. Once level, tighten the eccentrics.
3.To install the wall bracket, first attach the rod adjuster to the rod. Do not completely screw the adjuster onto the rod in case some future adjustment is necessary. Using one of the small screws, attach the rod adjuster to the faucet spout. Attach the other end of the rod to the wall bracket
flange using the other small screw. To complete wall bracket installation, attach the flange to the wall or backsplash using the longer wall screws.
Step 2
1/2” NPT Supply
Nipples (not included)
Step 1
Gasket
Eccentric
Flange
Wall Flange ![]()
![]()
Step 3
Screw
Rod
Step 1 | Step 2 |
Remove Old
Control Valve
Step 3
Fisher Washer
Fisher Washer
EZ Install
Adapter
1/2” Nipple Kit
(optional)
Elbows
![]() (optional)
(optional)
Ø7/8”[196.9mm-209.6mm]
EZ Install
Adapter
Rod
Adjuster
Screw
New Fisher
Faucet