BI602CTE series
![]() 595m m
595m m
595 mm
|
| m |
| 0 | m |
6 |
| |
4 |
| or |
| endo | |
ov |
| |
585 mm![]()
| 55 |
|
| |
|
| 0m | ||
|
|
| m | |
|
|
|
| |
|
|
| 578 mm |
|
| m |
|
| |
|
|
| ||
0 | m |
|
|
|
2 |
|
| m | |
|
| 2 | m | |
| 6 |
|
| |
| 5 |
|
|
|
| m |
600 | m |
|
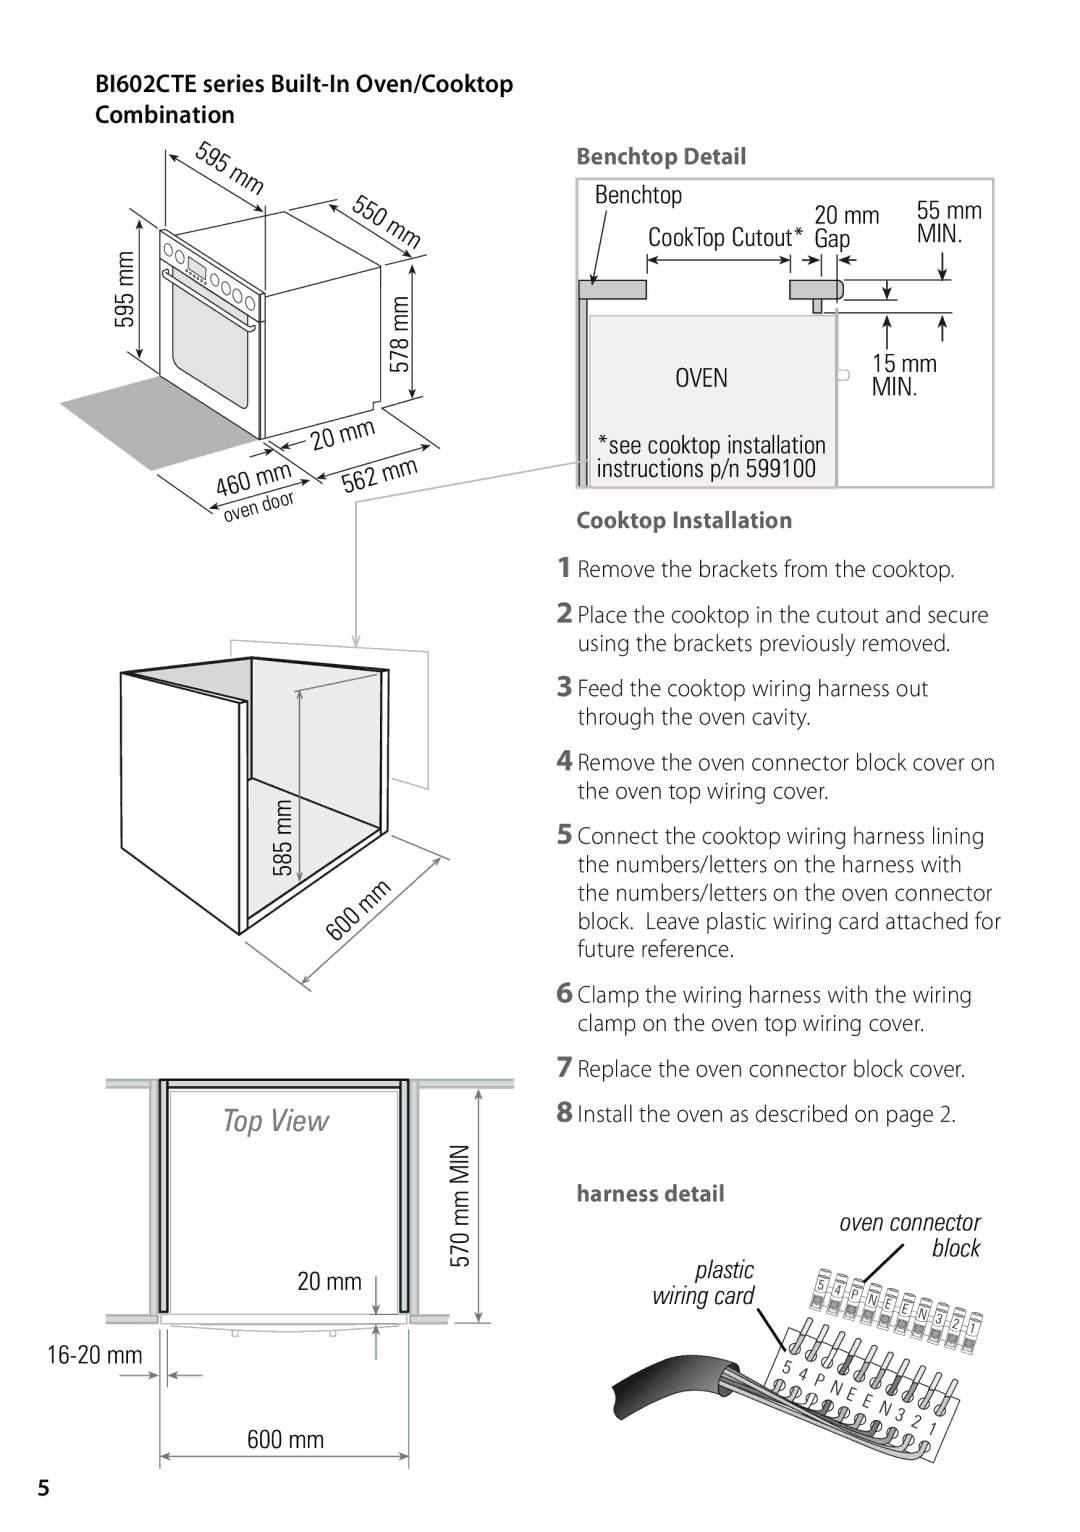
Benchtop Detail
Benchtop |
| 55 mm | |
20 mm | |||
CookTop Cutout* Gap |
| MIN. | |
OVEN | 15 mm | ||
MIN. | |||
| |||
*see cooktop installation |
|
| |
instructions p/n 599100 |
|
| |
Cooktop Installation
1 Remove the brackets from the cooktop.
2 Place the cooktop in the cutout and secure using the brackets previously removed.
3 Feed the cooktop wiring harness out through the oven cavity.
4 Remove the oven connector block cover on the oven top wiring cover.
5 Connect the cooktop wiring harness lining
the numbers/letters on the harness with the numbers/letters on the oven connector block. Leave plastic wiring card attached for future reference.
6 Clamp the wiring harness with the wiring clamp on the oven top wiring cover.
7 Replace the oven connector block cover.
Top View
570 mm MIN
20 mm
600 mm
8 Install the oven as described on page 2.
harness detail
oven connector
block
plastic
wiring card |
|
| 5 | 4 | P | N |
|
|
|
|
|
|
|
|
|
| E |
|
|
|
|
|
| ||||
|
|
|
|
|
|
| E |
|
|
|
|
| |
|
|
|
|
|
|
|
|
| N | 3 | 2 |
| |
|
|
|
|
|
|
|
|
|
| 1 | |||
|
|
|
|
|
|
|
|
|
|
| |||
|
|
|
|
|
|
|
|
|
|
|
| ||
|
|
|
|
|
|
|
|
|
|
|
|
| |
| 5 | 4 | P | N |
|
|
|
|
|
|
|
|
|
|
| E |
|
|
|
|
|
|
|
| |||
|
|
| E |
|
|
|
|
|
|
| |||
|
|
|
| N |
|
|
|
|
|
| |||
|
|
|
|
| 3 |
|
|
|
|
| |||
|
|
|
|
|
| 2 |
|
|
|
| |||
|
|
|
|
|
|
|
| 1 |
|
| |||
|
|
|
|
|
|
|
|
|
|
| |||
|
|
|
|
|
|
|
|
|
|
|
| ||
|
|
|
|
|
|
|
|
|
|
|
|
|
5
