FIRST USE
3 REPLACE SHELVING IN YOUR PREFERRED POSITIONS
We recommend placing the telescopic sliding shelves on positions 2 and 4 as these are the shelf positions most often used.
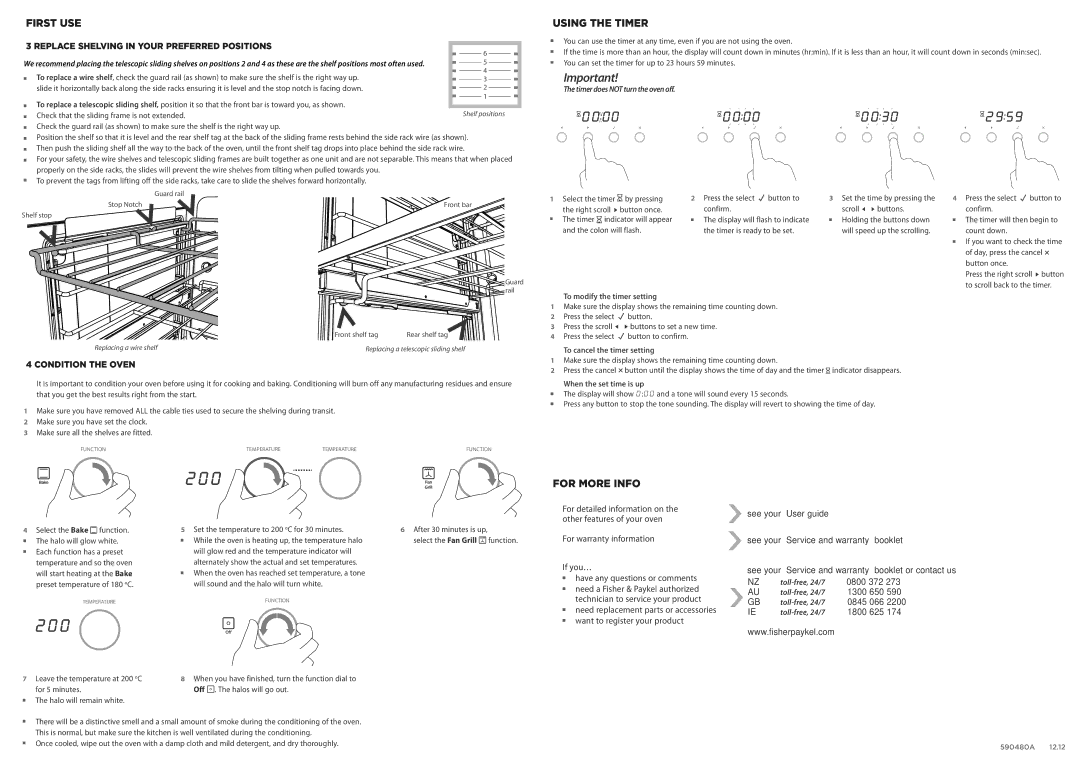
To replace a wire shelf, check the guard rail (as shown) to make sure the shelf is the right way up. slide it horizontally back along the side racks ensuring it is level and the stop notch is facing down.
To replace a telescopic sliding shelf, position it so that the front bar is toward you, as shown. Check that the sliding frame is not extended.
Check the guard rail (as shown) to make sure the shelf is the right way up.
Position the shelf so that it is level and the rear shelf tag at the back of the sliding frame rests behind the side rack wire (as shown). Then push the sliding shelf all the way to the back of the oven, until the front shelf tag drops into place behind the side rack wire.
For your safety, the wire shelves and telescopic sliding frames are built together as one unit and are not separable. This means that when placed properly on the side racks, the slides will prevent the wire shelves from tilting when pulled towards you.
To prevent the tags from lifting off the side racks, take care to slide the shelves forward horizontally.
USING THE TIMER
You can use the timer at any time, even if you are not using the oven.
If the time is more than an hour, the display will count down in minutes (hr:min). If it is less than an hour, it will count down in seconds (min:sec). You can set the timer for up to 23 hours 59 minutes.
Important!
The timer does NOT turn the oven off.
Guard rail
Stop Notch | Front bar |
Shelf stop
Guard rail
1Select the timer![]() by pressing
by pressing
the right scroll ![]() button once. The timer
button once. The timer![]() indicator will appear and the colon will flash.
indicator will appear and the colon will flash.
To modify the timer setting
2 Press the select | button to | 3 Set the time by pressing the | 4 Press the select | button to | ||||
| confirm. |
|
| scroll | buttons. |
| confirm. |
|
| The display will flash to indicate |
| Holding the buttons down |
| The timer will then begin to | |||
|
|
| ||||||
| the timer is ready to be set. |
| will speed up the scrolling. |
| count down. |
| ||
|
|
|
|
|
|
| If you want to check the time | |
|
|
|
|
|
|
| ||
|
|
|
|
|
|
| of day, press the cancel | |
button once.
Press the right scroll ![]() button to scroll back to the timer.
button to scroll back to the timer.
| Front shelf tag | Rear shelf tag |
Replacing a wire shelf | Replacing a telescopic sliding shelf | |
4 CONDITION THE OVEN
It is important to condition your oven before using it for cooking and baking. Conditioning will burn off any manufacturing residues and ensure that you get the best results right from the start.
1Make sure you have removed ALL the cable ties used to secure the shelving during transit.
2 Make sure you have set the clock.
3 Make sure all the shelves are fitted.
FUNCTION | TEMPERATURE | TEMPERATURE | FUNCTION |
1Make sure the display shows the remaining time counting down.
2 Press the select ![]() button.
button.
3 Press the scroll ![]()
![]() buttons to set a new time. 4 Press the select
buttons to set a new time. 4 Press the select ![]() button to confirm.
button to confirm.
To cancel the timer setting
1Make sure the display shows the remaining time counting down.
2Press the cancel ![]() button until the display shows the time of day and the timer
button until the display shows the time of day and the timer![]() indicator disappears.
indicator disappears.
When the set time is up
The display will show 0:00 and a tone will sound every 15 seconds.
Press any button to stop the tone sounding. The display will revert to showing the time of day.
4Select the Bake![]() function.
function.
The halo will glow white. Each function has a preset temperature and so the oven will start heating at the Bake preset temperature of 180 oC.
TEMPERATURE
7Leave the temperature at 200 oC for 5 minutes.
The halo will remain white.
5Set the temperature to 200 oC for 30 minutes.
While the oven is heating up, the temperature halo will glow red and the temperature indicator will alternately show the actual and set temperatures. When the oven has reached set temperature, a tone will sound and the halo will turn white.
FUNCTION
8When you have finished, turn the function dial to Off ![]() . The halos will go out.
. The halos will go out.
6After 30 minutes is up,
select the Fan Grill![]() function.
function.
FOR MORE INFO
For detailed information on the other features of your oven
For warranty information
If you…
have any questions or comments
need a Fisher & Paykel authorized technician to service your product
need replacement parts or accessories want to register your product
see your ‘User guide’
see your ‘Service and warranty’ booklet
see your ‘Service and warranty’ booklet or contact us
NZ | 0800 372 273 | |
AU | 1300 650 590 | |
GB | 0845 066 2200 | |
IE | 1800 625 174 |
www.fisherpaykel.com
There will be a distinctive smell and a small amount of smoke during the conditioning of the oven. This is normal, but make sure the kitchen is well ventilated during the conditioning.
Once cooled, wipe out the oven with a damp cloth and mild detergent, and dry thoroughly.
590480A 12.12