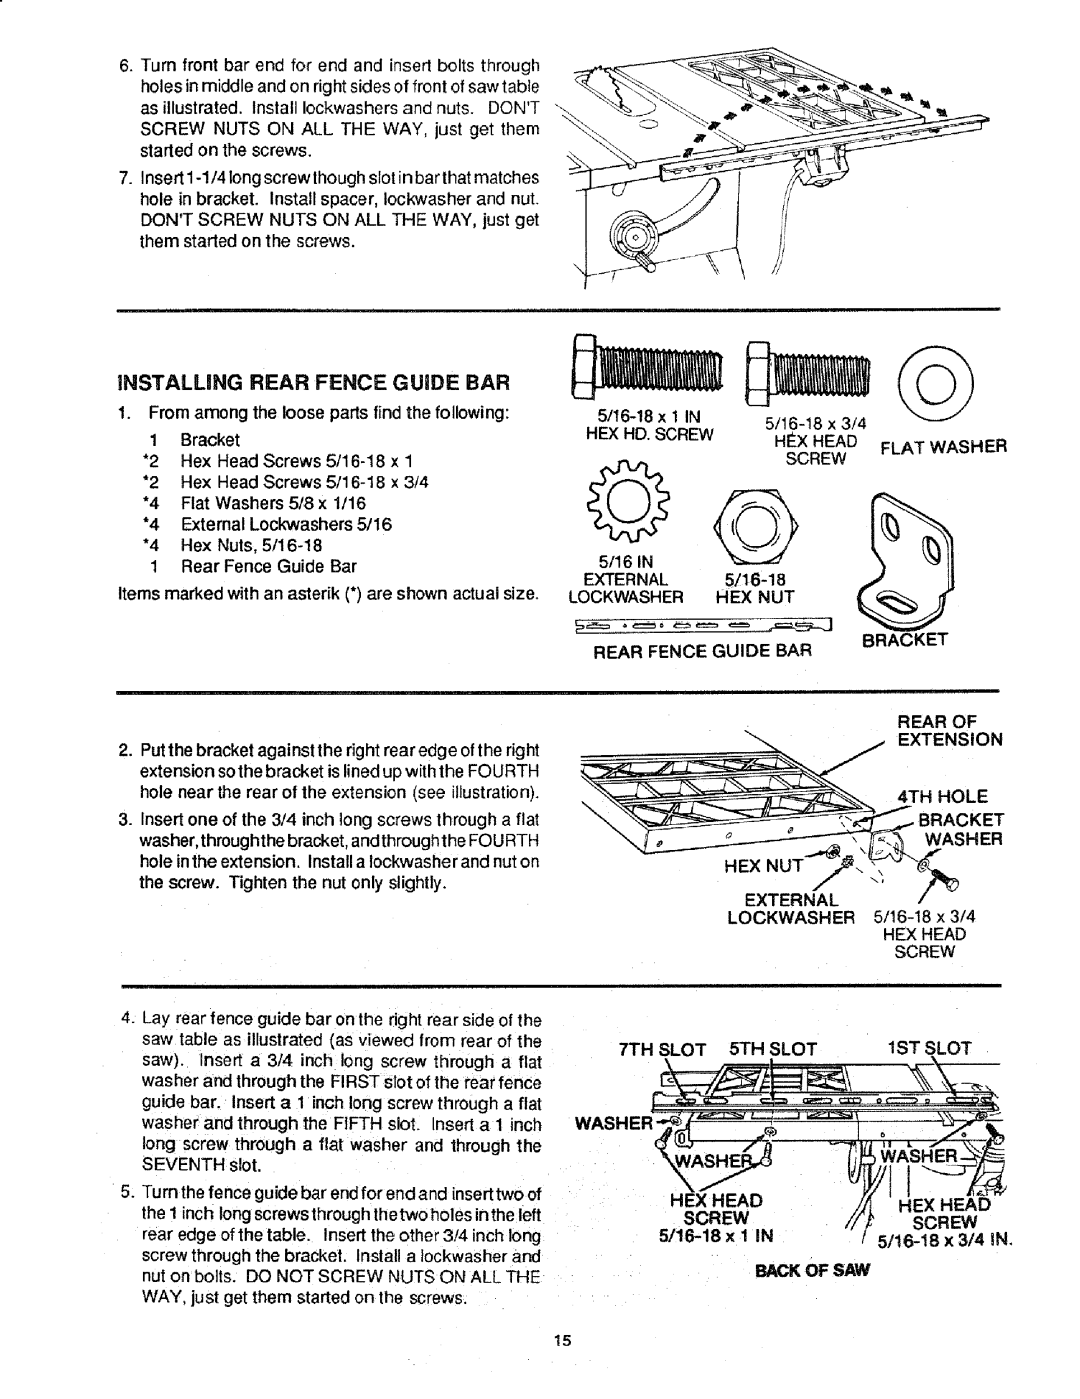
6.Turn front bar end for end and insert bolts through holes in middle and on right sides of front of saw table as illustrated. Install Iockwashers and nuts. DON'T
SCREW NUTS ON ALL THE WAY, just get them started on the screws.
7.Insert
iNSTALLING REAR FENCE GUIDE BAR
1.From among the loose parts find the following:
1 Bracket
*2 Hex Head Screws
*2 Hex Head Screws
*4 Flat Washers 5/8 x 1116
*4 External Lockwashers 5/16
*4 Hex Nuts,
| |||
HEX HD. SCREW |
| ||
HEx HEAD | FLAT WASHER | ||
| |||
| SCREW | ||
|
|
1 Rear Fence Guide Bar
Items marked with an asterik (*) are shown actual size.
2. Put the bracket against the right rear edge of the right | ||
extension | sothe bracket | is lined up with the FOURTH |
hole near | the rear of the | extension (see illustration). |
5/16 IN
EXTERNAL
LOCKWASHER HEX NUT
REAR FENCE GUIDE BAR
BRACKET
REAR OF
EXTENSION
4TH HOLE
3. Insert one of the 3/4 inch long screws through a flat |
washer, through the bracket, andthrough the FOU RTH hole inthe extension. Install a Iockwashe rand nut on
the screw. Tighten the nut only slightly.
4.Lay rear fence guide bar on the right rear side of the saw table as illustrated (as viewed from rear of the saw). Insert a 3/4 inch long screw through a flat washer and through the FIRST slot of the rear fence guide bar. Insert a I inch long screw through a flat washer and through the FIFTH slot. Insert a I inch
long screw through a flat washer and through the SEVENTH slot.
5.Turn the fence guide bar end for end and inserttwo of the 1 inch long screwsthrough thetwo holes inthe left rear edge of the table. Insert the other 3/4 inch long screw through the bracket. Instal] a tockwasher and nut on bolts. DO NOT SCREW NUTS ON ALL THE WAY. just get them started on the screws.
\
IKET
WASHER
HEX NUT
EXTERNAL
LOCKWASH ER
HEX HEAD
SCREW
7TH SLOT 5TH SLOT | 1ST SLOT |
HEX HEAD | I | |
HEX HEAD | ||
SCREW | ||
SCREW | ||
| ||
BACK OF SAW |
|
15
