safety for basic saw operations
BEFORE LEAVING THE SAW
1.Turn the saw off,
2.Wait for blade to stop spinning.
3.Make workshop
i
nect master switches. Remove the yellow Switch Key. Store it away from children and others not qualified to use the tool.
4. Unplug the saw.
i,,i
basic saw operation - using the miter gauge
CROSSCUTTING, MITER CUTTING, BEVEL CUT- TING, COMPOUND MITER
BETING across the end of a narrow workpiece, the
MITER GAUGE IS USED.
WARNING: For your own safety, aNvays observe the following safety precautions in addition to the safety instructions on pages 2, 3, 4, 5, 28, 29 & 30.
ADDITIONAL SAFETY INSTRUCTIONS FOR
CROSS CUT TYPE CUTS
Before S_rting:
1. Never use the Rip Fence when crosscutting,
2.An auxiliarywood facing attached to the Miter Gauge can help preventworkpiece twisting and throwback s. Attach it to the holes provided. Make the facing long enough and big enough to support yourwork. Make sure, however, itwill not interfere with the sawblade guard.
3.Use jigs or fixtures to help hold any piece too small to extend across the full length of the Miter Gauge face during the cut. This lets you properly hold the Miter Gauge and workpiece and helps keep your hands away from the blade.
While Cutting:
1.To avoid blade contact, always hold the Miter Gauge as shown in the "BASIC SAW OPERATIONS -
USING THE MITER GAUGE."
i iii
WORK HELPERS
Before cutting any wood on your saw, study all of the "Basic Saw Operations."
Notice that in order to make some of the cuts, it is necessary to use certain devices, "Work Helpers", like the Push Stick, the Push Blockandthe Auxiliary Fence/ Work Support, which you can make yourself.
After you have made afew practice cuts, make up these "helpers"before starting any projects. Make the "Push
Stick" first.
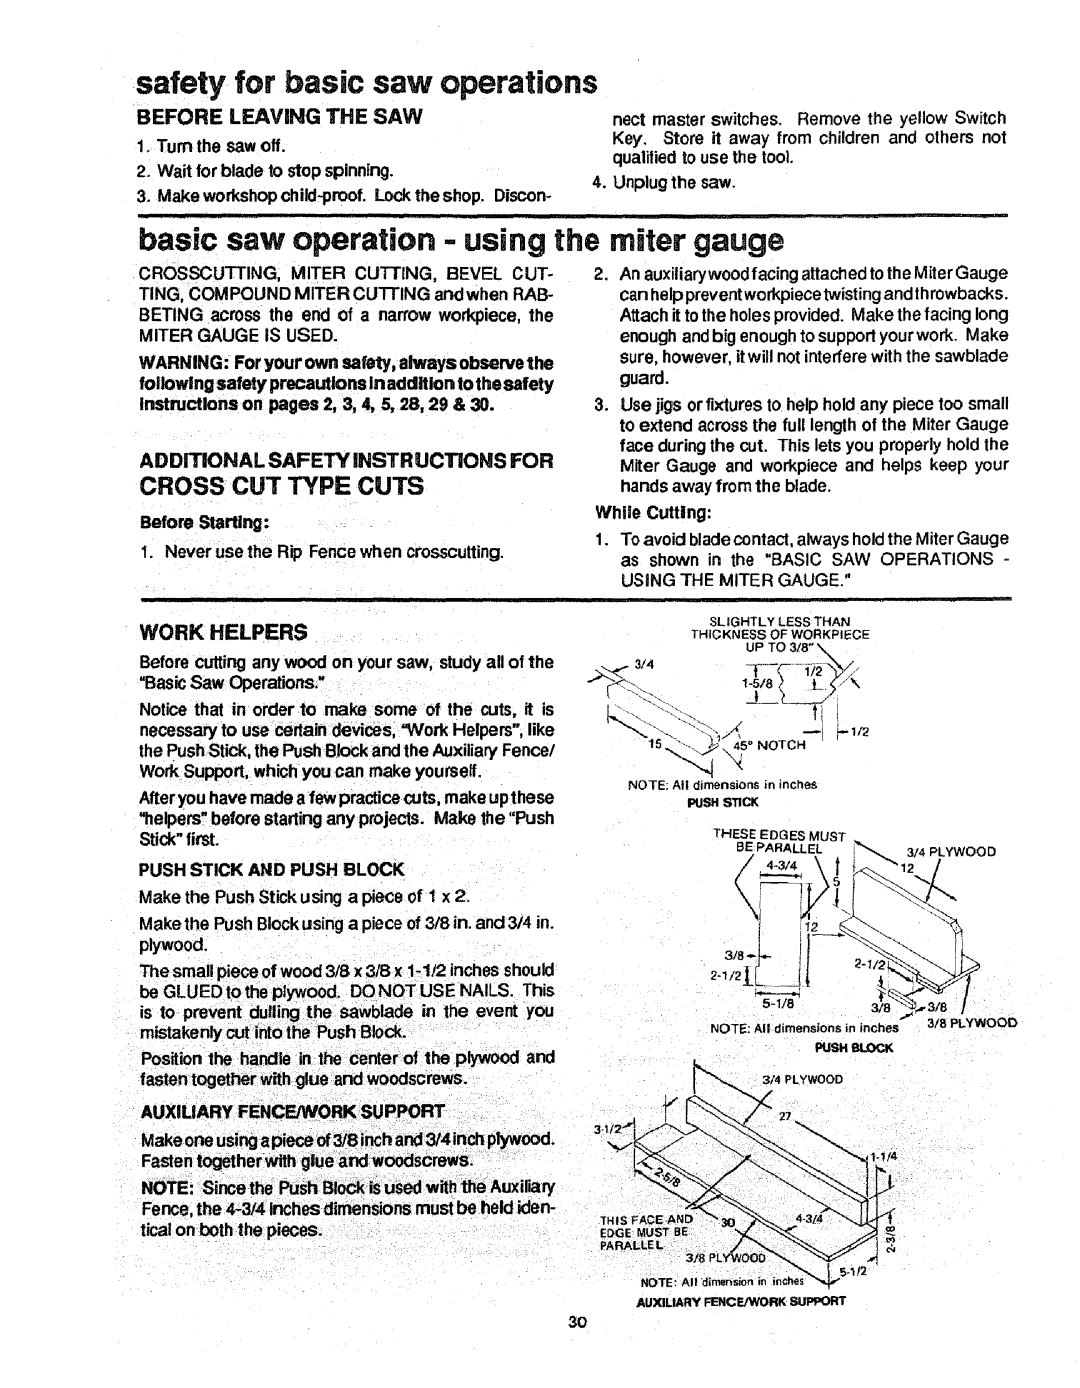
PUSH STICK AND PUSH BLOCK
SLIGHTLY LESS THAN
THICKNESS OF WORKPIECE
uP TO 3/8"
%.
45 ° NOTCH
NOTE: All dimensions in inches
PUSH STICK
THESE EDGES MUST
BE PARALLEL
Make the Push Stick using a piece of 1 x 2. | \ | |
Make the Push Blockusing a piece of 3/8 in. and 3/4 in. | ||
| ||
plywood. | 3/8 | |
|
The small piece of wood 3/8 x 3/8 x
NOTE: All dimensions in inches
3/8 PLYWOOD
Position the handle in the center of the plywood and fastentogetherwith glue and woodscrews.
AUXILIARY FENCE/WORK SUPPOFIT
NOTE: Since the Push BloCkis used with the Auxiliary Fence, the
FUSH BLOCK
3/4 PLYWOOD
NOTE
AUXILIARY FENCE/WORK SUPPORT
3O