STEP 3 – Handlebar Tube Assembly

down

angle

front


towards


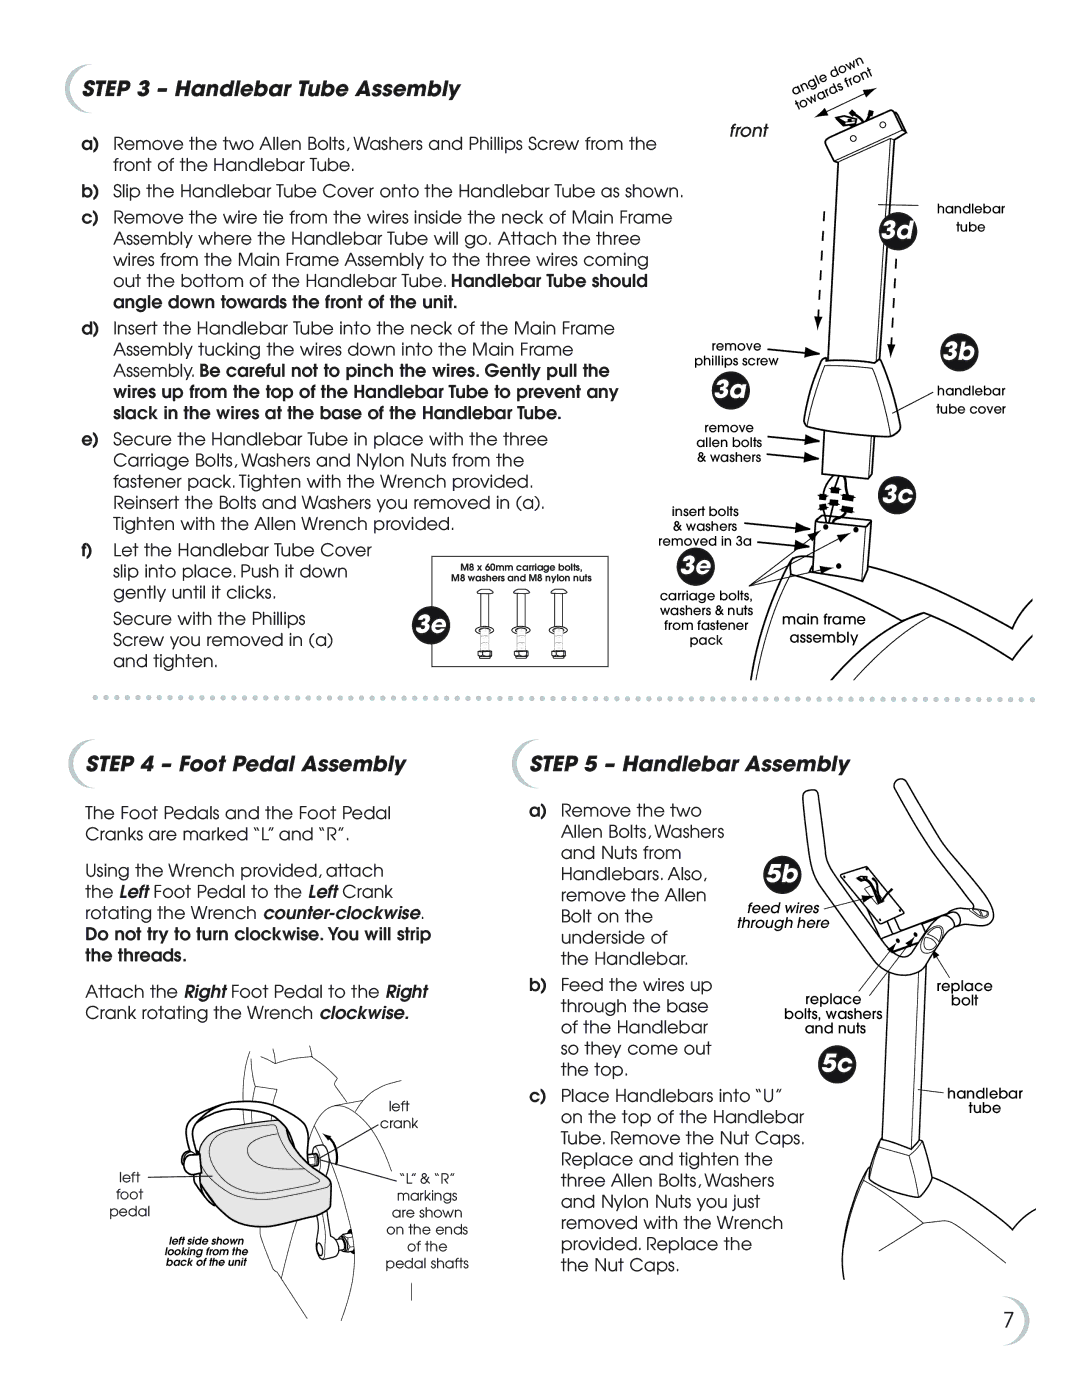
a)Remove the two Allen Bolts, Washers and Phillips Screw from the front of the Handlebar Tube.

b)Slip the Handlebar Tube Cover onto the Handlebar Tube as shown.

c)Remove the wire tie from the wires inside the neck of Main Frame Assembly where the Handlebar Tube will go. Attach the three wires from the Main Frame Assembly to the three wires coming out the bottom of the Handlebar Tube. Handlebar Tube should angle down towards the front of the unit.

d)Insert the Handlebar Tube into the neck of the Main Frame Assembly tucking the wires down into the Main Frame Assembly. Be careful not to pinch the wires. Gently pull the wires up from the top of the Handlebar Tube to prevent any slack in the wires at the base of the Handlebar Tube.

front

remove

phillips screw

3a

handlebar

3d tube

3b

handlebar tube cover

e)Secure the Handlebar Tube in place with the three Carriage Bolts, Washers and Nylon Nuts from the fastener pack. Tighten with the Wrench provided. Reinsert the Bolts and Washers you removed in (a). Tighten with the Allen Wrench provided.

f)Let the Handlebar Tube Cover

slip into place. Push it down

M8 x 60mm carriage bolts,

M8 washers and M8 nylon nuts

gently until it clicks.


Secure with the Phillips

3e

Screw you removed in (a)


and tighten.


remove

allen bolts & washers

insert bolts & washers

removed in 3a

3e

carriage bolts,

washers & nuts

from fastener main frame

packassembly

3c

STEP 4 – Foot Pedal Assembly

STEP 5 – Handlebar Assembly

The Foot Pedals and the Foot Pedal Cranks are marked “L” and “R”.

Using the Wrench provided, attach the Left Foot Pedal to the Left Crank rotating the Wrench counter-clockwise. Do not try to turn clockwise. You will strip the threads.

Attach the Right Foot Pedal to the Right Crank rotating the Wrench clockwise.

a)Remove the two Allen Bolts, Washers and Nuts from Handlebars. Also, remove the Allen Bolt on the underside of

the Handlebar.

b)Feed the wires up through the base of the Handlebar so they come out the top.

5b

feed wires through here

replace

bolts, washers and nuts

5c

replace

bolt


left


crank

left

“L” & “R”

foot

markings

pedal

are shown

left side shown

on the ends

of the

looking from the

back of the unit

pedal shafts

c)Place Handlebars into “U” on the top of the Handlebar Tube. Remove the Nut Caps. Replace and tighten the three Allen Bolts, Washers and Nylon Nuts you just removed with the Wrench provided. Replace the

the Nut Caps.

handlebar tube

7

Page 8
Image 8
Fitness Quest NBP01060-2 manual Handlebar Tube Assembly, Foot Pedal Assembly Handlebar Assembly

NBP01060-2 specifications

The Fitness Quest NBP01060-2 stands out in the realm of fitness equipment, providing an innovative and user-friendly experience for fitness enthusiasts of all levels. This multi-functional workout machine is designed to offer a full-body workout while being compact enough to fit into various home environments. Its aesthetic appeal is complemented by its sturdy construction, ensuring durability and stability during use.

One of the main features of the NBP01060-2 is its versatility. This machine incorporates various workout options, allowing users to perform exercises such as squats, bench presses, leg extensions, and more, all within a single unit. This multifunctionality is perfect for individuals looking to maximize their workout time while minimizing the space they need for equipment.

The NBP01060-2 is equipped with adjustable features, ensuring that it caters to a wide range of user heights and fitness preferences. The adjustable seat and back rest allow for personalized settings, enabling an ergonomic fit that contributes to proper form and reduces the risk of injury. Additionally, the machine features a sturdy frame, crafted from high-quality steel, which supports weights up to a certain limit, making it suitable for both beginners and advanced users.

The technology integrated into the Fitness Quest NBP01060-2 enhances the overall workout experience. It features a user-friendly console that tracks workout metrics such as time, repetitions, and calories burned, providing motivation and promoting goal setting. The console is designed to be easy to read and navigate, making it simple for users to monitor their progress.

Another notable characteristic of the NBP01060-2 is its safety features. The equipment is designed with safety in mind, featuring locking mechanisms to keep weights secure during workouts. This is particularly important for users engaged in heavy lifting.

In summary, the Fitness Quest NBP01060-2 is a well-rounded workout machine that combines versatility, adjustability, and technology, making it an ideal choice for those seeking an effective and efficient fitness solution at home. Its robust design and user-friendly features ensure that it can accommodate users of all fitness levels, making it a valuable addition to any home gym. Whether you are aiming to build strength, improve overall fitness, or maintain your health, the NBP01060-2 is tailored to help achieve these fitness goals.