
V2240-I specifications
The FoodSaver V2240-I is a versatile vacuum sealing system designed to extend food preservation and minimize waste. Its innovative technology and user-friendly features make it an essential appliance for any home chef or health-conscious individual.One of the standout features of the FoodSaver V2240-I is its powerful vacuum pump that efficiently removes air from vacuum seal bags, creating an airtight seal that locks in freshness. This capability significantly slows down the deterioration of food, allowing users to enjoy meals that taste fresh for longer periods. The system can preserve not only solid foods but also liquids, making it highly versatile for storing soups, marinades, and more.
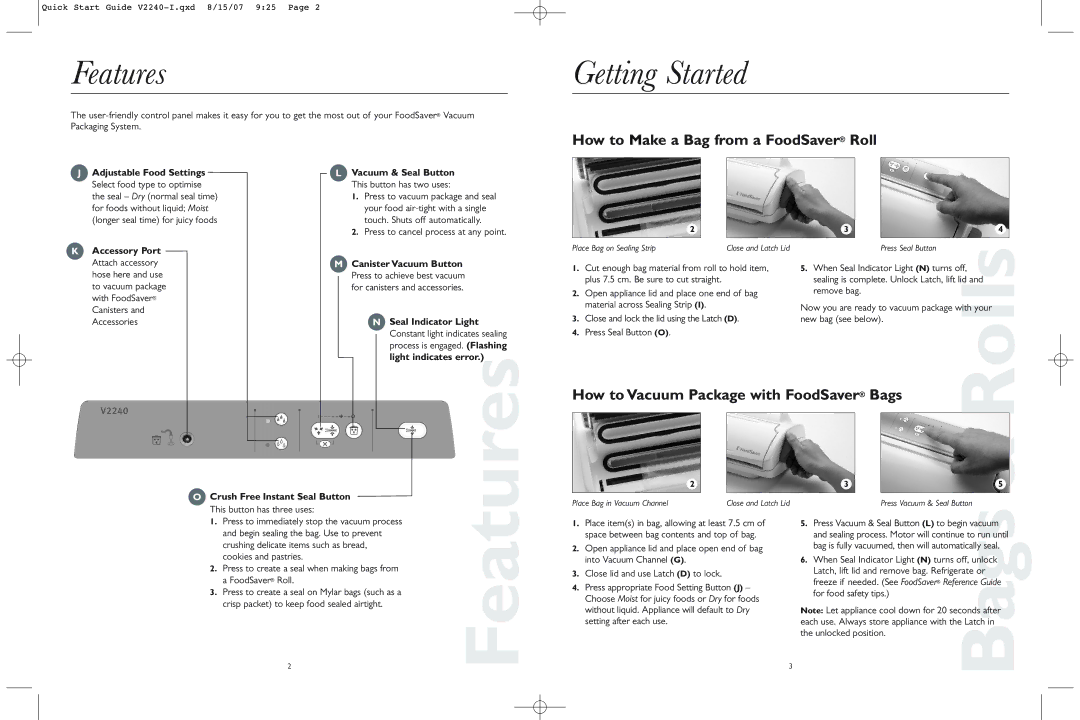
The vacuum sealer comes equipped with a double seal technology that ensures a tight and reliable closure on bags. This dual sealing operation provides an extra layer of safety, preventing leaks and ensuring that foods remain protected from the elements. Additionally, the FoodSaver V2240-I includes adjustable settings, allowing users to customize the seal based on the type of food being preserved. This feature is particularly important for delicate items like berries or crusty bread, where a softer vacuum seal is required to maintain texture and integrity.
The FoodSaver V2240-I also features an easy-to-use control panel with simple buttons that guide the user through the sealing process. This intuitive design enhances the overall user experience, making it accessible for anyone, regardless of their kitchen skills. Its compact size ensures that it can fit conveniently on kitchen countertops or be stored away when not in use.
The appliance supports a variety of bag sizes, providing flexibility for different sealing needs. Users can opt for pre-cut bags or rolls, allowing them to create custom-sized bags tailored to their storage requirements. Furthermore, the machine is designed to handle various foods, including meats, vegetables, and pantry staples, allowing for a wide range of meal prep options.
For those who prioritize health and sustainability, using the FoodSaver V2240-I can lead to less food waste, as meals can be prepared in advance and stored safely. This vacuum sealer undoubtedly stands out as a solution that combines durability, efficiency, and innovative technology, making it an ideal addition to modern kitchens. With the FoodSaver V2240-I, preserving food has never been easier or more efficient, paving the way for a more organized and eco-friendly approach to meal preparation and storage.