GB english
 service information
3The following operations must be carried out by qualified personnel.
 Starting the Machine
Before starting the ice machine perform the following:
a)Remove the cover and the side.
b)Check that the compressor moves freely on the rubber mounts and that the condenser fan blade turns freely.
c)Verify that the water supply valve is open; then connect the machine electrical plug to the socket and switch on the main switch; the machine starts working automatically.
d)Check that the sensor prevents the water from overflowing into the storage bin, controlled by the water level sensor. (After 3 minutes from start up the water solenoid valve is activated again for a few seconds till the water reaches the maximum water level to reduce any possibility of slush ice formation).
e)Check if the water pumps works regularly (30 seconds delay from start up).
f)Check that the water flows evenly over the evaporator and that there are no leaks in the
g)Verify any irregular vibrations.
h)To adjust the cube size, adjust the screw No. 1 (Fig.19) which determines the distance between the sensor reeds and the evaporator. The distance (factory set) is about 4 mm for a
Fig 19. | normal ice cube. |
i)Check an ice production cycle ensuring that the cube plate is conveyed into the storage bin and that all operations are performed correctly.
j)Verify the working of the machine- stopping microswitch by keeping the
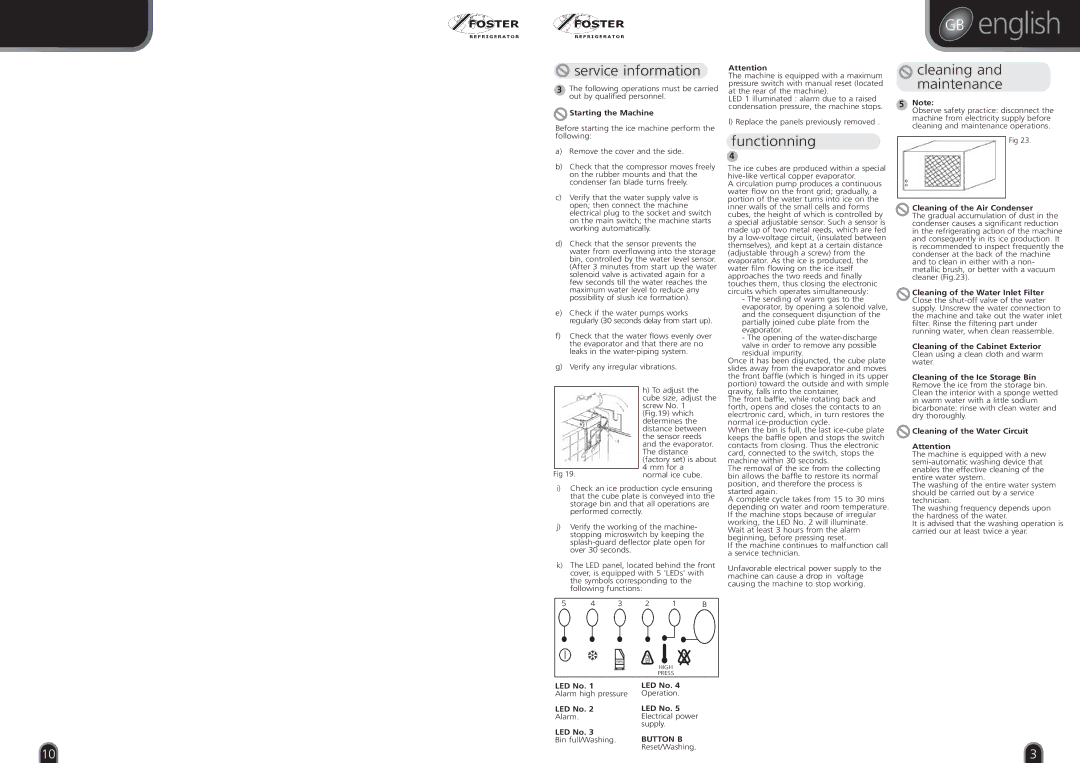
k)The LED panel, located behind the front cover, is equipped with 5 'LEDs' with the symbols corresponding to the following functions:
5 | 4 | 3 | 2 | 1 | B |
Attention
The machine is equipped with a maximum pressure switch with manual reset (located at the rear of the machine).
LED 1 illuminated : alarm due to a raised condensation pressure, the machine stops.
l) Replace the panels previously removed .
functionning
4
The ice cubes are produced within a special
A circulation pump produces a continuous water flow on the front grid; gradually, a portion of the water turns into ice on the inner walls of the small cells and forms cubes, the height of which is controlled by a special adjustable sensor. Such a sensor is made up of two metal reeds, which are fed by a
-The sending of warm gas to the evaporator, by opening a solenoid valve, and the consequent disjunction of the partially joined cube plate from the evaporator.
-The opening of the
Once it has been disjuncted, the cube plate slides away from the evaporator and moves the front baffle (which is hinged in its upper portion) toward the outside and with simple gravity, falls into the container,
The front baffle, while rotating back and forth, opens and closes the contacts to an elecrtronic card, which, in turn restores the normal
When the bin is full, the last
The removal of the ice from the collecting bin allows the baffle to restore its normal position, and therefore the process is started again.
A complete cycle takes from 15 to 30 mins depending on water and room temperature. If the machine stops because of irregular working, the LED No. 2 will illuminate.
Wait at least 3 hours from the alarm beginning, before pressing reset.
If the machine continues to malfunction call a service technician.
Unfavorable electrical power supply to the machine can cause a drop in voltage causing the machine to stop working.
 cleaning and maintenance
5Note:
Observe safety practice: disconnect the machine from electricity supply before cleaning and maintenance operations.
Fig 23.
Cleaning of the Air Condenser
The gradual accumulation of dust in the condenser causes a significant reduction in the refrigerating action of the machine and consequently in its ice production. It is recommended to inspect frequently the condenser at the back of the machine and to clean in either with a non- metallic brush, or better with a vacuum cleaner (Fig.23).
Cleaning of the Water Inlet Filter Close the
Cleaning of the Cabinet Exterior Clean using a clean cloth and warm water.
Cleaning of the Ice Storage Bin Remove the ice from the storage bin. Clean the interior with a sponge wetted in warm water with a little sodium bicarbonate: rinse with clean water and dry thoroughly.
![]() Cleaning of the Water Circuit Attention
Cleaning of the Water Circuit Attention
The machine is equipped with a new
The washing of the entire water system should be carried out by a service technician.
The washing frequency depends upon the hardness of the water.
It is advised that the washing operation is carried our at least twice a year.
![]()
![]()
![]()
![]()
![]() 10
10![]()
![]()
![]()
![]()
![]()
![]()
![]()
![]()
![]()
![]()
![]()
![]()
![]()
❆ | 100% |
|
|
|
| HIGH |
|
|
| PRESS |
|
LED No. 1 |
| LED No. 4 |
|
Alarm high pressure | Operation. |
| |
LED No. 2 |
| LED No. 5 |
|
Alarm. |
| Electrical power |
|
LED No. 3 |
| supply. |
|
| BUTTON B |
| |
Bin full/Washing. |
|
| |
|
| Reset/Washing. | 3 |
|
|
| |