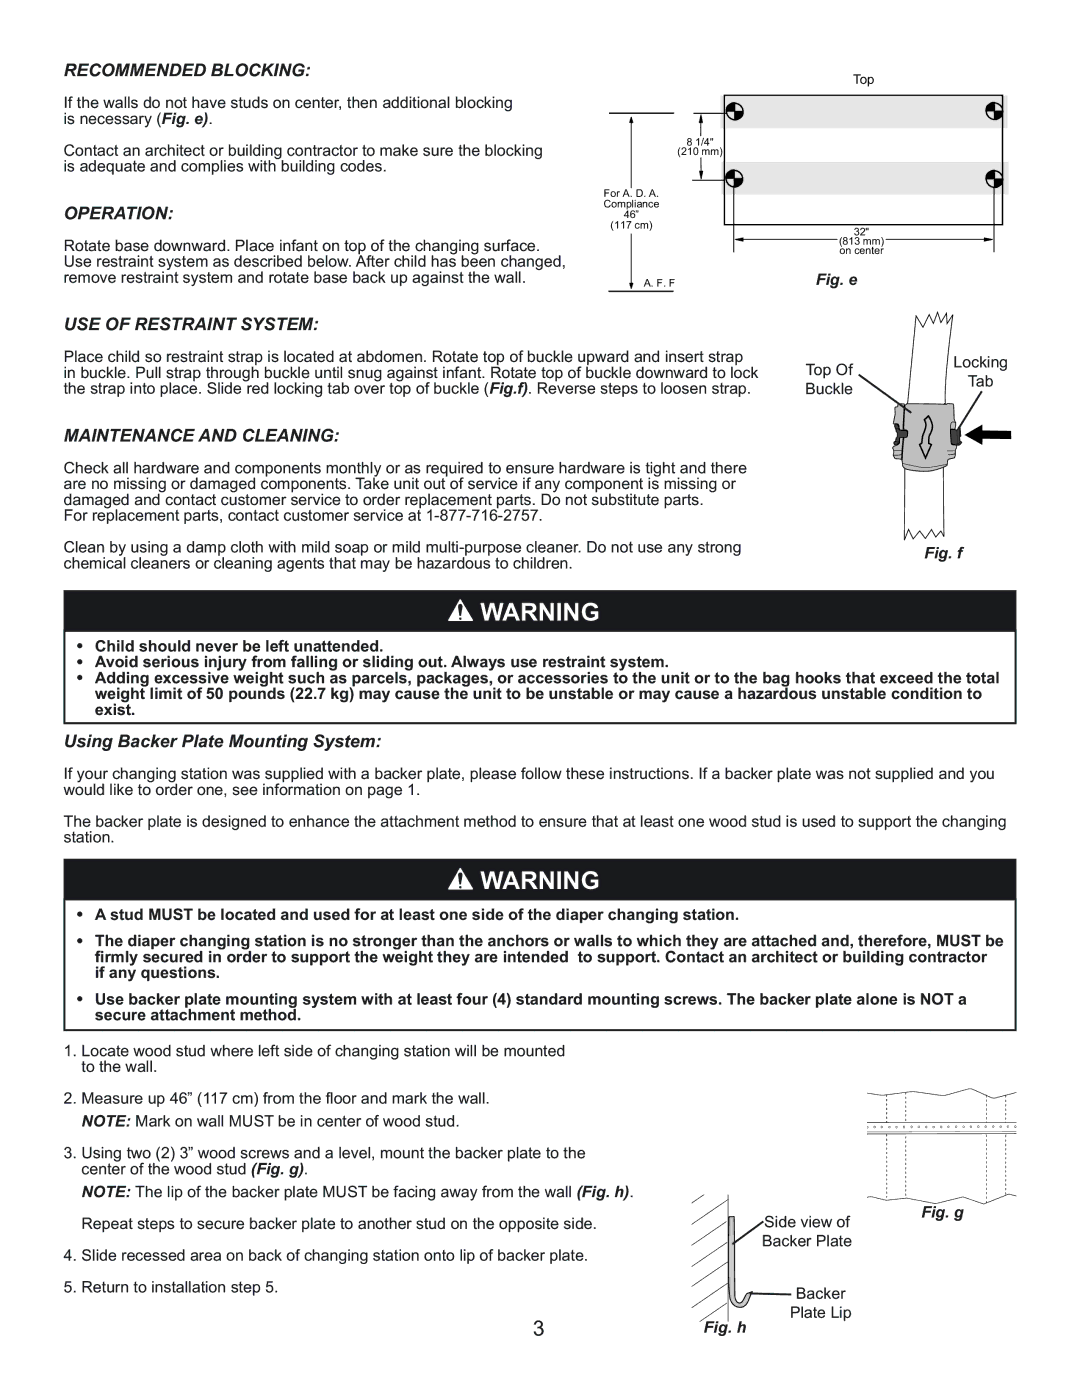
RECOMMENDED BLOCKING: |
|
|
|
|
|
|
|
|
|
|
| Top |
|
|
| |
If the walls do not have studs on center, then additional blocking |
|
|
|
|
|
|
|
|
|
|
|
|
|
| ||
|
|
|
|
|
|
|
|
|
|
|
|
|
| |||
is necessary (Fig. e). |
|
|
|
|
|
|
|
|
|
|
|
|
|
|
| |
|
|
|
|
|
|
|
|
|
|
|
|
|
|
| ||
Contact an architect or building contractor to make sure the blocking |
|
| 8 | 1/4" |
|
|
|
|
|
|
|
| ||||
|
|
|
| (210 mm) |
|
|
|
|
|
|
|
| ||||
is adequate and complies with building codes. |
|
|
|
|
|
|
|
|
|
|
|
|
|
|
| |
|
|
|
|
|
|
|
|
|
|
|
|
|
|
| ||
OPERATION: |
| For A. |
| D. A. |
|
|
|
|
|
|
|
|
| |||
|
|
|
|
|
|
|
|
|
|
| ||||||
|
|
|
|
|
|
|
|
|
| |||||||
| Compliance |
|
|
|
|
|
|
|
|
| ||||||
|
| 46” |
|
|
|
|
|
|
|
|
| |||||
|
| (117 cm) |
|
|
|
|
|
|
|
|
| |||||
|
|
|
|
| 32" |
|
|
| ||||||||
Rotate base downward. Place infant on top of the changing surface. |
|
|
|
|
|
|
|
|
|
|
|
| ||||
|
|
|
|
|
|
|
|
|
| (813 mm) |
|
|
| |||
|
|
|
|
|
|
|
|
|
|
|
|
| ||||
|
|
|
|
|
|
|
|
|
| on center |
|
|
| |||
Use restraint system as described below. After child has been changed, |
|
|
|
|
|
|
|
|
| Fig. e |
|
|
| |||
remove restraint system and rotate base back up against the wall. |
|
|
| A. F. F |
|
|
|
|
|
|
| |||||
USE OF RESTRAINT SYSTEM: |
|
|
|
|
|
|
|
|
|
|
|
|
|
|
| |
Place child so restraint strap is located at abdomen. Rotate top of buckle upward and insert strap | Top Of | Locking | ||||||||||||||
in buckle. Pull strap through buckle until snug against infant. Rotate top of buckle downward to lock | ||||||||||||||||
the strap into place. Slide red locking tab over top of buckle (Fig.f). Reverse steps to loosen strap. | Buckle | Tab | ||||||||||||||
MAINTENANCE AND CLEANING: |
|
|
|
|
|
|
|
|
|
|
|
|
|
|
| |
Check all hardware and components monthly or as required to ensure hardware is tight and there |
|
|
|
|
| |||||||||||
are no missing or damaged components. Take unit out of service if any component is missing or |
|
|
|
|
| |||||||||||
damaged and contact customer service to order replacement parts. Do not substitute parts. |
|
|
|
|
| |||||||||||
For replacement parts, contact customer service at |
|
|
|
|
|
|
|
|
|
|
|
|
|
| ||
Clean by using a damp cloth with mild soap or mild |
|
| Fig. f | |||||||||||||
chemical cleaners or cleaning agents that may be hazardous to children. |
|
|
|
|
|
|
|
|
|
|
| |||||
|
| WARNING |
|
|
|
|
|
|
|
|
| |||||
• | Child should never be left unattended. |
|
|
|
|
|
|
|
|
|
|
|
|
|
|
|
Avoid serious injury from falling or sliding out. Always use restraint system. |
|
|
|
|
|
|
|
|
| |||||||
• | Adding excessive weight such as parcels, packages, or accessories to the unit or to the bag hooks that exceed the total | |||||||||||||||
• | weight limit of 50 pounds (22.7 kg) may cause the unit to be unstable or may cause a hazardous unstable condition to | |||||||||||||||
| exist. |
|
|
|
|
|
|
|
|
|
|
|
|
|
|
|
Using Backer Plate Mounting System: |
|
|
|
|
|
|
|
|
|
|
|
|
|
|
| |
If your changing station was supplied with a backer plate, please follow these instructions. If a backer plate was not supplied and you | ||||||||||||||||
would like to order one, see information on page 1. |
|
|
|
|
|
|
|
|
|
|
|
|
|
|
| |
The backer plate is designed to enhance the attachment method to ensure that at least one wood stud is used to support the changing | ||||||||||||||||
station. |
|
|
|
|
|
|
|
|
|
|
|
|
|
|
| |
|
| WARNING |
|
|
|
|
|
|
|
|
| |||||
• | A stud MUST be located and used for at least one side of the diaper changing station. |
|
|
|
|
| ||||||||||
The diaper changing station is no stronger than the anchors or walls to which they are attached and, therefore, MUST be | ||||||||||||||||
• | firmly secured in order to support the weight they are intended | to support. Contact an architect or building contractor | ||||||||||||||
• | if any questions. |
|
|
|
|
|
|
|
|
|
|
|
|
|
|
|
Use backer plate mounting system with at least four (4) standard mounting screws. The backer plate alone is NOT a | ||||||||||||||||
secure attachment method. |
|
|
|
|
|
|
|
|
|
|
|
|
|
|
| |
1. Locate wood stud where left side of changing station will be mounted |
|
|
|
|
|
|
|
|
|
|
|
|
|
| ||
to the wall. |
|
|
|
|
|
|
|
|
|
|
|
|
|
|
| |
2. Measure up 46” (117 cm) from the floor and mark the wall. |
|
|
|
|
|
|
|
|
|
|
|
|
|
| ||
NOTE: Mark on wall MUST be in center of wood stud. |
|
|
|
|
|
|
|
|
|
|
|
|
|
|
| |
3. Using two (2) 3” wood screws and a level, mount the backer plate to the |
|
|
|
|
|
|
|
|
| |||||||
center of the wood stud (Fig. g). |
|
|
|
|
|
|
|
|
|
|
|
|
|
|
| |
NOTE: The lip of the backer plate MUST be facing away from the wall (Fig. h). |
|
|
|
| Side view of | Fig. g | ||||||||||
Repeat steps to secure backer plate to another stud on the opposite side. |
|
|
|
| ||||||||||||
4. Slide recessed area on back of changing station onto lip of backer plate. |
|
|
|
| Backer Plate |
|
|
| ||||||||
5. Return to installation step 5. |
|
|
|
|
|
|
|
|
|
| Backer |
|
|
| ||
|
| 3 |
|
|
|
|
| Fig. |
| h | Plate Lip |
|
|
| ||
|
|
|
|
|
|
|
|
|
|
| ||||||