716 & 634 XTERRA
WATCH INSTRUCTIONS
FEATURES:
•CURRENT TIME (HR., MIN., &
SEC.) DAY AND DATE
•CHRONOGRAPH WITH SPLIT AND LAP TIMER
•
•COUNTDOWN INTERVAL TIMER WITH FIVE PROGRAMMABLE SEGMENTS, AND COUNTDOWN STOP TIMER.
•DUAL TIME
•OPTIONAL
•WATER RESISTANT TO 300 FT.
•NIGHT VISION™ ELECTROLUMINESCENT BACKLIGHTING
KEY REFERENCES
D ![]()
![]()
![]()
![]()
![]()
![]()
![]() B
B
C | A |
| E |
D - Clear | B - Light |
A - Stop | C - Mode |
E - Lap |
|
NORMAL TIME MODE
(The term “mode” means the function status of the watch.) “Normal time mode” shows hours, minutes, seconds, day, date. To set time, see operating instructions on “How to Set Normal Time.”
HOW TO SET NORMAL TIME, DATE AND
Press MODE button C to cycle through the remaining digits to be set. Advance flashing digits by pressing LAP button E; hold for rapid advance. Retard digits by pressing STOP button A. The setting sequence is: seconds, hours, minutes, year, month, date, day,
(Note: In the 12H mode, the “A” flag indicates time is in a.m.; “P” flag indicates time is in p.m.)
Press CLEAR button D to complete setting at any time.
Press LAP button E to change digits to larger format.
HOW TO SET AND VIEW
DUAL TIME
From “normal time mode”, press and hold STOP button A for three seconds. “T2 “ will appear in the upper right corner of the display. To set dual time, follow the same procedure used to set normal time, as indicated above. To return to normal time mode, press and hold STOP button A for three seconds. “T1” will appear on the upper right corner of the display. To view dual time from normal time mode, simply press STOP button A momentarily.
HOW TO OPERATE THE CHRONOGRAPH/STOPWATCH The chronograph stores lap times in segment form. A segment is a group of laps (up to 100) recorded during a single run. Every time the chronograph is used, the lap times for that particular segment are automatically recorded into memory (unless memory is full), along with a segment number and the date.
The chronograph will record a maximum interval of 23 hours, 59 minutes and 59 seconds, and has a resolution of 1/100 second for intervals less than one hour.
To enter the “chronograph mode,” press MODE button C once from “normal time mode.”
Mode prompt “CHRON” will be displayed for one second.
To start the chronograph, press LAP button E. To use the lap time feature, press LAP button E while the chronograph is running. The display will pause for a few seconds, then momentarily show the lap number on the top row, the current lap time on the middle row, and the total elapsed time on the bottom row. The chronograph will continue counting.
When the timing session is complete, press STOP button A to stop the chronograph. Press and hold STOP button A again, and the number of available laps will appear on the display
message “FULL” will be displayed, and no additional lap times can be recorded.
HOW TO RECALL LAP TIMES From “normal time mode”, enter the “recall mode” by pressing MODE button C twice. Mode prompt
Segment one, and the day and date of segment one will flash momentarily, and then the first lap time of segment one will be displayed.
Press STOP button A to select recorded segment of choice.
Once a segment is selected, press LAP button E to view the contents of that specific segment. The display will show the lap number on the top row, the lap time on the middle row and the total elapsed time will appear on the bottom row.
Press LAP button E to advance through the individual laps of that segment. After viewing the last lap of that segment, press STOP button A to view the next segment.
TO CLEAR THE MEMORY
While in the “recall mode”, press and hold CLEAR button D, (CLR- HOLD will be displayed), to clear the segment that was last viewed. To clear all stored segments, press and hold CLEAR button D for six seconds;
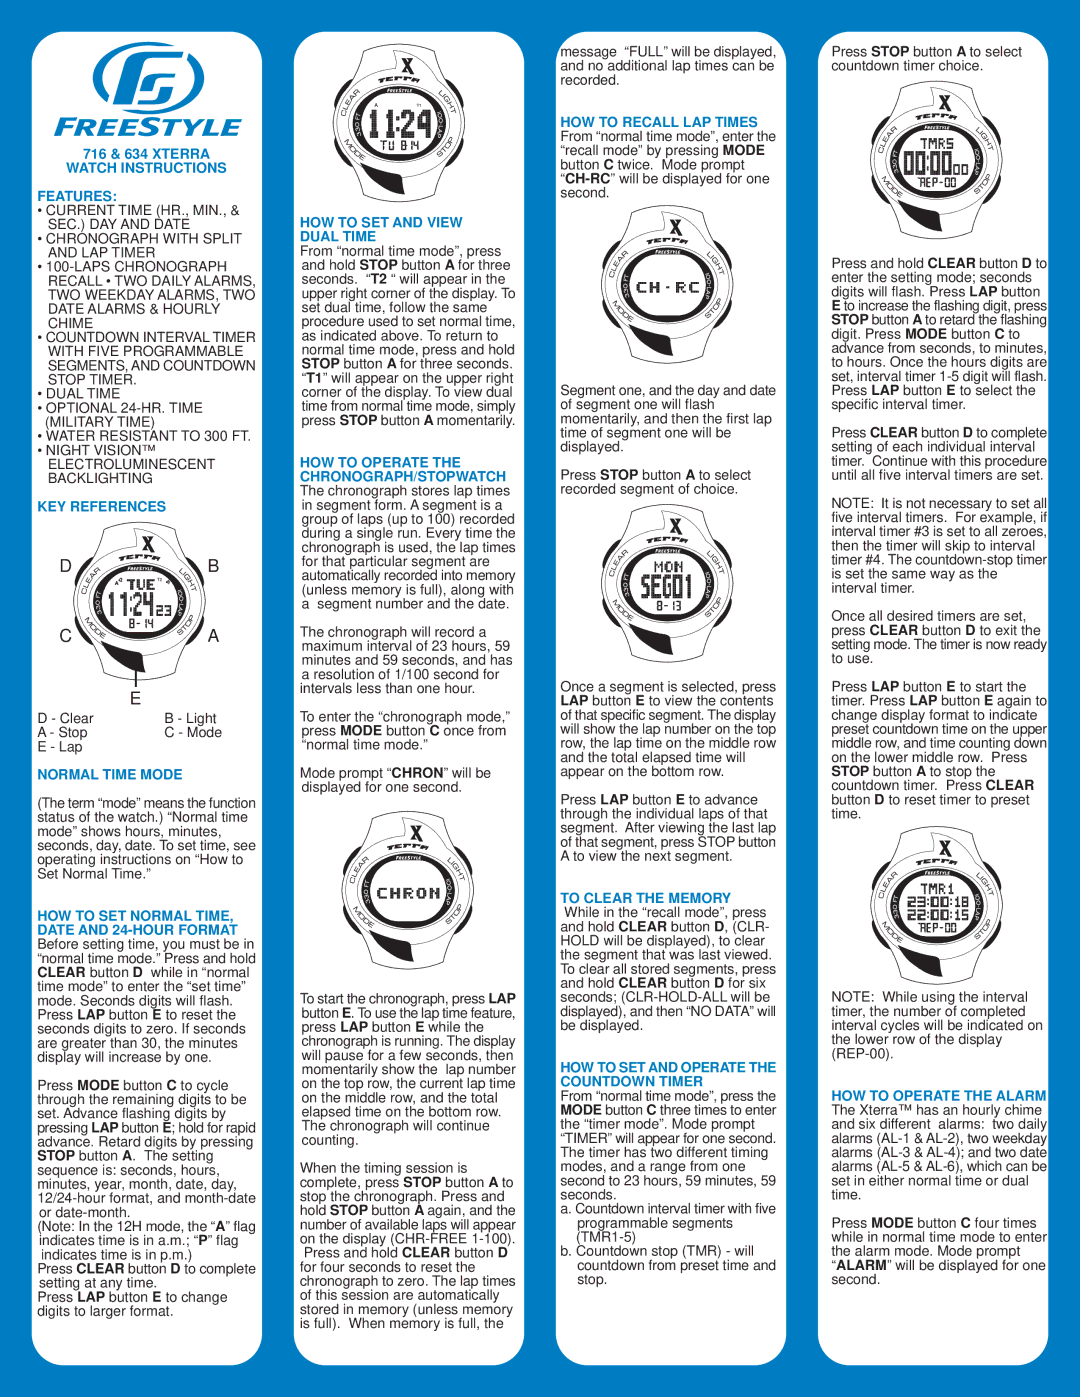
HOW TO SET AND OPERATE THE COUNTDOWN TIMER
From “normal time mode”, press the MODE button C three times to enter the “timer mode”. Mode prompt “TIMER” will appear for one second. The timer has two different timing modes, and a range from one second to 23 hours, 59 minutes, 59 seconds.
a. Countdown interval timer with five programmable segments
b. Countdown stop (TMR) - will countdown from preset time and stop.
Press STOP button A to select countdown timer choice.
Press and hold CLEAR button D to enter the setting mode; seconds digits will flash. Press LAP button E to increase the flashing digit, press STOP button A to retard the flashing digit. Press MODE button C to advance from seconds, to minutes, to hours. Once the hours digits are set, interval timer
Press CLEAR button D to complete setting of each individual interval timer. Continue with this procedure until all five interval timers are set.
NOTE: It is not necessary to set all five interval timers. For example, if interval timer #3 is set to all zeroes, then the timer will skip to interval timer #4. The
Once all desired timers are set, press CLEAR button D to exit the setting mode. The timer is now ready to use.
Press LAP button E to start the timer. Press LAP button E again to change display format to indicate preset countdown time on the upper middle row, and time counting down on the lower middle row. Press STOP button A to stop the countdown timer. Press CLEAR button D to reset timer to preset time.
NOTE: While using the interval timer, the number of completed interval cycles will be indicated on the lower row of the display
HOW TO OPERATE THE ALARM The Xterra™ has an hourly chime and six different alarms: two daily alarms
Press MODE button C four times while in normal time mode to enter the alarm mode. Mode prompt “ALARM” will be displayed for one second.