MOBILE HOME INSTALLATION
1.Dryer MUST be exhausted outside (outdoors, not beneath the mobile home) using metal ducting that will not support combustion. Metal ducting must be 4 inches (10.16 cm) in diameter with no obstructions. Rigid metal duct is preferred.
2.If dryer is exhausted through the floor and area beneath the mobile home is enclosed, the exhaust system MUST terminate outside the enclosure with the termination securely fastened to the mobile home structure.
3.When installing a gas dryer into a mobile home, a provision must be made for outside make up air. This provision is to be not less than twice the area of the dryer exhaust outlet.
4.This dryer MUST be fastened to the floor. Mobile Home Installation Kit No. 346764 is available from your dealer.
5.Refer to pages 2 and 3 for other important venting requirements.
6.Installation MUST conform to current Manufactured Home Construction & Safety Standard (which is a Federal Regulation Title 24
![]()
![]()
![]()
![]()
![]() The dryer is designed under ANSI Z 21.5.1 or ANSI/ UL2158 - CAN/CSA C22.2 (latest editions) for HOME USE only.
The dryer is designed under ANSI Z 21.5.1 or ANSI/ UL2158 - CAN/CSA C22.2 (latest editions) for HOME USE only.
UNPACKING
1.Using the four shipping carton corner posts (two on each side), carefully lay the dryer on its left side and remove the foam shipping base.
![]() To prevent damage, do not use the control panel as a means to pick up or move the dryer.
To prevent damage, do not use the control panel as a means to pick up or move the dryer.
2. Return the dryer to an upright position.
PACKING
REVERSING DOOR SWING
Solid Door Reversing Instructions:
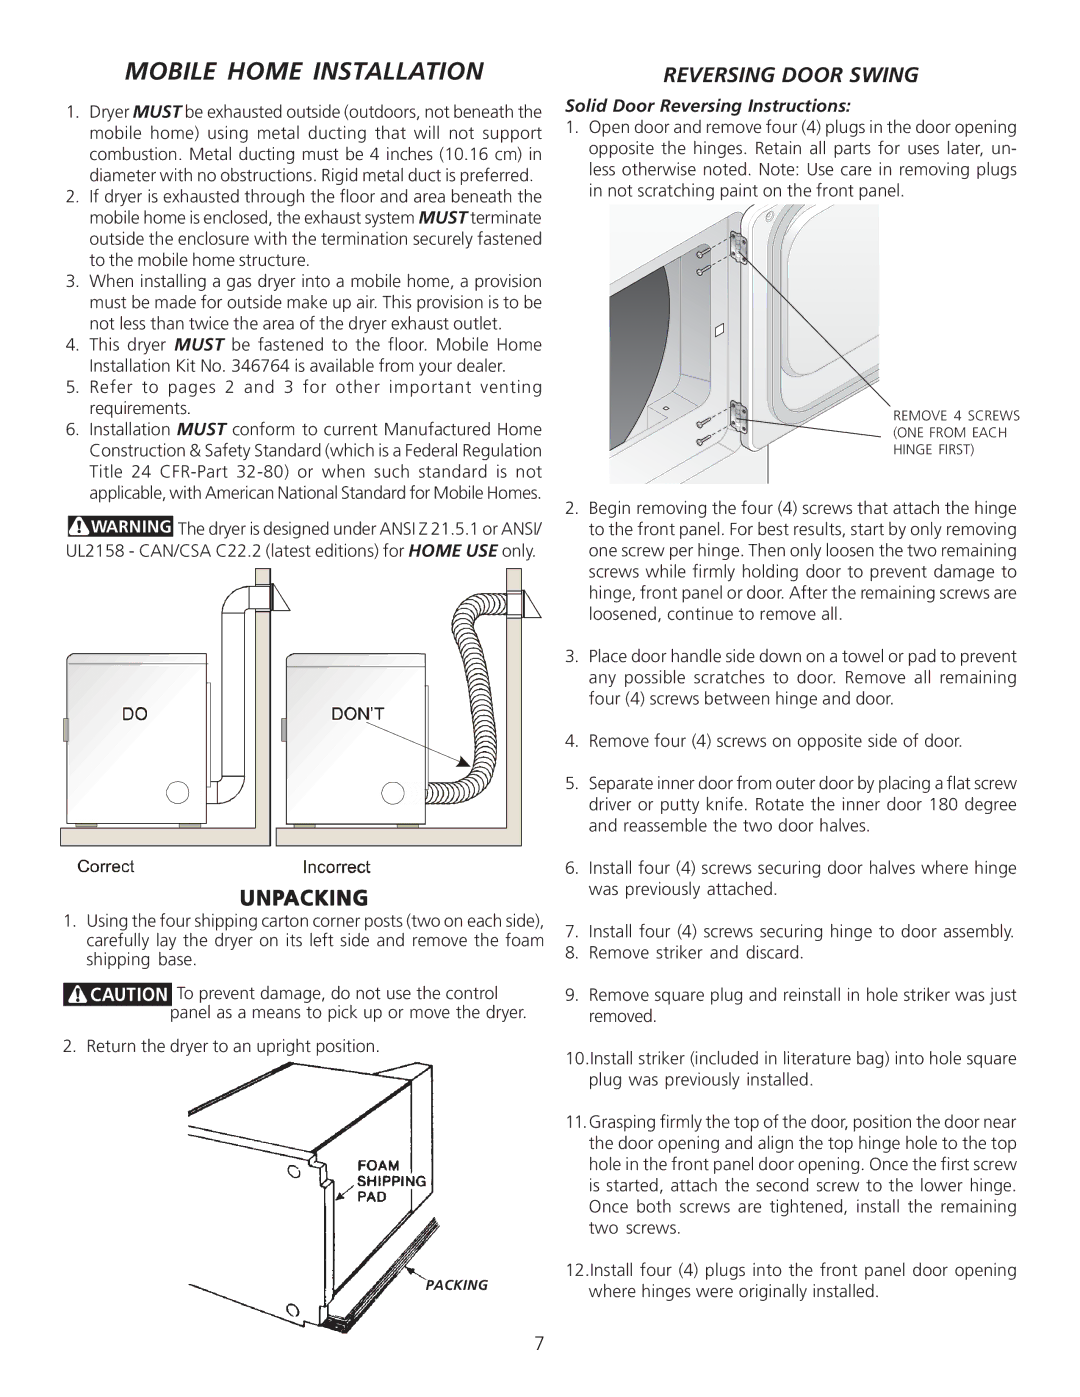
1.Open door and remove four (4) plugs in the door opening opposite the hinges. Retain all parts for uses later, un- less otherwise noted. Note: Use care in removing plugs in not scratching paint on the front panel.
REMOVE 4 SCREWS (ONE FROM EACH HINGE FIRST)
2.Begin removing the four (4) screws that attach the hinge to the front panel. For best results, start by only removing one screw per hinge. Then only loosen the two remaining screws while firmly holding door to prevent damage to hinge, front panel or door. After the remaining screws are loosened, continue to remove all.
3.Place door handle side down on a towel or pad to prevent any possible scratches to door. Remove all remaining four (4) screws between hinge and door.
4.Remove four (4) screws on opposite side of door.
5.Separate inner door from outer door by placing a flat screw driver or putty knife. Rotate the inner door 180 degree and reassemble the two door halves.
6.Install four (4) screws securing door halves where hinge was previously attached.
7.Install four (4) screws securing hinge to door assembly.
8.Remove striker and discard.
9.Remove square plug and reinstall in hole striker was just removed.
10.Install striker (included in literature bag) into hole square plug was previously installed.
11.Grasping firmly the top of the door, position the door near the door opening and align the top hinge hole to the top hole in the front panel door opening. Once the first screw is started, attach the second screw to the lower hinge. Once both screws are tightened, install the remaining two screws.
12.Install four (4) plugs into the front panel door opening where hinges were originally installed.
7