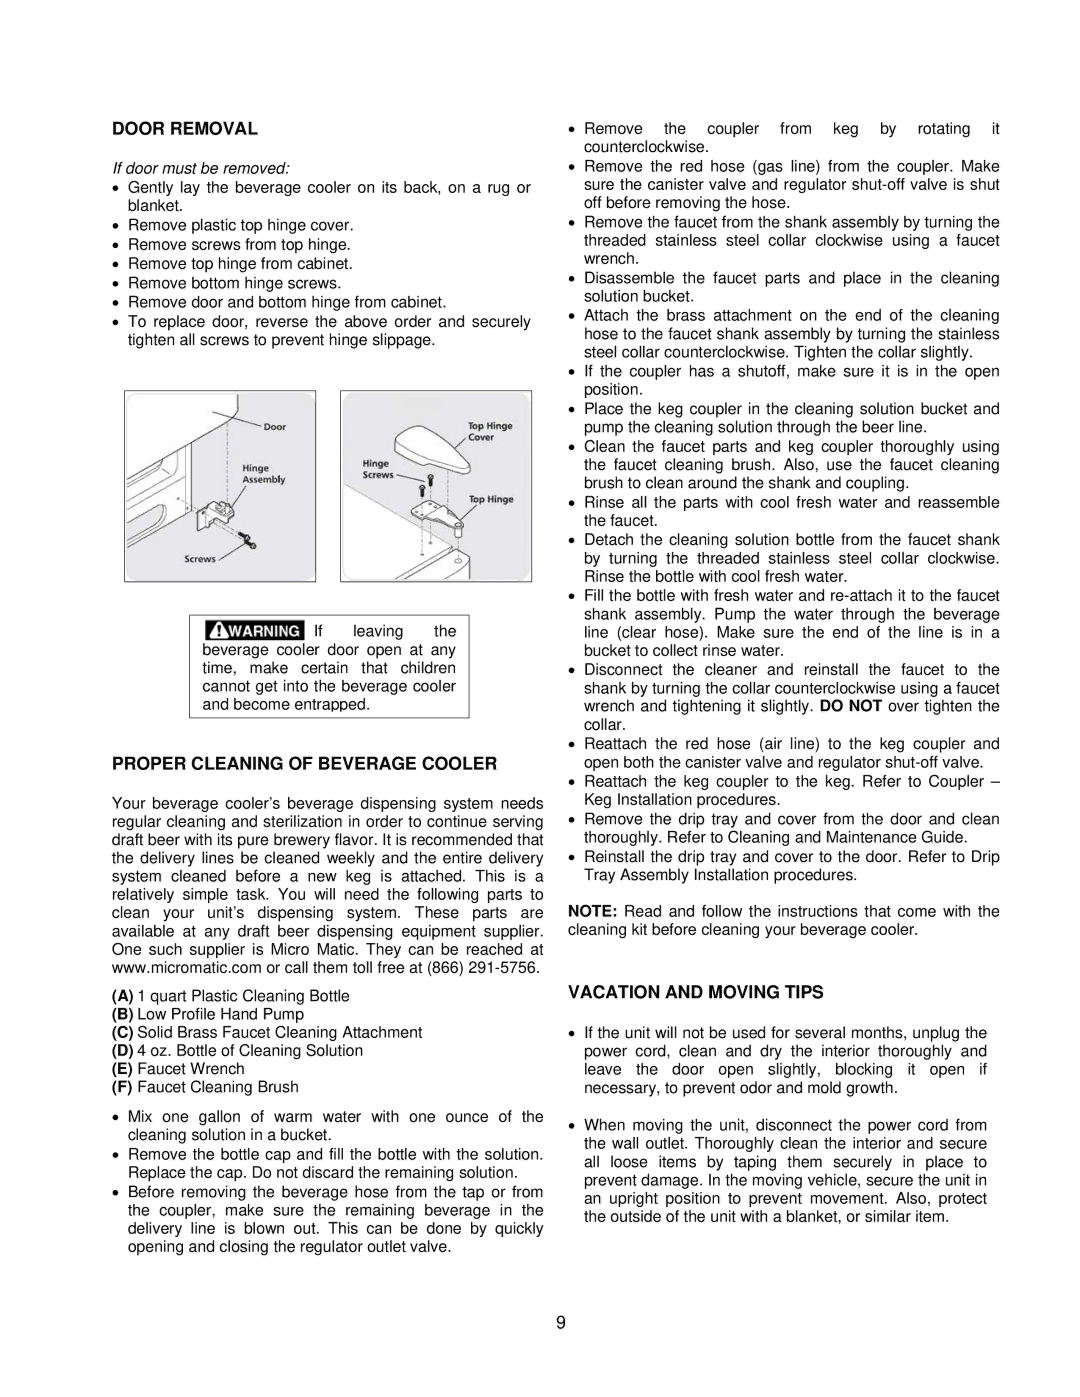
DOOR REMOVAL
If door must be removed:
•Gently lay the beverage cooler on its back, on a rug or blanket.
•Remove plastic top hinge cover.
•Remove screws from top hinge.
•Remove top hinge from cabinet.
•Remove bottom hinge screws.
•Remove door and bottom hinge from cabinet.
•To replace door, reverse the above order and securely tighten all screws to prevent hinge slippage.
![]() If leaving the beverage cooler door open at any time, make certain that children cannot get into the beverage cooler and become entrapped.
If leaving the beverage cooler door open at any time, make certain that children cannot get into the beverage cooler and become entrapped.
PROPER CLEANING OF BEVERAGE COOLER
Your beverage cooler’s beverage dispensing system needs regular cleaning and sterilization in order to continue serving draft beer with its pure brewery flavor. It is recommended that the delivery lines be cleaned weekly and the entire delivery system cleaned before a new keg is attached. This is a relatively simple task. You will need the following parts to clean your unit’s dispensing system. These parts are available at any draft beer dispensing equipment supplier. One such supplier is Micro Matic. They can be reached at www.micromatic.com or call them toll free at (866)
(A)1 quart Plastic Cleaning Bottle
(B)Low Profile Hand Pump
(C)Solid Brass Faucet Cleaning Attachment
(D)4 oz. Bottle of Cleaning Solution
(E)Faucet Wrench
(F)Faucet Cleaning Brush
•Mix one gallon of warm water with one ounce of the cleaning solution in a bucket.
•Remove the bottle cap and fill the bottle with the solution. Replace the cap. Do not discard the remaining solution.
•Before removing the beverage hose from the tap or from the coupler, make sure the remaining beverage in the delivery line is blown out. This can be done by quickly opening and closing the regulator outlet valve.
•Remove the coupler from keg by rotating it counterclockwise.
•Remove the red hose (gas line) from the coupler. Make sure the canister valve and regulator
•Remove the faucet from the shank assembly by turning the threaded stainless steel collar clockwise using a faucet wrench.
•Disassemble the faucet parts and place in the cleaning solution bucket.
•Attach the brass attachment on the end of the cleaning hose to the faucet shank assembly by turning the stainless steel collar counterclockwise. Tighten the collar slightly.
•If the coupler has a shutoff, make sure it is in the open position.
•Place the keg coupler in the cleaning solution bucket and pump the cleaning solution through the beer line.
•Clean the faucet parts and keg coupler thoroughly using the faucet cleaning brush. Also, use the faucet cleaning brush to clean around the shank and coupling.
•Rinse all the parts with cool fresh water and reassemble the faucet.
•Detach the cleaning solution bottle from the faucet shank by turning the threaded stainless steel collar clockwise. Rinse the bottle with cool fresh water.
•Fill the bottle with fresh water and
•Disconnect the cleaner and reinstall the faucet to the shank by turning the collar counterclockwise using a faucet wrench and tightening it slightly. DO NOT over tighten the collar.
•Reattach the red hose (air line) to the keg coupler and open both the canister valve and regulator
•Reattach the keg coupler to the keg. Refer to Coupler – Keg Installation procedures.
•Remove the drip tray and cover from the door and clean thoroughly. Refer to Cleaning and Maintenance Guide.
•Reinstall the drip tray and cover to the door. Refer to Drip Tray Assembly Installation procedures.
NOTE: Read and follow the instructions that come with the cleaning kit before cleaning your beverage cooler.
VACATION AND MOVING TIPS
•If the unit will not be used for several months, unplug the power cord, clean and dry the interior thoroughly and leave the door open slightly, blocking it open if necessary, to prevent odor and mold growth.
•When moving the unit, disconnect the power cord from the wall outlet. Thoroughly clean the interior and secure all loose items by taping them securely in place to prevent damage. In the moving vehicle, secure the unit in an upright position to prevent movement. Also, protect the outside of the unit with a blanket, or similar item.
9