INSTALL THE DUCTWORK
(This section for F30WV hoods only. F24WR and F30WR hoods skip this section and go on to “Install Range Hood”.)
![]() NOTE
NOTE ![]() These instructions will follow plans made on Page 2. Start at the exterior and run ductwork back to the range hood.
These instructions will follow plans made on Page 2. Start at the exterior and run ductwork back to the range hood.
For best possible performance, use the shortest possible duct run and a minimum number of elbows. Do not vent a range hood into an attic space. A buildup of grease in the attic could become a fire hazard.
Use only metal ductwork. DO NOT USE PLASTIC DUCT. As- semble duct run securely so that in case of a grease fire on the range, the fire will be contained inside metal ductwork.
Tape all duct connections.
1.Follow appropriate directions below for type of duct run you install.
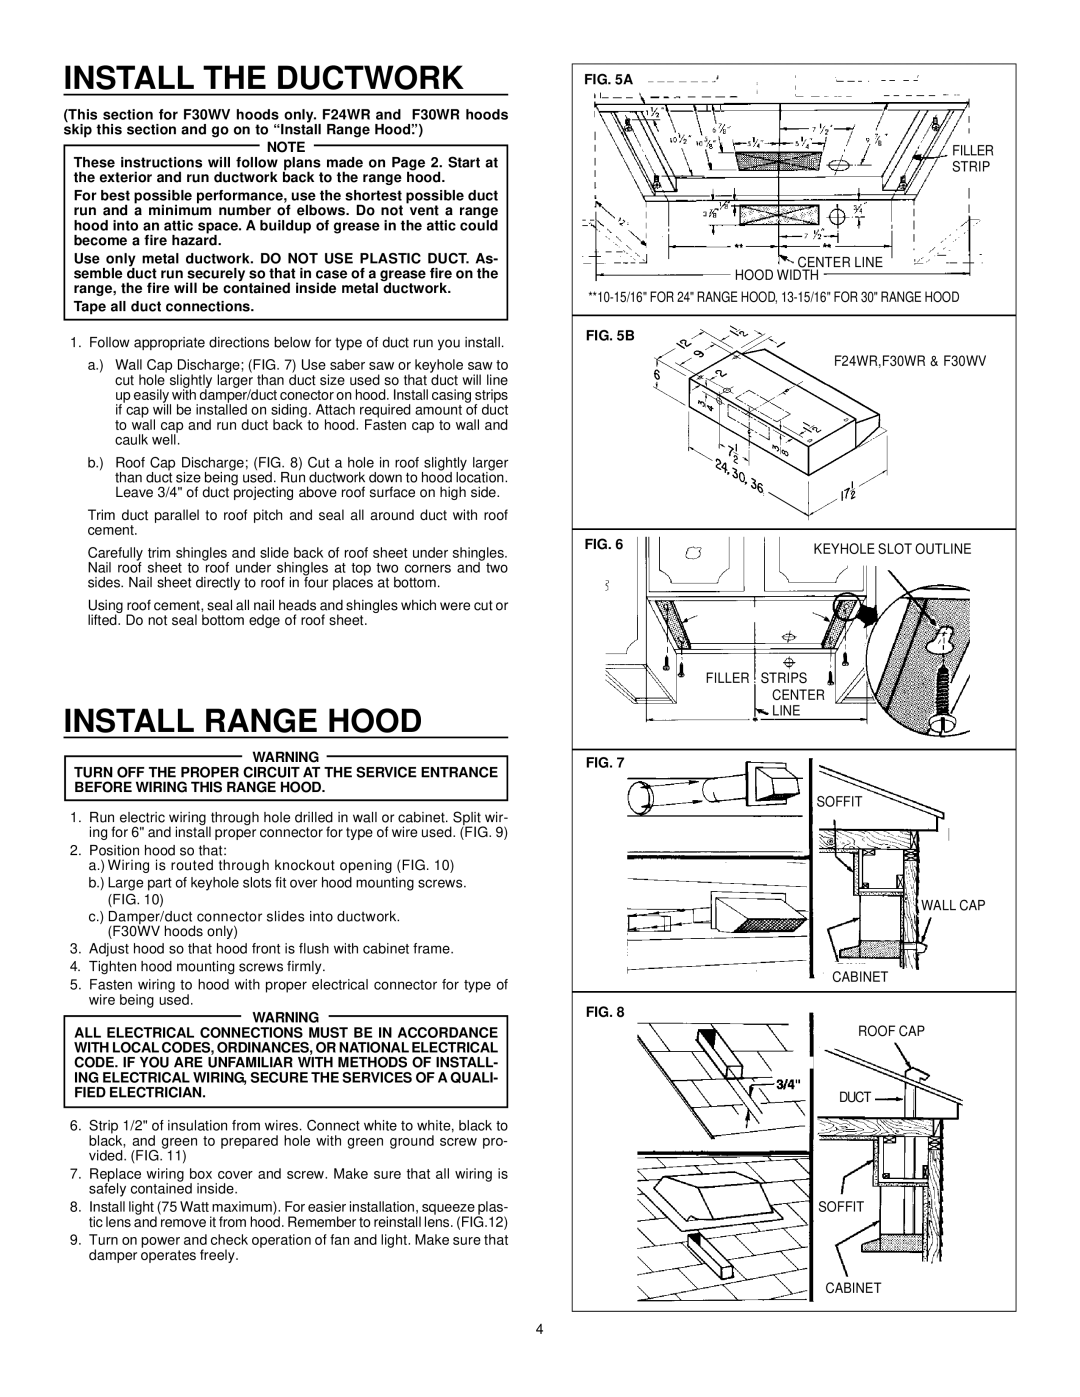
a.) Wall Cap Discharge; (FIG. 7) Use saber saw or keyhole saw to cut hole slightly larger than duct size used so that duct will line up easily with damper/duct conector on hood. Install casing strips if cap will be installed on siding. Attach required amount of duct to wall cap and run duct back to hood. Fasten cap to wall and caulk well.
b.) Roof Cap Discharge; (FIG. 8) Cut a hole in roof slightly larger than duct size being used. Run ductwork down to hood location. Leave 3/4" of duct projecting above roof surface on high side.
Trim duct parallel to roof pitch and seal all around duct with roof cement.
Carefully trim shingles and slide back of roof sheet under shingles. Nail roof sheet to roof under shingles at top two corners and two sides. Nail sheet directly to roof in four places at bottom.
Using roof cement, seal all nail heads and shingles which were cut or lifted. Do not seal bottom edge of roof sheet.
INSTALL RANGE HOOD
WARNING
TURN OFF THE PROPER CIRCUIT AT THE SERVICE ENTRANCE BEFORE WIRING THIS RANGE HOOD.
1.Run electric wiring through hole drilled in wall or cabinet. Split wir- ing for 6" and install proper connector for type of wire used. (FIG. 9)
2.Position hood so that:
a.) Wiring is routed through knockout opening (FIG. 10) b.) Large part of keyhole slots fit over hood mounting screws.
(FIG. 10)
c.) Damper/duct connector slides into ductwork. (F30WV hoods only)
3.Adjust hood so that hood front is flush with cabinet frame.
4.Tighten hood mounting screws firmly.
5.Fasten wiring to hood with proper electrical connector for type of wire being used.
WARNING
ALL ELECTRICAL CONNECTIONS MUST BE IN ACCORDANCE WITH LOCAL CODES, ORDINANCES, OR NATIONAL ELECTRICAL CODE. IF YOU ARE UNFAMILIAR WITH METHODS OF INSTALL- ING ELECTRICAL WIRING, SECURE THE SERVICES OF A QUALI- FIED ELECTRICIAN.
6.Strip 1/2" of insulation from wires. Connect white to white, black to black, and green to prepared hole with green ground screw pro- vided. (FIG. 11)
7.Replace wiring box cover and screw. Make sure that all wiring is safely contained inside.
8.Install light (75 Watt maximum). For easier installation, squeeze plas- tic lens and remove it from hood. Remember to reinstall lens. (FIG.12)
9.Turn on power and check operation of fan and light. Make sure that damper operates freely.
FIG. 5A
FILLER
STRIP
CENTER LINE
HOOD WIDTH
FIG. 5B
F24WR,F30WR & F30WV
FIG. 6 | KEYHOLE SLOT OUTLINE |
FILLER STRIPS
CENTER
LINE
FIG. 7
SOFFIT
WALL CAP
CABINET
FIG. 8
ROOF CAP
DUCT
SOFFIT
CABINET
4