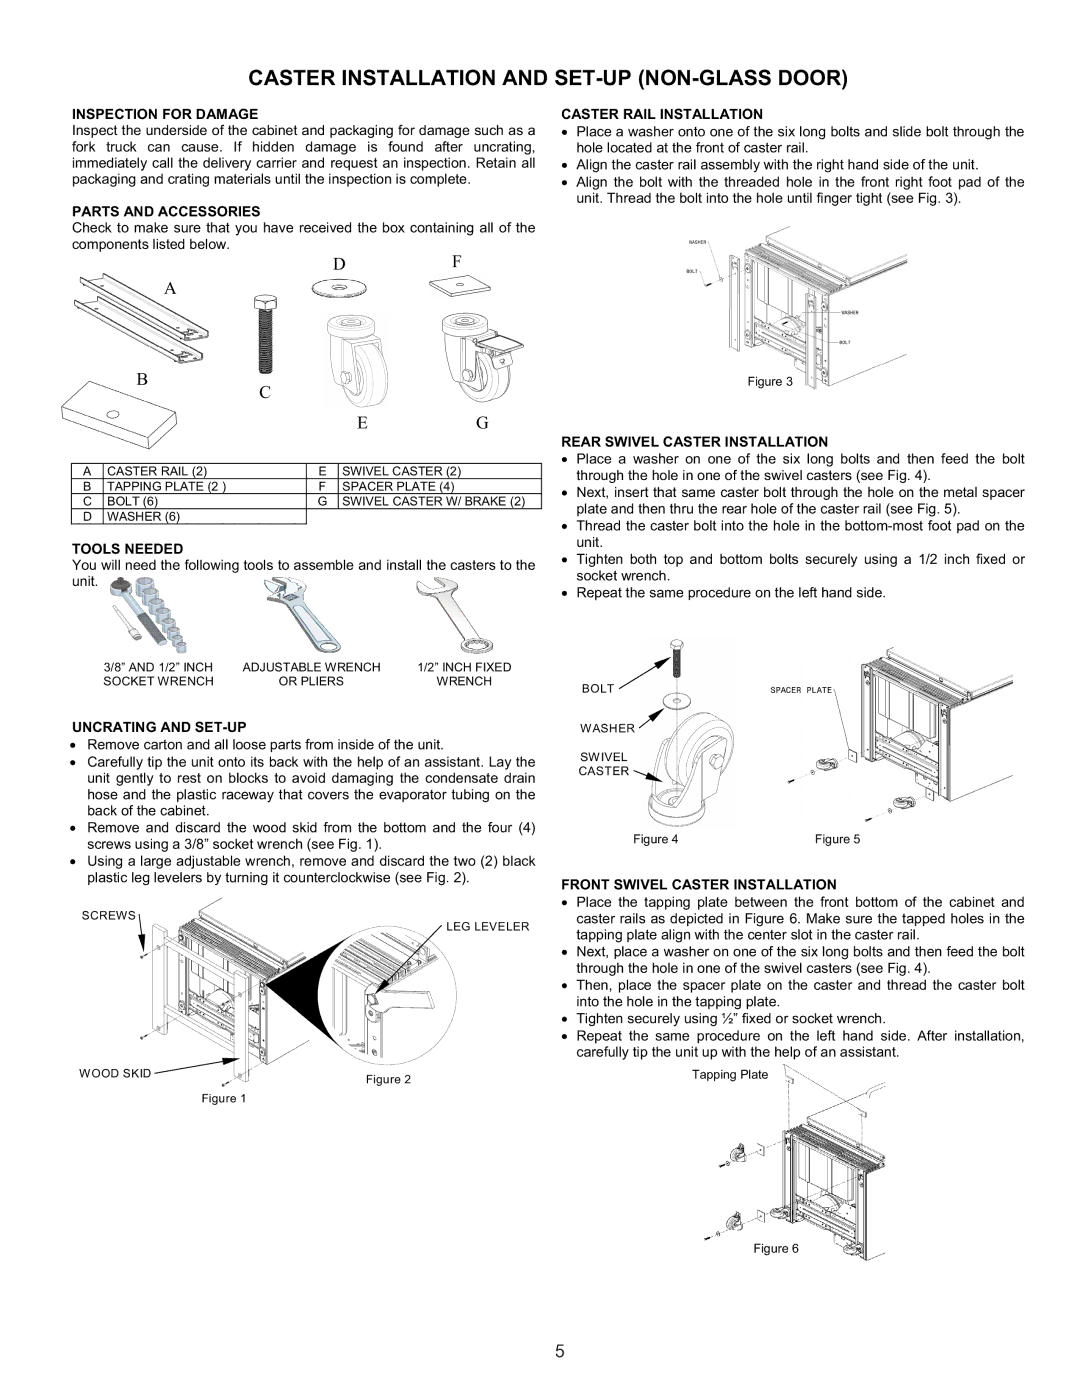
CASTER INSTALLATION AND SET-UP (NON-GLASS DOOR)

INSPECTION FOR DAMAGE

Inspect the underside of the cabinet and packaging for damage such as a fork truck can cause. If hidden damage is found after uncrating, immediately call the delivery carrier and request an inspection. Retain all packaging and crating materials until the inspection is complete.

PARTS AND ACCESSORIES

Check to make sure that you have received the box containing all of the components listed below.

D F

A

CASTER RAIL INSTALLATION

ξPlace a washer onto one of the six long bolts and slide bolt through the hole located at the front of caster rail.

ξAlign the caster rail assembly with the right hand side of the unit.

ξAlign the bolt with the threaded hole in the front right foot pad of the unit. Thread the bolt into the hole until finger tight (see Fig. 3).

B


C


E

G


A

CASTER RAIL (2)

E

SWIVEL CASTER (2)


B

TAPPING PLATE (2 )

F

SPACER PLATE (4)


C

BOLT (6)

G

SWIVEL CASTER W/ BRAKE (2)

DWASHER (6)

TOOLS NEEDED

You will need the following tools to assemble and install the casters to the unit.

Figure 3

REAR SWIVEL CASTER INSTALLATION

ξPlace a washer on one of the six long bolts and then feed the bolt through the hole in one of the swivel casters (see Fig. 4).

ξNext, insert that same caster bolt through the hole on the metal spacer plate and then thru the rear hole of the caster rail (see Fig. 5).

ξThread the caster bolt into the hole in the bottom-most foot pad on the unit.

ξTighten both top and bottom bolts securely using a 1/2 inch fixed or socket wrench.

ξRepeat the same procedure on the left hand side.

3/8” AND 1/2” INCH

ADJUSTABLE WRENCH

1/2” INCH FIXED

SOCKET WRENCH

OR PLIERS

WRENCH

UNCRATING AND SET-UP

ξRemove carton and all loose parts from inside of the unit.

ξCarefully tip the unit onto its back with the help of an assistant. Lay the unit gently to rest on blocks to avoid damaging the condensate drain hose and the plastic raceway that covers the evaporator tubing on the back of the cabinet.

ξRemove and discard the wood skid from the bottom and the four (4) screws using a 3/8” socket wrench (see Fig. 1).

ξUsing a large adjustable wrench, remove and discard the two (2) black plastic leg levelers by turning it counterclockwise (see Fig. 2).

SCREWS

LEG LEVELER

WOOD SKID


Figure 2


Figure 1

BOLT

WASHER

SWIVEL

CASTER

Figure 4

Figure 5

FRONT SWIVEL CASTER INSTALLATION

ξPlace the tapping plate between the front bottom of the cabinet and caster rails as depicted in Figure 6. Make sure the tapped holes in the tapping plate align with the center slot in the caster rail.

ξNext, place a washer on one of the six long bolts and then feed the bolt through the hole in one of the swivel casters (see Fig. 4).

ξThen, place the spacer plate on the caster and thread the caster bolt into the hole in the tapping plate.

ξTighten securely using ½” fixed or socket wrench.

ξRepeat the same procedure on the left hand side. After installation, carefully tip the unit up with the help of an assistant.

Tapping Plate

Figure 6

5

Page 5
Image 5
Frigidaire GLASS DOOR REFRIGERATOR important safety instructions Caster Installation and SET-UP NON-GLASS Door

GLASS DOOR REFRIGERATOR specifications

The Frigidaire Glass Door Refrigerator is a modern and innovative appliance that combines style and functionality, making it an excellent choice for both commercial and home use. This refrigerator features a sleek glass door design, offering a clear view of its contents while enhancing the aesthetic appeal of any space. With its emphasis on performance and efficiency, the Frigidaire Glass Door Refrigerator stands out as a preferred option for those seeking both practicality and elegance.

One of the main features of the Frigidaire Glass Door Refrigerator is its energy-efficient operation. Equipped with an advanced cooling system, this model maintains ideal temperatures, ensuring that food and beverages are stored at their freshest. The refrigerator's energy-saving technology not only helps to reduce electricity bills but also contributes to a more sustainable environment.

Among its notable technologies, the Frigidaire Glass Door Refrigerator includes an auto-defrost feature that eliminates the hassle of manual defrosting. This technology ensures that frost buildup is minimized, maintaining optimal cooling performance while allowing for easy maintenance. Additionally, the adjustable shelving allows users to customize the interior layout according to their storage needs, accommodating various sizes of items from towering soda bottles to wide platters.

The design of the refrigerator incorporates bright LED lighting, illuminating the interior while consuming less energy than traditional bulb lighting. This feature not only enhances visibility but also adds a modern touch to the overall look of the appliance. The glass doors are engineered with tempered glass, offering durability and security while maintaining an attractive appearance.

Furthermore, the Frigidaire Glass Door Refrigerator is equipped with a reliable temperature management system that ensures consistent cooling performance, even during busy hours. The unit operates quietly, allowing it to fit seamlessly into any environment without causing disruptions.

In summary, the Frigidaire Glass Door Refrigerator is a stylish and efficient appliance that features energy-saving technologies, customizable storage options, and advanced cooling systems. Its tempered glass design not only elevates the aesthetic of your space but also provides convenience and easy access to stored items, making it an appealing choice for homeowners and businesses alike. With this refrigerator, users can enjoy freshness, performance, and a modern touch in their kitchens or commercial settings.