Connecting Ice Maker to Water Supply

To avoid electric shock, which can cause death or severe personal injury, disconnect the refrigerator from electrical power before connecting a water supply line to the refrigerator.

To Avoid Property Damage:

Copper tubing is recommended for the water supply line. Water supply tubing made of 1/4 inch plastic is not recommended since it greatly increases the potential for water leaks. Manufacturer will not be responsible for any damage if plastic tubing is used for supply line.

DO NOT install water supply tubing in areas where temperatures fall below freezing.

Connect the ice maker to a potable water source that is not tied into a water softening system. Chemicals from the softener may damage the ice maker, causing it to malfunction.

IMPORTANT: Ensure that your water supply line connections comply with all local plumbing codes.

Before Installing The Water Supply Line, You Will Need

Basic tools: adjustable wrench, flat blade screwdriver, and PhillipsTM screwdriver.

Access to a household cold water line with water pressure between 20 and 120 psi.

A water supply line made of 1/4 inch (6.4 mm) OD, copper tubing. To determine the length of copper tubing needed, you will need to measure the distance from the ice maker inlet valve at the back of the refrigerator to your cold water pipe. Then add approximately 7 feet (2.1 meters), so the refrigerator can be moved out for cleaning.

A shutoff valve to connect the water supply line to your household water system. DO NOT use a self-piercing type shutoff valve.

A compression nut and ferrule (sleeve) for connecting the water supply line to the ice maker inlet valve.

NOTE: Water line kit number 5303917950, available from your appliance dealer at additional cost, contains 25 feet (7.6 meters) of 1/4 inch OD copper tubing, a saddle type shutoff valve (nonpiercing), (2) 1/4 inch brass compression nuts, (2) ferrules/sleeves, and instructions for installing a water supply line.

To Connect Water Supply Line To Ice Maker Inlet Valve

1. Disconnect refrigerator from electric power supply.

2. Place end of water supply line into sink or bucket. Turn ON water supply and flush supply line until water is clear. Turn OFF water supply at shutoff valve.

3. Unscrew plastic cap from water valve inlet and discard cap.

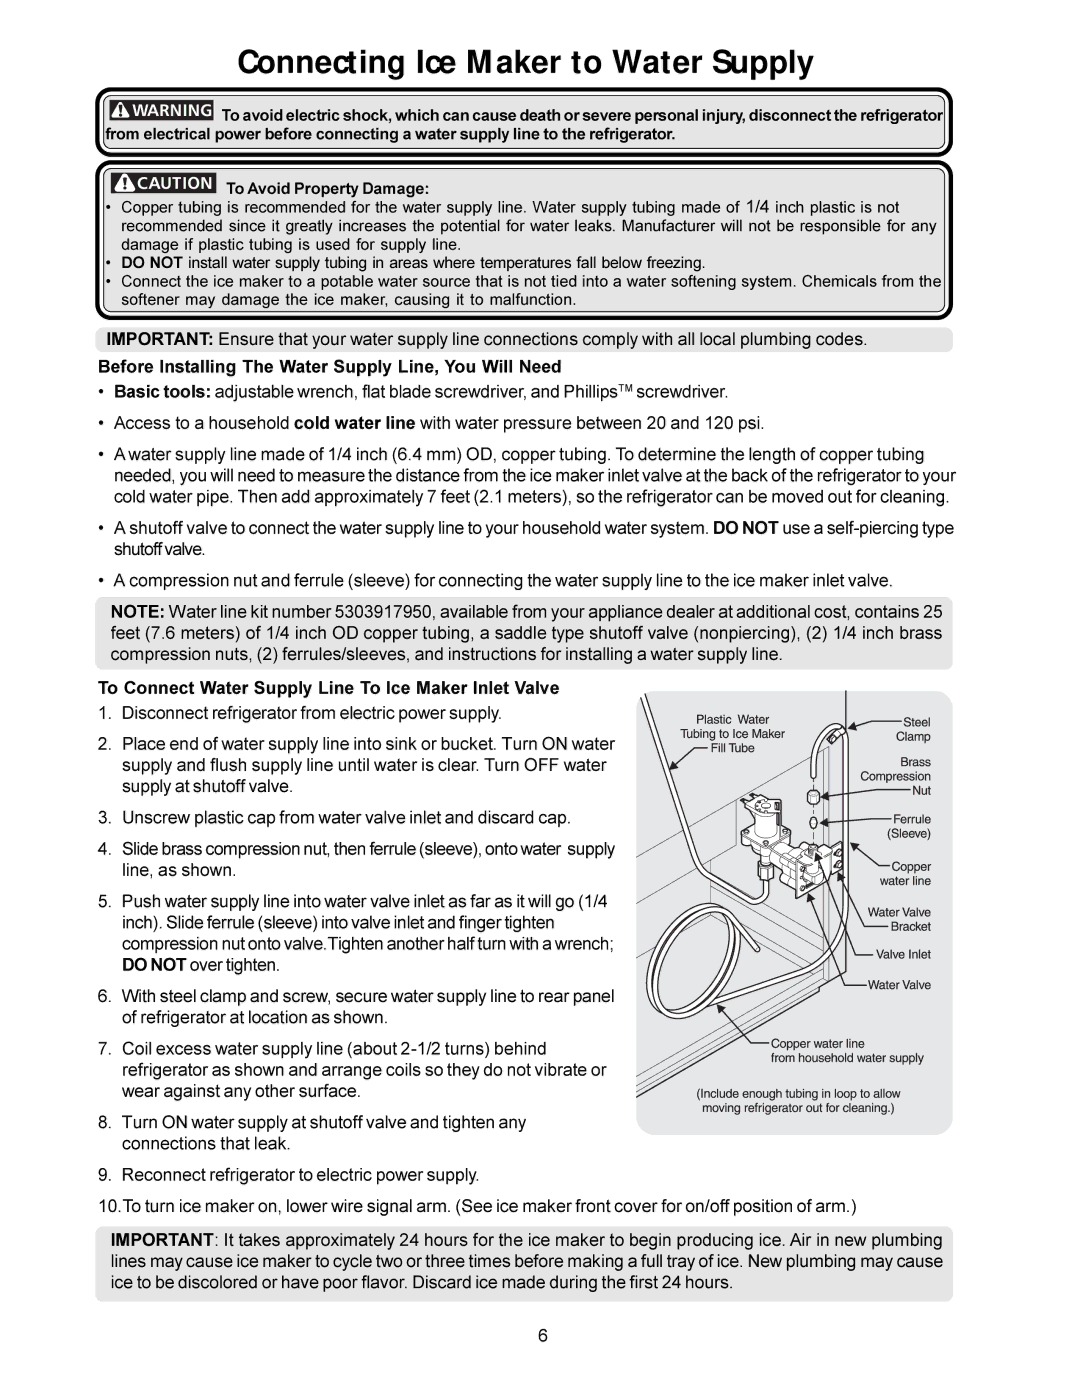
4. Slide brass compression nut, then ferrule (sleeve), onto water supply line, as shown.

5. Push water supply line into water valve inlet as far as it will go (1/4 inch). Slide ferrule (sleeve) into valve inlet and finger tighten compression nut onto valve.Tighten another half turn with a wrench; DO NOT over tighten.

6. With steel clamp and screw, secure water supply line to rear panel of refrigerator at location as shown.

7. Coil excess water supply line (about 2-1/2 turns) behind refrigerator as shown and arrange coils so they do not vibrate or wear against any other surface.

8.Turn ON water supply at shutoff valve and tighten any connections that leak.

9.Reconnect refrigerator to electric power supply.

10.To turn ice maker on, lower wire signal arm. (See ice maker front cover for on/off position of arm.)

IMPORTANT: It takes approximately 24 hours for the ice maker to begin producing ice. Air in new plumbing lines may cause ice maker to cycle two or three times before making a full tray of ice. New plumbing may cause ice to be discolored or have poor flavor. Discard ice made during the first 24 hours.

6

Page 6
Image 6
Frigidaire IM115 installation instructions Before Installing The Water Supply Line, You Will Need

IM115 specifications

The Frigidaire IM115 is a standout ice maker designed to meet the needs of homes and small businesses. This compact unit is perfect for those who require a reliable source of ice without the hassle of large, traditional ice-making machines. Its sleek design allows it to fit seamlessly into various settings, whether it is placed in a kitchen, bar, or entertaining area.

One of the main features of the IM115 is its ability to produce up to 28 pounds of clear, restaurant-quality ice in a 24-hour period. This high production capacity ensures that you will always have a sufficient supply of ice for any gathering or event. The machine creates bullet-shaped ice, which is not only aesthetically pleasing but also melts more slowly than traditional ice cubes, keeping drinks colder for longer.

The IM115 incorporates advanced technologies that enhance its performance and efficiency. It features a user-friendly control panel that allows you to easily monitor and manage ice production. The built-in bin can hold up to 2.5 pounds of ice, so you don’t have to continually empty it after each use. The automatic shut-off function is another smart addition, preventing overflow and optimizing energy consumption.

In terms of installation, the Frigidaire IM115 is designed for convenient under-counter or freestanding placement. Its dimensions make it a suitable option for spaces where larger appliances would be impractical. The ice maker operates quietly, ensuring that your environment remains peaceful, which is particularly beneficial in home or dining settings.

Energy efficiency is also a priority for the IM115, which is ENERGY STAR certified. This not only helps reduce electric bills but also contributes to environmental sustainability. The machine is built with high-quality materials, ensuring durability and longevity.

Additional features of the Frigidaire IM115 include a removable ice bin for easy cleaning and maintenance, and a simple setup that does not require specialized tools or professional installation. Overall, the Frigidaire IM115 stands out as a practical and stylish solution for ice production, making it a perfect addition to any space that demands consistent and high-quality ice. Whether for personal use or business purposes, the IM115 delivers on its promise of efficiency and reliability.