PREPARE THE HOOD


PREPARE THE HOOD

TOP RECTANGULAR


UP TO 1”

DUCT KNOCKOUT

SEMI-CIRCULAR

SIDE-TO-SIDE

(Remove for 3¼” x 10”

Vertical & for 7” Round

DUCT KNOCKOUT

ADJUSTMENT

(Remove for 7” Round

Discharge)


Discharge)


TAPE

➙➙

TOP/BACK

EDGE


DAMPER/


PIVOT

DUCT


CONNECTOR


(Vertical discharge


REAR


position shown)


RECTANGULAR


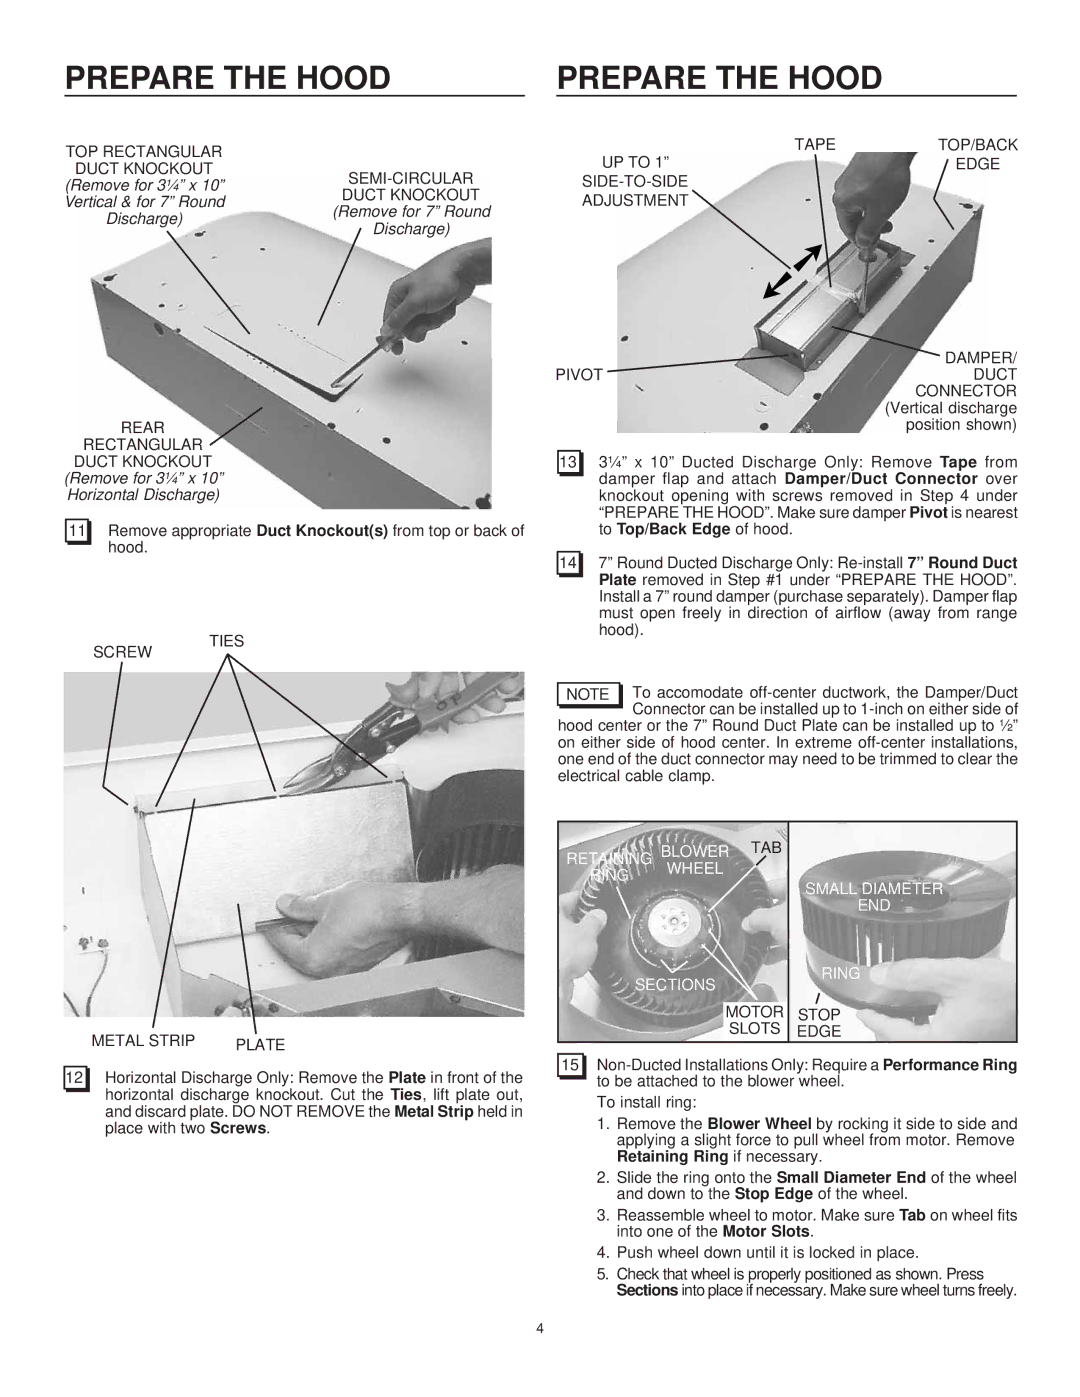
3¼” x 10” Ducted Discharge Only: Remove Tape from


DUCT KNOCKOUT

13


(Remove for 3¼” x 10”


damper flap and attach Damper/Duct Connector over


Horizontal Discharge)


knockout opening with screws removed in Step 4 under


“PREPARE THE HOOD”. Make sure damper Pivot is nearest


11

Remove appropriate Duct Knockout(s) from top or back of


to Top/Back Edge of hood.


hood.


7” Round Ducted Discharge Only: Re-install 7” Round Duct


14


Plate removed in Step #1 under “PREPARE THE HOOD”.


Install a 7” round damper (purchase separately). Damper flap


must open freely in direction of airflow (away from range


TIES


hood).


SCREW


To accomodate off-center ductwork, the Damper/Duct


NOTE


Connector can be installed up to 1-inch on either side of


hood center or the 7” Round Duct Plate can be installed up to ½”


on either side of hood center. In extreme off-center installations,


one end of the duct connector may need to be trimmed to clear the


electrical cable clamp.

METAL STRIP

PLATE

RETAINING BLOWER TAB

RING WHEEL

SECTIONS

MOTOR

SLOTS

SMALL DIAMETER

END

RING

STOP

EDGE

12Horizontal Discharge Only: Remove the Plate in front of the horizontal discharge knockout. Cut the Ties, lift plate out, and discard plate. DO NOT REMOVE the Metal Strip held in

place with two Screws.

15 Non-Ducted Installations Only: Require a Performance Ring to be attached to the blower wheel.

To install ring:

1.Remove the Blower Wheel by rocking it side to side and applying a slight force to pull wheel from motor. Remove

Retaining Ring if necessary.

2.Slide the ring onto the Small Diameter End of the wheel and down to the Stop Edge of the wheel.

3.Reassemble wheel to motor. Make sure Tab on wheel fits into one of the Motor Slots.

4.Push wheel down until it is locked in place.

5.Check that wheel is properly positioned as shown. Press Sections into place if necessary. Make sure wheel turns freely.

4

Page 4
Image 4
Frigidaire GL30WC4IEB, PL30WC4IEC, GL36WC4IEB, GL30WC4IES, GL36WC4IES To Top/Back Edge of hood, Retaining Ring if necessary

PL36WC4IEC, GL30WC4IEB, GL36WC4IES, GL30WC4IES, GL36WC4IEB specifications

The Frigidaire GL36WC4IES, GL36WC4IEB, GL30WC4IES, PL36WC4IEC, and PL30WC4IEC are part of Frigidaire's premium lineup of wall ovens and range cookers, designed to meet the modern kitchen's demands for efficiency, style, and functionality. Each model comes with a variety of features and technologies aimed at enhancing the cooking experience.

One of the standout characteristics of these models is their spacious oven capacity. Large enough to accommodate multiple dishes, they are ideal for families or those who love entertaining. The ovens are designed with even heat technology, which ensures consistent cooking results by distributing heat evenly throughout the oven. This feature minimizes the risk of hot or cold spots during cooking, allowing for perfectly baked breads and evenly roasted meats.

The Frigidaire series also showcases advanced cooking technologies such as True Convection cooking. This feature uses a fan to circulate hot air throughout the oven, significantly reducing cooking times and providing more uniform results. This is particularly beneficial for baking multiple trays of cookies or other baked goods simultaneously.

In addition to performance, these models prioritize user-friendly controls. Intuitive touch panels and digital displays allow for precise temperature settings and cooking time adjustments, ensuring ease of use. Some models also come equipped with smart oven features, allowing users to control and monitor the oven remotely via a mobile app. This connectivity provides added convenience for busy homeowners.

Safety is another essential consideration reflected in these models. They are equipped with features like automatic shut-off and child safety locks, giving homeowners peace of mind during cooking. Clean-up is simplified with self-cleaning options that utilize high temperatures to burn away food residues, making post-meal maintenance effortless.

The aesthetics of the Frigidaire GL and PL series are equally appealing, with sleek stainless-steel finishes that fit seamlessly into any modern kitchen décor. The illuminated oven racks and bright interior lighting enhance visibility, making it easier to monitor food as it cooks.

Whether you're a novice home cook or a seasoned chef, the Frigidaire GL36WC4IES, GL36WC4IEB, GL30WC4IES, PL36WC4IEC, and PL30WC4IEC offer a blend of style, technology, and functionality that can elevate your culinary experience. With a strong emphasis on performance and convenience, these appliances are designed to make cooking and baking enjoyable and efficient.