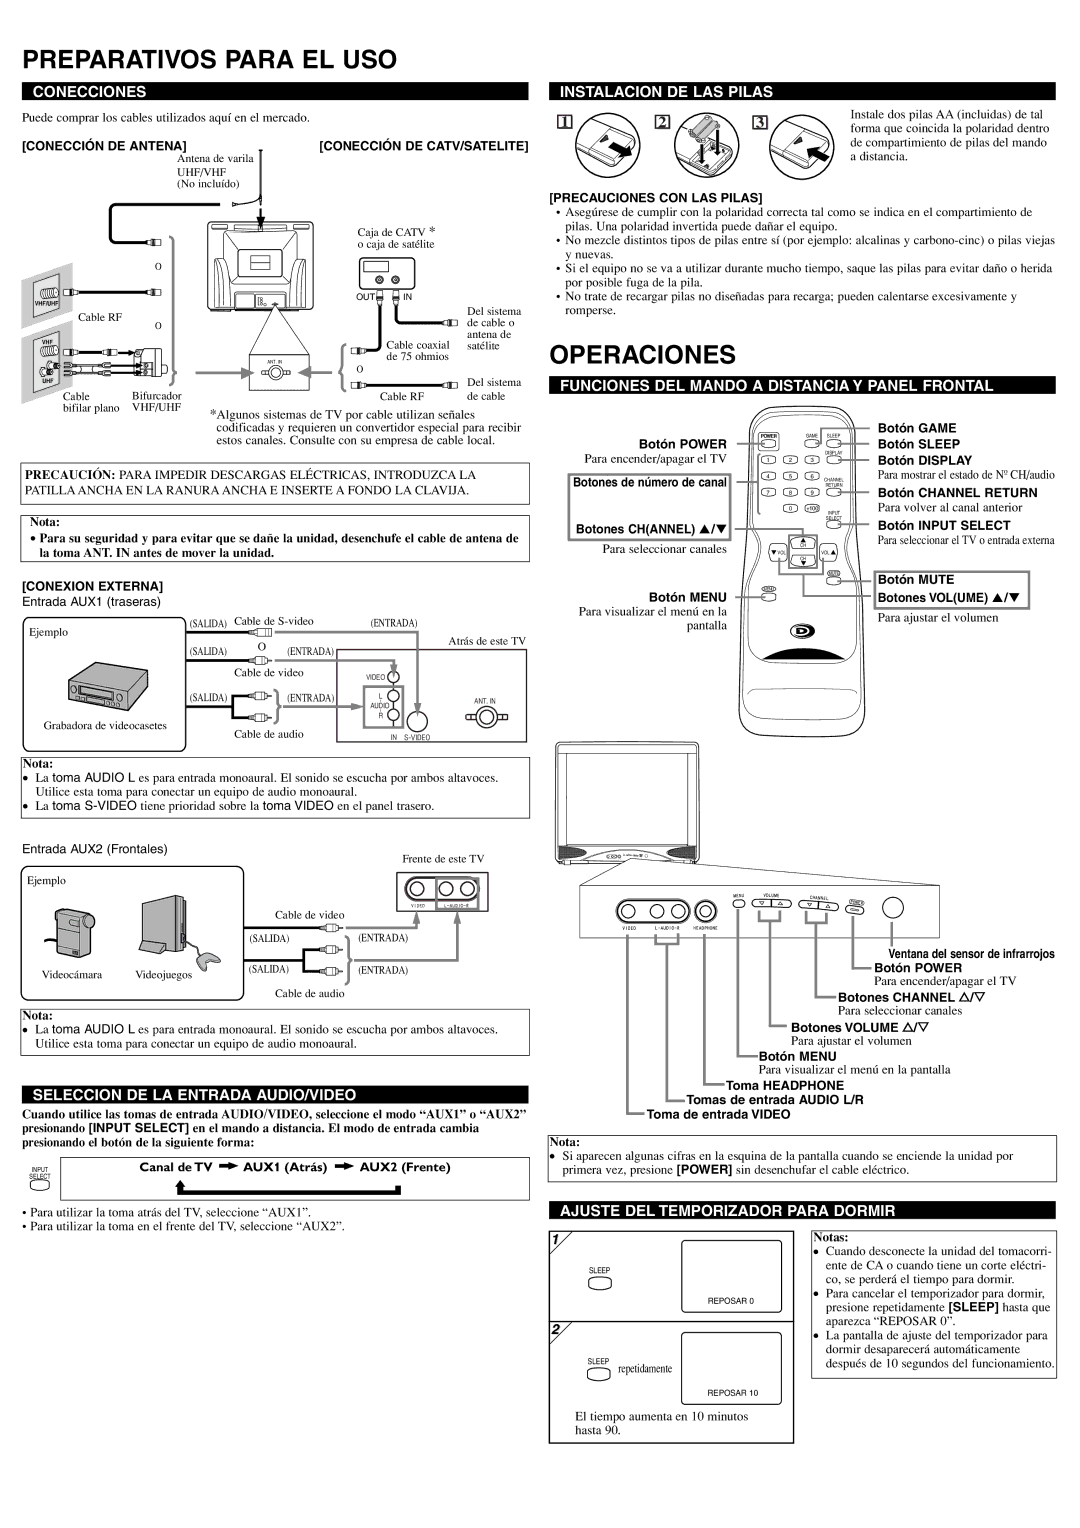
FUNAI DWT2704A owner manual Preparativos Para EL USO, Operaciones

Models: DWT2704A

1 8
Download 8 pages 63.98 Kb
Page 6
Image 6

PREPARATIVOS PARA EL USO

CONECCIONES

Puede comprar los cables utilizados aquí en el mercado.

INSTALACION DE LAS PILAS


1

2

3

Instale dos pilas AA (incluidas) de tal

forma que coincida la polaridad dentro


[CONECCIÓN DE ANTENA]

Antena de varila

UHF/VHF (No incluído)

O

VHF/UHF

[CONECCIÓN DE CATV/SATELITE]

Caja de CATV * o caja de satélite

OUT IN

de compartimiento de pilas del mando

a distancia.

[PRECAUCIONES CON LAS PILAS]

• Asegúrese de cumplir con la polaridad correcta tal como se indica en el compartimiento de

pilas. Una polaridad invertida puede dañar el equipo.

• No mezcle distintos tipos de pilas entre sí (por ejemplo: alcalinas y carbono-cinc) o pilas viejas

y nuevas.

• Si el equipo no se va a utilizar durante mucho tiempo, saque las pilas para evitar daño o herida

por posible fuga de la pila.

• No trate de recargar pilas no diseñadas para recarga; pueden calentarse excesivamente y

Cable RF

O

VHF

ANT. IN

Del sistema

de cable o antena de

Cable coaxial satélite de 75 ohmios

romperse.

OPERACIONES

UHF

O

Del sistema

FUNCIONES DEL MANDO A DISTANCIA Y PANEL FRONTAL

Cable

Bifurcador

Cable RF

de cable

bifilar plano

VHF/UHF

*Algunos sistemas de TV por cable utilizan señales


codificadas y requieren un convertidor especial para recibir estos canales. Consulte con su empresa de cable local.

PRECAUCIÓN: PARA IMPEDIR DESCARGAS ELÉCTRICAS, INTRODUZCA LA PATILLA ANCHA EN LA RANURA ANCHA E INSERTE A FONDO LA CLAVIJA.

Nota:

Para su seguridad y para evitar que se dañe la unidad, desenchufe el cable de antena de la toma ANT. IN antes de mover la unidad.

Botón POWER

Para encender/apagar el TV

Botones de número de canal

Botones CH(ANNEL) /

Para seleccionar canales

POWER

GAME SLEEP

DISPLAY

1 2 3

4

5

6

CHANNEL


RETURN

7

8

9


0

+100

INPUT


SELECT


CH


VOL


VOL


CH


MUTE

Botón GAME

Botón SLEEP

Botón DISPLAY

Para mostrar el estado de Nº CH/audio

Botón CHANNEL RETURN

Para volver al canal anterior

Botón INPUT SELECT

Para seleccionar el TV o entrada externa

[CONEXION EXTERNA]

Entrada AUX1 (traseras)

Ejemplo

Grabadora de videocasetes

(SALIDA) Cable de S-video

(SALIDA)

O

(ENTRADA)


Cable de video

(SALIDA)


(ENTRADA)


Cable de audio

(ENTRADA)

Atrás de este TV

VIDEO

L

ANT. IN

AUDIO

R

IN S-VIDEO

Botón MENU Para visualizar el menú en la pantalla

MENU

Botón MUTE

Botones VOL(UME) /

Para ajustar el volumen

Nota:

La toma AUDIO L es para entrada monoaural. El sonido se escucha por ambos altavoces. Utilice esta toma para conectar un equipo de audio monoaural.

La toma S-VIDEOtiene prioridad sobre la toma VIDEO en el panel trasero.

Entrada AUX2 (Frontales)

Frente de este TV

Ejemplo


Cable de video


(SALIDA)

(ENTRADA)

Videocámara

Videojuegos

(SALIDA)

(ENTRADA)


Cable de audio

Nota:

La toma AUDIO L es para entrada monoaural. El sonido se escucha por ambos altavoces. Utilice esta toma para conectar un equipo de audio monoaural.

SELECCION DE LA ENTRADA AUDIO/VIDEO

Cuando utilice las tomas de entrada AUDIO/VIDEO, seleccione el modo “AUX1” o “AUX2” presionando [INPUT SELECT] en el mando a distancia. El modo de entrada cambia presionando el botón de la siguiente forma:

INPUT

Canal de TV

AUX1 (Atrás)

AUX2 (Frente)

SELECT


Para utilizar la toma atrás del TV, seleccione “AUX1”.

Para utilizar la toma en el frente del TV, seleccione “AUX2”.

Ventana del sensor de infrarrojos

Botón POWER

Para encender/apagar el TV

Botones CHANNEL X/Y

Para seleccionar canales

Botones VOLUME X/Y

Para ajustar el volumen

Botón MENU

Para visualizar el menú en la pantalla

Toma HEADPHONE

Tomas de entrada AUDIO L/R

Toma de entrada VIDEO

Nota:

Si aparecen algunas cifras en la esquina de la pantalla cuando se enciende la unidad por primera vez, presione [POWER] sin desenchufar el cable eléctrico.

AJUSTE DEL TEMPORIZADOR PARA DORMIR

1

SLEEP

Notas:

Cuando desconecte la unidad del tomacorri-


ente de CA o cuando tiene un corte eléctri-


co, se perderá el tiempo para dormir.

Para cancelar el temporizador para dormir,

2

SLEEP

REPOSAR 0

repetidamente

REPOSAR 10

presione repetidamente [SLEEP] hasta que

aparezca “REPOSAR 0”.

La pantalla de ajuste del temporizador para

dormir desaparecerá automáticamente

después de 10 segundos del funcionamiento.

El tiempo aumenta en 10 minutos hasta 90.

Page 6
Image 6
FUNAI DWT2704A owner manual Preparativos Para EL USO, Operaciones

DWT2704A specifications

The FUNAI DWT2704A is an innovative multifunctional device that combines the capabilities of a digital video recorder (DVR) and a DVD player, tailored for those who demand versatility in their home entertainment environment. This device stands out in the crowded market of multimedia solutions, offering features that cater to various viewing preferences and content formats.

One of the key features of the FUNAI DWT2704A is its ability to record television programs directly onto a DVD or a hard disk drive. This functionality allows users to capture their favorite shows and movies effortlessly, ensuring that they never miss an episode of their beloved series. The one-touch recording feature simplifies the process, enabling quick and straightforward operations.

In terms of compatibility, the FUNAI DWT2704A supports various media formats, including CD, DVD, and various video formats such as MPEG-2 and DIVX. This wide-ranging support ensures that users can play a plethora of content without worrying about format restrictions. Additionally, the device features a built-in tuner, providing access to over-the-air broadcasts without the need for external equipment.

The DWT2704A also boasts a user-friendly interface, making navigation through menus and settings seamless. The remote control included with the device enhances convenience, allowing users to operate all features from the comfort of their couch. Moreover, its compact design makes it an ideal fit for any entertainment setup, whether in a living room, bedroom, or home theater system.

Another notable characteristic of the FUNAI DWT2704A is its advanced connectivity options. With multiple input and output ports, including HDMI, composite, and component video outputs, users can easily integrate it with other devices, such as televisions, sound systems, or streaming devices. This connectivity ensures that users can maximize their multimedia experience and adapt to evolving technology landscapes.

Lastly, the durability and reliability of the FUNAI DWT2704A are commendable, ensuring that it serves as a long-lasting component of any entertainment system. Overall, the DWT2704A by FUNAI is a feature-rich device that successfully combines multiple functionalities, making it a valuable addition for those looking to enhance their viewing experience while enjoying the flexibility of modern technology.