3. Assembly

GB


WARNING: Stop the unit and unplug the extension cord before opening the


inlet cover or attempting to install or remove the blower tube or vacuum tubes.


The motor must be stopped and the impeller blades no longer turning to avoid 


serious injury from the rotating blades.


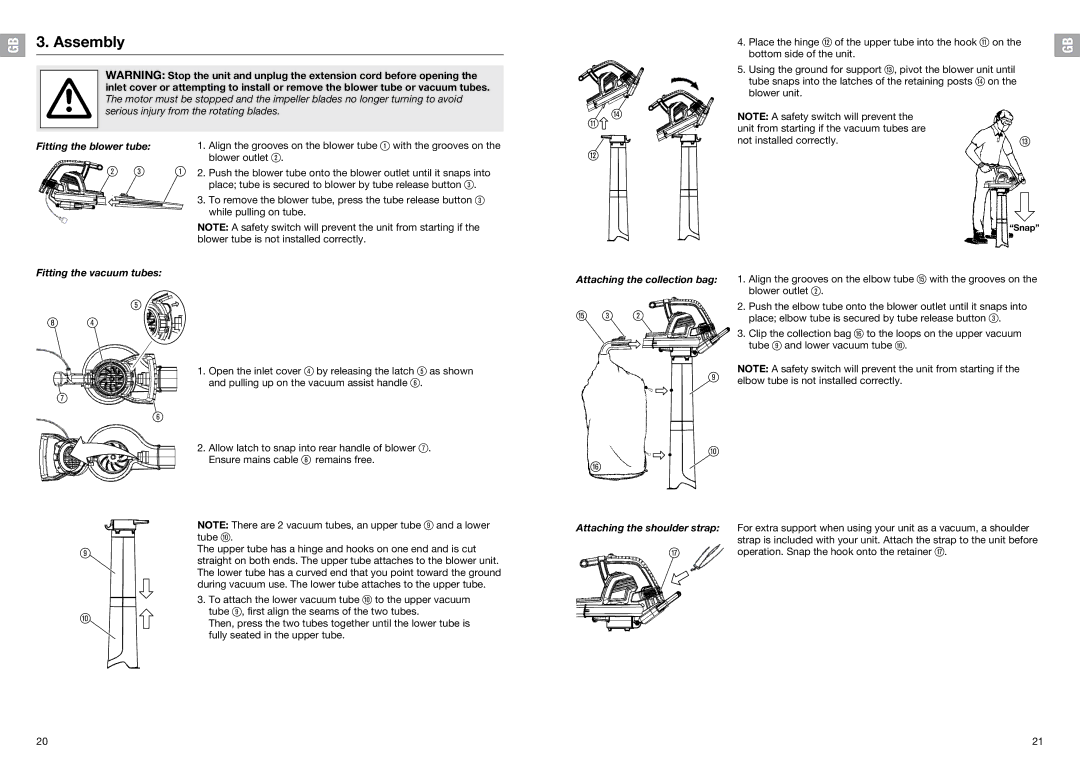
Fitting the blower tube: 1. Align the grooves on the blower tube 1 with the grooves on the blower outlet 2.

2 3

1 2. Push the blower tube onto the blower outlet until it snaps into


place; tube is secured to blower by tube release button 3.

3.To remove the blower tube, press the tube release button 3 while pulling on tube.

NOTE: A safety switch will prevent the unit from starting if the blower tube is not installed correctly.

Fitting the vacuum tubes:

5

8 4

1.Open the inlet cover 4 by releasing the latch 5 as shown and pulling up on the vacuum assist handle 6.


4. Place the hinge w of the upper tube into the hook q on the

GB


bottom­

side of the unit.


5. Using the ground for support e, pivot the blower unit until


tube snaps into the latches of the retaining posts r on the


blower unit.


r

NOTE: A safety switch will prevent the


q

unit from starting if the vacuum tubes are


not installed correctly.

e


w


“Snap”

Attaching the collection bag:

1.

Align the grooves on the elbow tube t with the grooves on the


blower outlet 2.

t 3

2

2.

Push the elbow tube onto the blower outlet until it snaps into


place; elbow tube is secured by tube release button 3.


3.

Clip the collection bag z to the loops on the upper vacuum


tube 9 and lower vacuum tube 0.

NOTE: A safety switch will prevent the unit from starting if the

9elbow tube is not installed correctly.

7

6

9

0

2.Allow latch to snap into rear handle of blower 7. Ensure mains cable 8 remains free.

NOTE: There are 2 vacuum tubes, an upper tube 9 and a lower tube 0.

The upper tube has a hinge and hooks on one end and is cut straight on both ends. The upper tube attaches to the blower unit. The lower tube has a curved end that you point toward the ground during vacuum use. The lower tube attaches to the upper tube.

3.To attach the lower vacuum tube 0 to the upper vacuum tube 9, first align the seams of the two tubes.

Then, press the two tubes together until the lower tube is  fully seated in the upper tube.

0

z

Attaching the shoulder strap:

For extra support when using your unit as a vacuum, a shoulder


strap is included with your unit. Attach the strap to the unit before


u

operation. Snap the hook onto the retainer u.


20

21

Page 4
Image 4
Gardena EJ3000 manual Fitting the vacuum tubes, Attaching the shoulder strap

EJ3000 specifications

The Gardena EJ3000 is a state-of-the-art electric submersible pump designed for durability and efficiency, making it an ideal choice for various water management tasks. This versatile device excels in a range of applications, from garden irrigation to draining water from flooded basements or ponds.

Equipped with a powerful motor, the EJ3000 boasts a maximum flow rate of up to 3,000 liters per hour. This ensures rapid water removal, making it perfect for quick drainage in emergencies or for regularly maintaining water levels in pools and basements. Its compact and lightweight design allows for easy handling, while the pump's robust construction guarantees long-lasting performance even in demanding conditions.

One of the standout features of the Gardena EJ3000 is its easy self-priming technology. This allows for hassle-free operation, as users do not need to manually fill the pump before it can start working. The pump can handle dirty water, inclusive of solid particles up to 20mm in size, thanks to its highly efficient pre-filter, which protects the motor and enhances longevity.

The EJ3000 is designed with user convenience in mind. It features a practical carrying handle, making it easy to transport to various locations. Moreover, the pump's integrated cable storage ensures that cords remain neat and tangle-free, enhancing the overall user experience.

Another significant aspect of the Gardena EJ3000 is its built-in thermal overload protection. This technology prevents the motor from overheating during prolonged use, ensuring safety and reliability. Additionally, the pump includes a float switch that automatically turns the pump on and off depending on the water level, which saves energy and minimizes the risk of damage.

For further ease of use, the Gardena EJ3000 comes equipped with a variety of connection options, including a standard 1-inch hose connector and an adapter for larger hoses. This versatility allows users to connect the pump effortlessly to their existing irrigation or drainage systems.

In conclusion, the Gardena EJ3000 is a robust and reliable submersible pump that caters to a wide range of water management needs. Its powerful performance, user-friendly features, and advanced technologies, such as self-priming capability and thermal overload protection, make it a top choice for both homeowners and professionals alike. The combined benefits of efficiency, durability, and convenience position the Gardena EJ3000 as an essential tool for effective water management.