INSTALLATION INSTRUCTIONS (USA only)
MODELS DSKS433 AND DSKS333 MUST BE INSTALLED WITH CONTROL PANEL AT BOTTOM IN ORDER TO OPERATE ADEQUATELY.
BEFORE YOU BEGIN
Read these instructions completely and carefully.
• IMPORTANT- Save these instruc- tions for local inspector’s use.
•IMPORTANT- Observe all govern- ingcodes and ordinances.
•Note to Installer - Be sure to leave these instruc- tions with the customer.
•Note to Customer - Keep these instructions with your Use and Care Book for future reference.
•Before the old dryer is removed from service or discarded, remove the dryer door.
•Service information and the wiring diagram are located in the control console.
•Do not allow children on or in the appliance. Close supervision of children is necessary when the appliance is used near children.
•Install the dryer where the temperature is above 50°F for satisfactory operation of the dryer control system.
![]() WARNING RISK OF FIRE
WARNING RISK OF FIRE
•To reduce the risk of severe injury or death, follow all installation instructions.
•Clothes dryer installation must be performed by a qualified installer.
•Install the clothes dryer according to these instructions and in accordance with local codes.
•This dryer must be exhausted to the outdoors.
•Use only 4” rigid metal ducting for exhausting the clothes dryer to the outdoors.
•DO NOT install a clothes dryer with flexible plastic ducting materials. If flexible metal
•Do not install or store this appliance in any location where it could be exposed to water and or weather.
•Save these instructions. (Installers: Be sure to leave these instructions with the customer).
DETERMINE ELECTRICAL REQUIREMENTS FOR YOUR DRYER MODEL
• This dryer must be connected to an individual branch circuit of proper voltage and frequency as specified on Rating Plate (located inside dryer door) with no other appliances or fixtures attached.
EXCEPTION:
• A 120V receptacle is located on the back on the dryer and is available only for use with a washer that is affixed to the dryer with a
• Branch circuit must be protected by the required
• The electrical installation must conform to the national and local codes.
208V AND 240V MODELS ARE NOT APPROVED FOR120 V INSTALLATION.
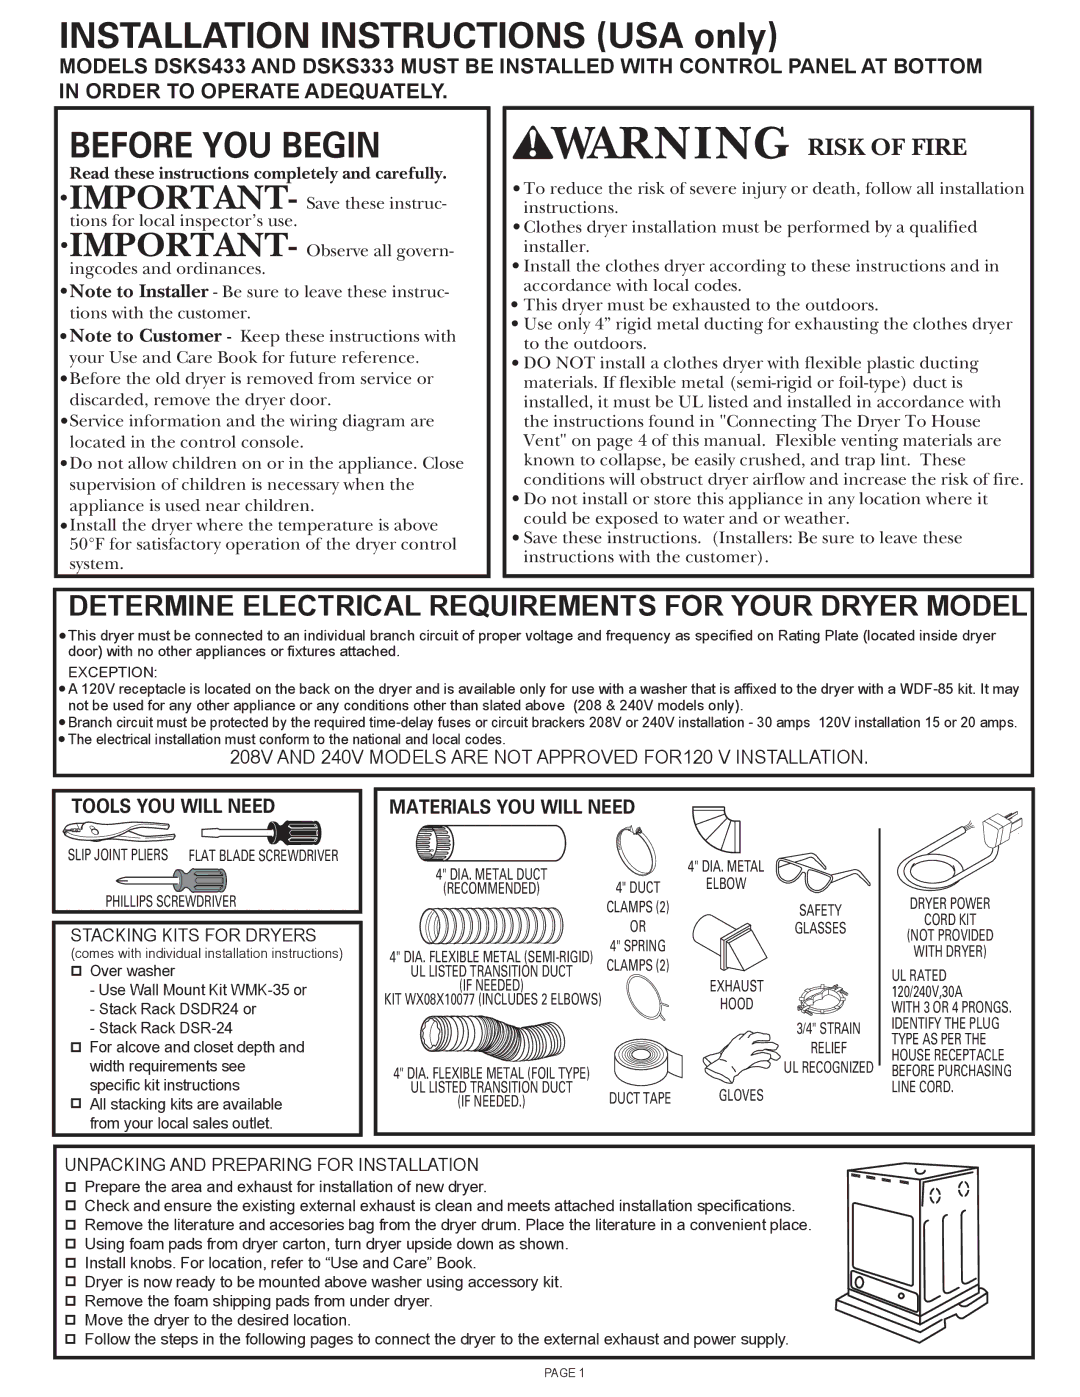
TOOLS YOU WILL NEED
MATERIALS YOU WILL NEED
SLIP JOINT PLIERS FLAT BLADE SCREWDRIVER
PHILLIPS SCREWDRIVER
STACKING KITS FOR DRYERS
(comes with individual installation instructions)
Over washer
-Use Wall Mount Kit
-Stack Rack DSDR24 or
-Stack Rack
For alcove and closet depth and width requirements see specific kit instructions
All stacking kits are available from your local sales outlet.
4" DIA. METAL DUCT |
| 4" DIA. METAL | |
4" DUCT | ELBOW | ||
(RECOMMENDED) | |||
| CLAMPS (2) | SAFETY | |
| OR | GLASSES | |
4" DIA. FLEXIBLE METAL | 4" SPRING |
| |
UL LISTED TRANSITION DUCT | CLAMPS (2) | EXHAUST | |
(IF NEEDED) |
| ||
KIT WX08X10077 (INCLUDES 2 ELBOWS) |
| HOOD | |
|
| 3/4" STRAIN | |
|
| RELIEF | |
4" DIA. FLEXIBLE METAL (FOIL TYPE) |
| UL RECOGNIZED | |
UL LISTED TRANSITION DUCT | DUCT TAPE | GLOVES | |
(IF NEEDED.) |
DRYER POWER
CORD KIT
(NOT PROVIDED
WITH DRYER)
UL RATED 120/240V,30A
WITH 3 OR 4 PRONGS. IDENTIFY THE PLUG TYPE AS PER THE HOUSE RECEPTACLE BEFORE PURCHASING LINE CORD.
UNPACKING AND PREPARING FOR INSTALLATION
Prepare the area and exhaust for installation of new dryer.
Check and ensure the existing external exhaust is clean and meets attached installation specifications. Remove the literature and accesories bag from the dryer drum. Place the literature in a convenient place. Using foam pads from dryer carton, turn dryer upside down as shown.
Install knobs. For location, refer to “Use and Care” Book.
Dryer is now ready to be mounted above washer using accessory kit. Remove the foam shipping pads from under dryer.
Move the dryer to the desired location.
Follow the steps in the following pages to connect the dryer to the external exhaust and power supply.
PAGE 1