GE Digital Camera
FCC Statement
For customers in Europe
Declaration of Conformity
Rain, in humid or dusty environments
Battery notes
Camera notes
Memory card notes
Trademarks
Safety Information
Preface
Copyright
About This Manual
Symbols used in this manual
Contents
Basic Operation
Expo Metering Exposure Metering
Connecting the Camera and Printer
Connecting to a PC Troubleshooting
Copy to Card Copy internal memory to
Unpacking
USB Cable Rechargeable lithium-ion battery
Back View Right View
Camera Views
Left View
Top View
Battery Charging
Open the battery compartment
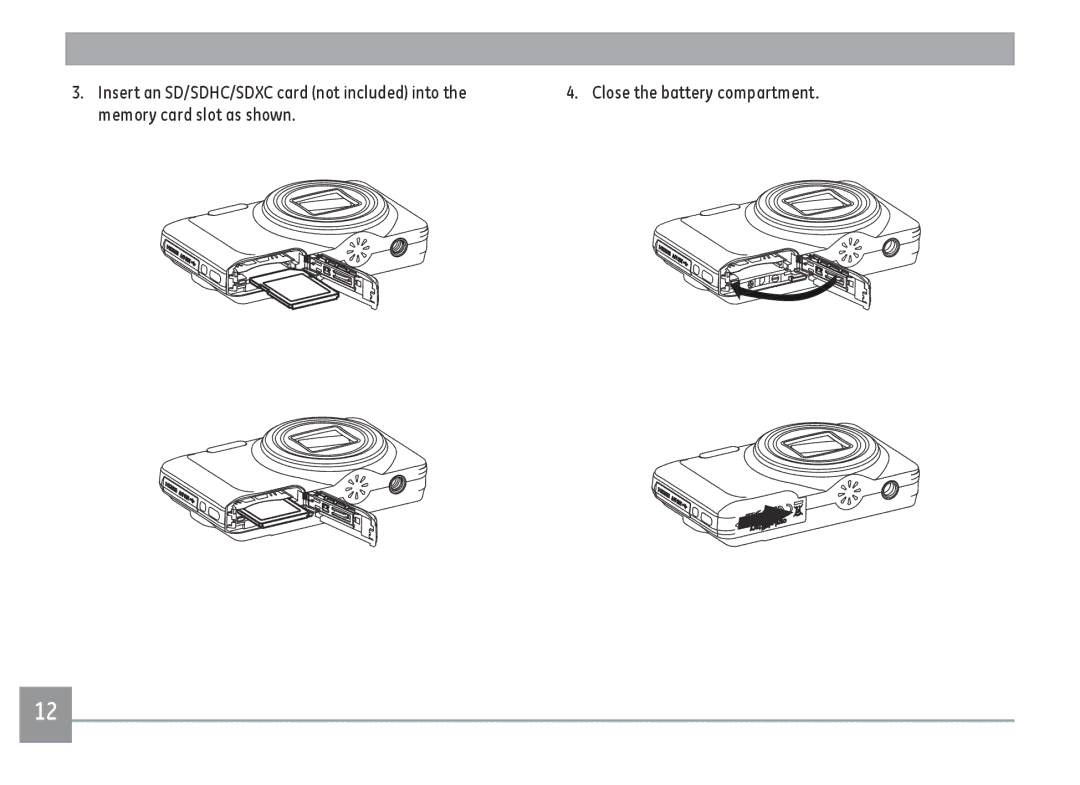
Insert the Battery and SD/SDHC/SDXC Card Not included
Page
Turning On and Off
Removing the battery
Set Display Language
Setting Language and Date/Time
Set Date/Time
LCD Screen notes
About the LCD Screen
Grid Camera parameters with Grid and Histogram
Display Setting
Mode
Still Picture Mode Display
LCD Screen Display
Histogram
Page
Video Mode Icon Macro Mode Self-Timer 10 sec
Video Shooting Mode Display
Playback Mode Display
Image Zoom Ratios
Image Zoon
Mode Name Icon Description
Using the Mode Button
Manual Mode M
Shooting in Auto Mode
Panorama
Beautifier Mode
Manual Scene Mode SCN
Recommended
Mode name Description Auto Scene
Scene with subject, Auto
Recommended for shooting indoors
Page
Auto Scene Mode Ascn
Exposure for people and night scenes
Mode name Description Landscape Mode
Night Landscape Mode
Blue colors
Basic Operation
Using the Zoom Function
Flash
Basic Functions Menu
Continuous Capture Setting
Self-Timer Setting
Macro Mode
SET Function Menu
Exposure Compensation
Slow Shutter
ISO
Pause Rewind Fast Forward
Operating instruction icons are as follows Increase Volume
Volume
Viewing Photos and Videos
Down button until the appears
Thumbnail View
Using Zoom Playback for still pictures only
Using the Delete Button
To the Photo Setup Menu To adjust each setting
Still Menu
Expo Metering Exposure Metering
OIS
Size
There are two options Off
Continuous AF
White Balance Setting
Focus Setting
Press Left/Right button to select image color setting
Image Color Setting
Adjustable only in Manual Mode
Quality
Setting Menu
Digital Zoom
AF-Assist Beam
Date Imprint
Blink Detection
Press Left/Right button to select functions
Movie Mode Menu
Press mode dial to select mode
Button to enter
Image Pixel
Image Color Setting
Playback Menu
Protect
To protect/unprotect a picture or video
There are 2 ways to delete files
Delete
Delete option, select All and then press the SET button
Dpof Digital Print Order Format
HDR-High Dynamic Range
Setting screen
:HDR :Cancel
Trim
Use this setting to remove red eye in your photos
Red-eye Reduction
Rotate
Menu, select
640X480, or cancel and return to the play menu
Resize
Color Effect
Continuous Capture Group Playback
Slideshow
Setup Menu
Mode
Beep
Press the SET button to confirm
Power Saver
See Setting the Language section on
Language
Format Memory
File / Software
Zone
Date/Time
File Numbering
Copy to Card Copy internal memory to SD memory card
FW Version Firmware Version
Reset Settings
Connecting to a PC
Setting the USB mode
Transferring files to your PC
If the USB option is set to PC
Disconnect the camera once transfer is completed
Macintosh Drag the untitled icon to the Trash. Untitled
Connection menu to select Eye-Fi, set it to on
Set Eye-Fi SD Card Connection Mode
Please turn on both the camera and TV before connection
Connecting the camera to an Hdmi TV
Supported Hdmi Connection
Camera will be automatically detected by the TV
Connecting to a PictBridge Compatible Printer
Connecting the Camera and Printer
Print with Date
Using the PictBridge Menu
Print without Date
Use this setting to print the photos without dates on them
Select Yes, then press SET button confirm print
Print Index
Exit
Print Dpof Digital Print Order Format
Appendices
Specifications
Detection Features Face, Smile, Blink, Cat, Dog
Number Still Image
Panorama Capture Still Image Yes Horizontal View Angle
Zoom Approx x ~ 8x, Histogram Display
On/Off
Exposure Metering Method
Frame, Face AE
Country or Area Quick Start Guide, Warranty Card
Temperature 32 ~ 104oF / 0 ~ 40oC, Humidity 0 ~ 90%
Weight Approx .8oz. / 136g Body Only
Rechargeable Li-ion Battery, AC Adapter, USB Cable
Error Messages
Out of the range
Incorrect
Messages Explanation
Saved Delete unwanted images Unlock the memory card
Troubleshooting
Camera
Images and video files cannot be Memory card is full
Recording Cannot write to the memory card
Images cannot print from
Replace the ink cartridge in the printer
This card
General Imaging Company
Follow us on