STEP-BY-STEP INSTALLATION INSTRUCTIONS (cont.)
Attach Fittings to Water Line
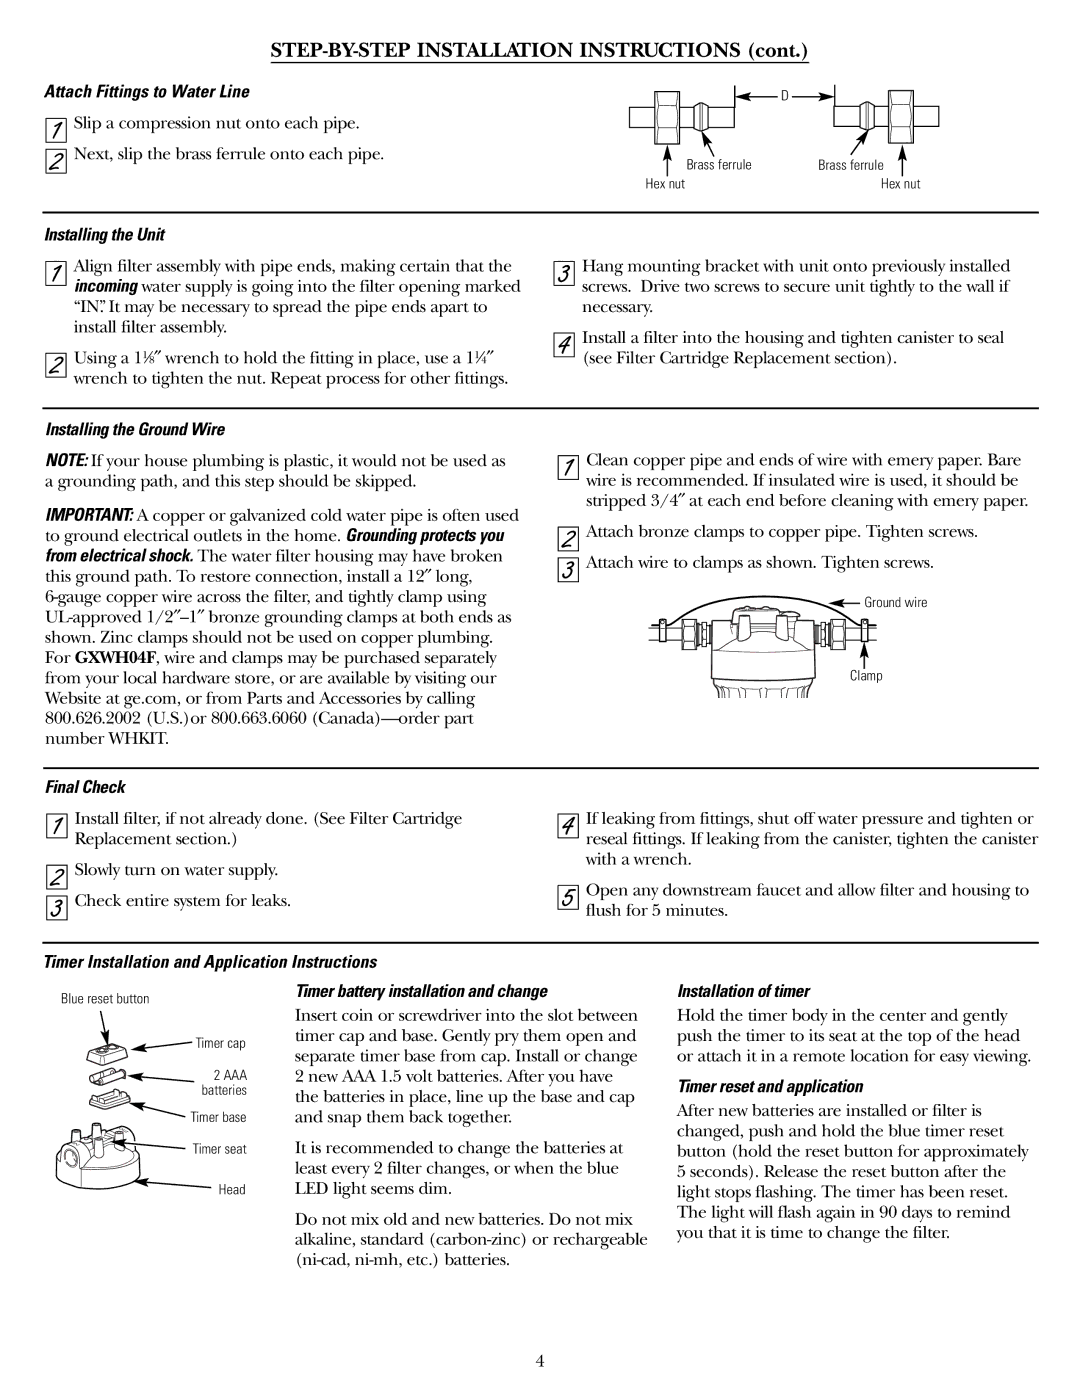
| Slip a compression nut onto each pipe. |
1 | |
| Next, slip the brass ferrule onto each pipe. |
2 |
| D |
Brass ferrule | Brass ferrule |
Hex nut | Hex nut |
Installing the Unit
1 | Align filter assembly with pipe ends, making certain that the | |
incoming water supply is going into the filter opening marked | ||
| ||
| “IN”. It may be necessary to spread the pipe ends apart to | |
| install filter assembly. | |
| Using a 11⁄8″ wrench to hold the fitting in place, use a 11⁄4″ | |
2 | ||
wrench to tighten the nut. Repeat process for other fittings. | ||
|
3
4
Hang mounting bracket with unit onto previously installed screws. Drive two screws to secure unit tightly to the wall if necessary.
Install a filter into the housing and tighten canister to seal (see Filter Cartridge Replacement section).
Installing the Ground Wire
NOTE: If your house plumbing is plastic, it would not be used as a grounding path, and this step should be skipped.
IMPORTANT: A copper or galvanized cold water pipe is often used to ground electrical outlets in the home. Grounding protects you from electrical shock. The water filter housing may have broken this ground path. To restore connection, install a 12″ long,
1 | Clean copper pipe and ends of wire with emery paper. Bare | |
wire is recommended. If insulated wire is used, it should be | ||
| ||
| stripped 3/4″ at each end before cleaning with emery paper. | |
| Attach bronze clamps to copper pipe. Tighten screws. | |
2 | ||
| Attach wire to clamps as shown. Tighten screws. | |
3 |
![]() Ground wire
Ground wire
Clamp
Final Check
1
2
3
Install filter, if not already done. (See Filter Cartridge Replacement section.)
Slowly turn on water supply.
Check entire system for leaks.
4
5
If leaking from fittings, shut off water pressure and tighten or reseal fittings. If leaking from the canister, tighten the canister with a wrench.
Open any downstream faucet and allow filter and housing to flush for 5 minutes.
Timer Installation and Application Instructions
Blue reset button
Timer cap
2 AAA batteries
![]() Timer base
Timer base
Timer seat
Head
Timer battery installation and change
Insert coin or screwdriver into the slot between timer cap and base. Gently pry them open and separate timer base from cap. Install or change 2 new AAA 1.5 volt batteries. After you have the batteries in place, line up the base and cap and snap them back together.
It is recommended to change the batteries at least every 2 filter changes, or when the blue LED light seems dim.
Do not mix old and new batteries. Do not mix alkaline, standard
Installation of timer
Hold the timer body in the center and gently push the timer to its seat at the top of the head or attach it in a remote location for easy viewing.
Timer reset and application
After new batteries are installed or filter is changed, push and hold the blue timer reset button (hold the reset button for approximately 5 seconds). Release the reset button after the light stops flashing. The timer has been reset. The light will flash again in 90 days to remind you that it is time to change the filter.
4
