Manuals
/
GE
/
Kitchen Appliance
/
Cooktop
GE
JP968 Consumer Support, Cleaning Troubleshooting Tips, Instructions Care and, Operating
Models:
JP968
1
9
40
40
Download
40 pages
16.4 Kb
6
7
8
9
10
11
12
13
Page 9
Image 9
Page 8
Page 10
Page 9
Image 9
Page 8
Page 10
Contents
Care and Cleaning
Safety Instructions Operating Instructions
Troubleshooting Tips . . 15 Consumer Support
Model # Serial #
SAFETY PRECAUTIONS
IMPORTANT SAFETY INFORMATION READ ALL INSTRUCTIONS BEFORE USING
Safety Instructions
Support Troubleshooting Tips Care and Cleaning Operating Instructions
Hot surfaces may include both the cooktop and areas facing the cooktop
SAVE THESE INSTRUCTIONS
RADIANT SURFACE UNITS
Consumer
READ AND FOLLOW THIS SAFETY INFORMATION CAREFULLY
Features of your cooktop
Explained on page
Feature Index Features and appearances may vary
Safety Instructions
Using the surface units
Tips Care and Cleaning Operating Instructions
Troubleshooting
Care and Cleaning
Safety
Cooking Guide for Using Heat Settings
Fault Code
Warmer Surface Unit
Bridge Surface Unit
Control Setting
Food Type
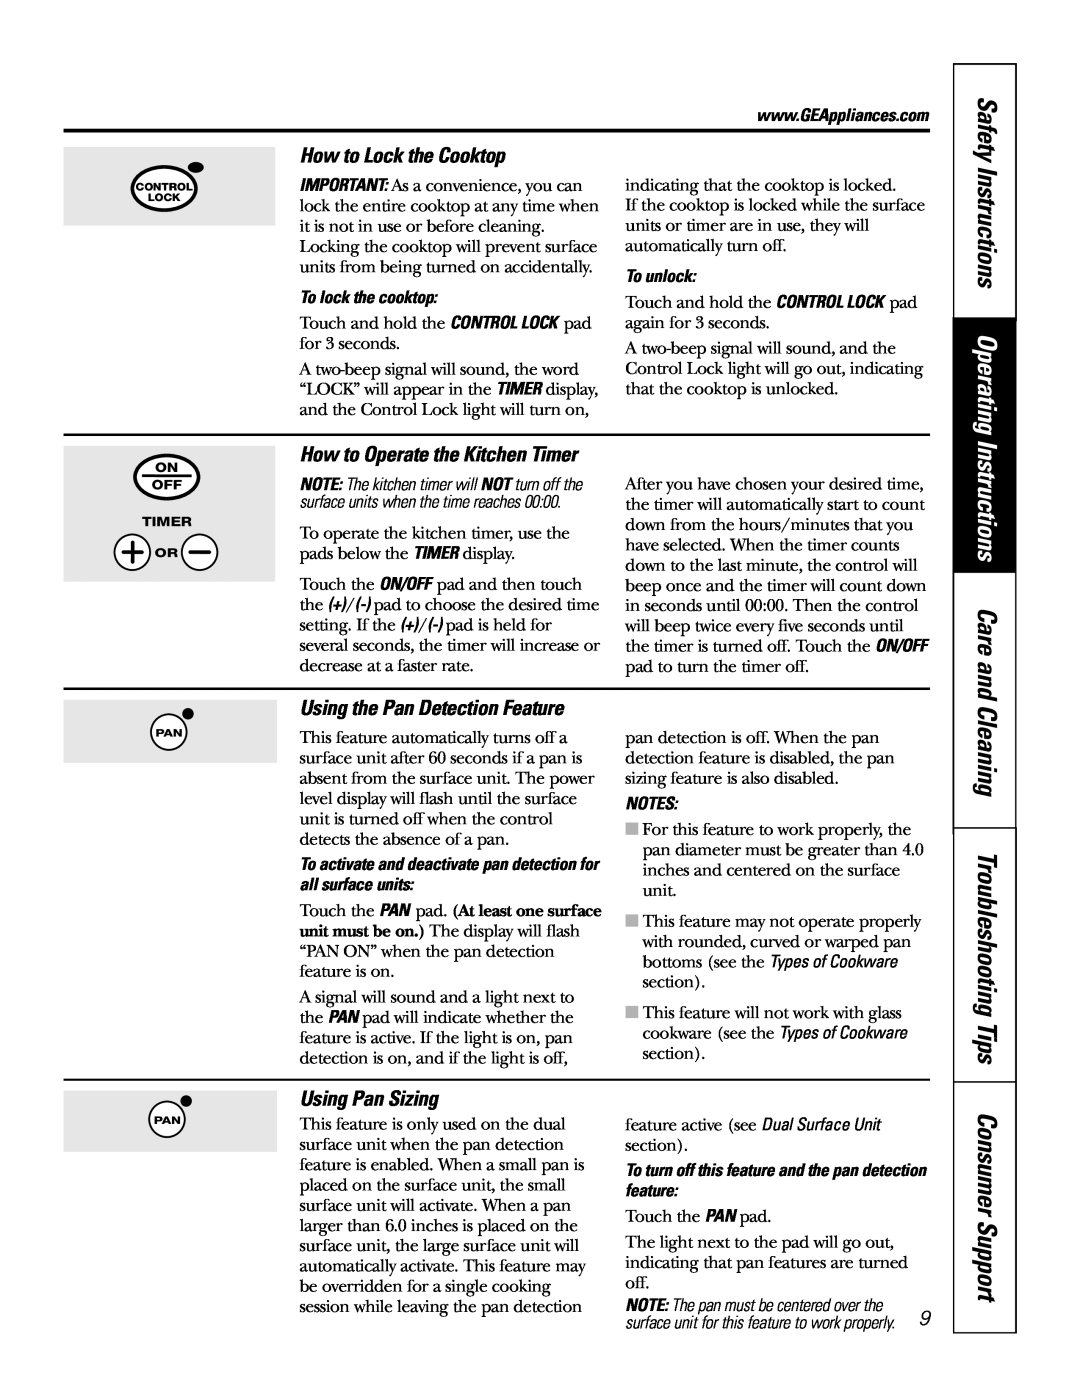
How to Lock the Cooktop
Cleaning Troubleshooting Tips
Using the Pan Detection Feature
Using Pan Sizing
Consumer Support Troubleshooting
Tips Care and Cleaning
Selecting types of cookware
Operating Instructions
1 using a pressure canner, and
Observe the Following Points in Canning
Care and cleaning of the cooktop
How to Remove Packaging Tape
Instructions
Safety Instructions
Cleaning the glass cooktop
and Cleaning Troubleshooting
Normal Daily Use Cleaning
Consumer Support Troubleshooting Tips
Instructions Safety
Care and Cleaning
Operating
Problem
Troubleshooting Tips
Possible Causes
What To Do
glowing hot when it
Before You Call For Service…
power setting
in the display
Warranty Registration Department P.O. Box Louisville, KY
GE Service Protection Plus
General Electric Company
We’ll Cover Any Appliance. Anywhere. Anytime
Model Number
Follow these three steps to protect your new appliance investment
Serial Number
Consumer Product Ownership Registration
Troubleshooting Tips Consumer Support
GE Electric Cooktop Warranty
Safety Instructions Operating Instructions
All warranty service provided by our Factory Service
Parts and Accessories
Schedule Service
Consumer Support
GE Appliances Website
Cuidado y limpieza
Instrucciones de seguridad Instrucciones de operación
Consejos para la solución
Soporte al consumidor
IMPORTANTE INFORMACIÓN DE SEGURIDAD
¡ADVERTENCIA
LEA TODAS LAS INSTRUCCIONES ANTES DEL USO
PRECAUCIONES DE SEGURIDAD
Instrucciones seguridad
LEA Y SIGA ESTA INFORMACIÓN DE SEGURIDAD CUIDADOSAMENTE
UNIDADES RADIANTES DE LA SUPERFICIE
CONSERVE ESTAS INSTRUCCIONES
Soporte al
Instrucciones de seguridad
Funciones de su cubierta
Instrucciones de operación
En este manual, las funciones y aspectos pueden variar de su modelo
deparaaveríasla Cuidado y limpieza
Cómo usar las unidades de la superficie
Soporte al
Sobre las unidades radiantes de la superficie
Soporte al consumidor
Código de error
Unidad sencilla de la superficie
Consejos para la solución de averías
Instrucciones de operación
Unidad puente de la superficie
Unidad entibiador de la superficie
Instrucciones seguridad
El reloj de la cocina
Cómo bloquear la cubierta
Para bloquear la cubierta
Para desactivar el bloqueo
Cuidado y limpieza
Cómo seleccionar la batería de cocina
Consejos para Soporte al consumidor solución de
Acero inoxidable PAN
Observe los siguientes puntos al preparar conservas
de seguridad
1 usar un envasador de presión, y
PRECAUCIÓN
Cómo retirar la cinta de empaque
Cuidado y limpieza de la cubierta
Botón de bloqueo del control
Cómo limpiar la cubierta de vidrio
Limpieza normal de uso diario
Residuos quemados
Marcas metálicas y rayas
Superficie de vidrio-posibilidad de daño permanente
Daños de derramamientos de dulce y plástico derretido
Para solicitar repuestos
Antes de llamar a solicitar servicio
Problema
Instrucciones de seguridad Instrucciones de operación
Consejos para la solución de averías
caliente
La cubierta se siente
La función de
detección/tamaño
Instrucciones de operación
Notas
Consejos para la
Cuidado y limpieza
Consejos para la solución de averías
Soporte al consumidor
depara laaverías Soporte al consumidor
Garantía de la cubierta para cocinar eléctrica de GE
GE repondrá
Qué no cubrirá GE
Página Web de GE Appliances
Soporte al Consumidor
Solicite una reparación
Garantías ampliadas
Top
Page
Image
Contents