Instructions

Care and cleaning of the range.

If the range is removed for cleaning or any reason, make sure the chain is reattached.

Operating Instructions Safety

Backsplash


Optional

(on some models)


bracket


location


Factory


bracket


location

Chain

Back of range

Anti-Tip Device

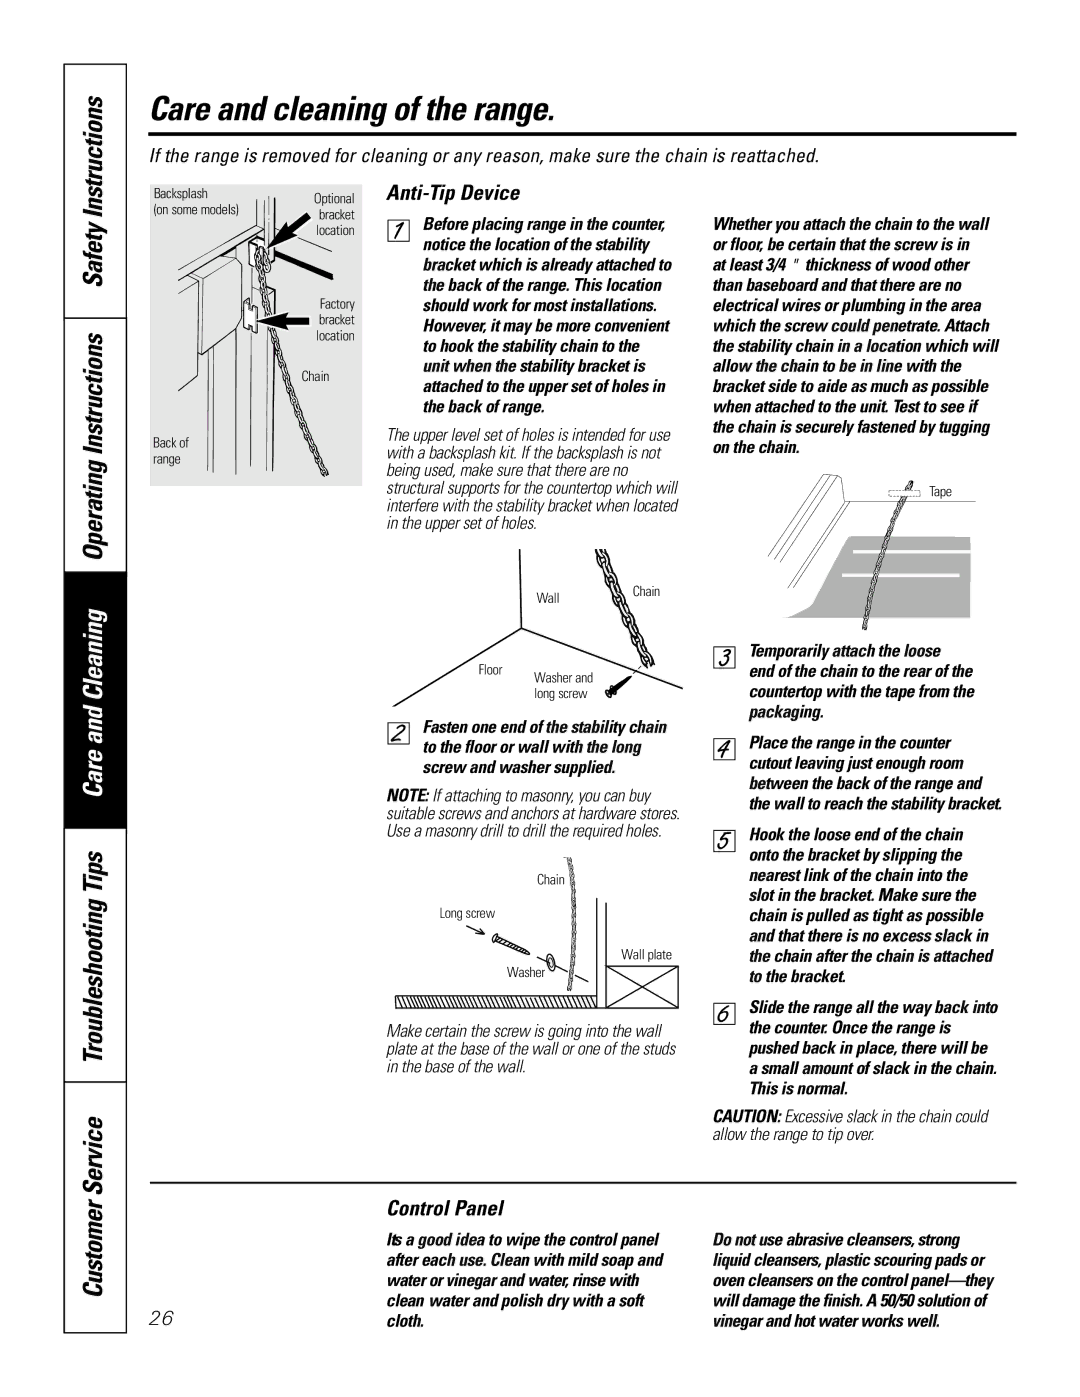
Before placing range in the counter, notice the location of the stability bracket which is already attached to the back of the range. This location should work for most installations. However, it may be more convenient to hook the stability chain to the unit when the stability bracket is attached to the upper set of holes in the back of range.

The upper level set of holes is intended for use with a backsplash kit. If the backsplash is not being used, make sure that there are no structural supports for the countertop which will interfere with the stability bracket when located in the upper set of holes.

Whether you attach the chain to the wall or floor, be certain that the screw is in at least 3/4″ thickness of wood other than baseboard and that there are no electrical wires or plumbing in the area which the screw could penetrate. Attach the stability chain in a location which will allow the chain to be in line with the bracket side to aide as much as possible when attached to the unit. Test to see if the chain is securely fastened by tugging on the chain.

Tape

Cleaning

Floor

WallChain

Washer and long screw

Temporarily attach the loose

end of the chain to the rear of the countertop with the tape from the packaging.

Service Troubleshooting Tips Care and

Fasten one end of the stability chain to the floor or wall with the long screw and washer supplied.

NOTE: If attaching to masonry, you can buy suitable screws and anchors at hardware stores. Use a masonry drill to drill the required holes.

Chain

Long screw

Wall plate

Washer

Make certain the screw is going into the wall plate at the base of the wall or one of the studs in the base of the wall.

Place the range in the counter cutout leaving just enough room between the back of the range and the wall to reach the stability bracket.

Hook the loose end of the chain onto the bracket by slipping the nearest link of the chain into the slot in the bracket. Make sure the chain is pulled as tight as possible and that there is no excess slack in the chain after the chain is attached to the bracket.

Slide the range all the way back into the counter. Once the range is pushed back in place, there will be a small amount of slack in the chain. This is normal.

CAUTION: Excessive slack in the chain could allow the range to tip over.

Customer


Control Panel


It’s a good idea to wipe the control panel


after each use. Clean with mild soap and


water or vinegar and water, rinse with

26

clean water and polish dry with a soft

cloth.

Do not use abrasive cleansers, strong liquid cleansers, plastic scouring pads or oven cleansers on the control panel—they will damage the finish. A 50/50 solution of vinegar and hot water works well.

Page 26
Image 26
GE JR JGSP22 owner manual Operating Instructions Safety, Service Troubleshooting Tips Care, Anti-Tip Device, Control Panel

JR JGSP22 specifications

The GE JR JGSP22 is a state-of-the-art refrigerator that embodies innovation and efficiency, making it a standout choice for modern households. This appliance not only offers superior cooling performance but also integrates advanced technologies that enhance user experience and food preservation.

One of the main features of the GE JR JGSP22 is its spacious interior. With a generous capacity, it provides ample storage space for a variety of food items, from large containers to smaller items. The adjustable shelves and door bins allow for flexible organization, so users can customize their storage configuration to suit their needs. This is particularly beneficial for families or those who enjoy bulk shopping, as it maximizes storage potential.

Another noteworthy feature is the advanced cooling technology employed in the GE JR JGSP22. It utilizes a multi-air flow system, which ensures even distribution of cold air throughout the refrigerator. This helps maintain consistent temperatures and reduces hotspots, keeping food fresh for longer periods. The humidity-controlled crisper drawers are designed to preserve fruits and vegetables, preventing wilting and extending shelf life.

Additionally, the refrigerator integrates smart technology features, allowing users to monitor and control their appliance remotely. With Wi-Fi connectivity, the GE JR JGSP22 can send alerts to your smartphone if the door is left open or if the temperature fluctuates. This enhances food safety and provides peace of mind, especially for those who travel frequently.

Energy efficiency is another hallmark of the GE JR JGSP22. Designed with eco-friendly technologies, it meets Energy Star standards, helping consumers save on energy bills while reducing their carbon footprint. The LED lighting not only provides better visibility inside the refrigerator but also uses less energy compared to traditional incandescent bulbs.

In terms of design, the GE JR JGSP22 boasts a sleek and modern aesthetic. Available in multiple finishes, including stainless steel and classic white, it can seamlessly blend into any kitchen decor. The user-friendly controls make it easy to adjust settings, and the elegant external water and ice dispenser adds convenience.

In summary, the GE JR JGSP22 combines style, technology, and practical features, making it an exceptional choice for anyone seeking a reliable and efficient refrigerator. Its spacious design, advanced cooling system, smart technology, energy efficiency, and modern aesthetics position it as a leader in the kitchen appliance market.