Installation Instructions

3ATTACH THE WATER VALVE (cont.)

Clip the end of the ground wire to the refrigerator cabinet.

IMPORTANT: To ensure a proper ground, the end of the ground wire MUST be secured to the refrigerator cabinet.

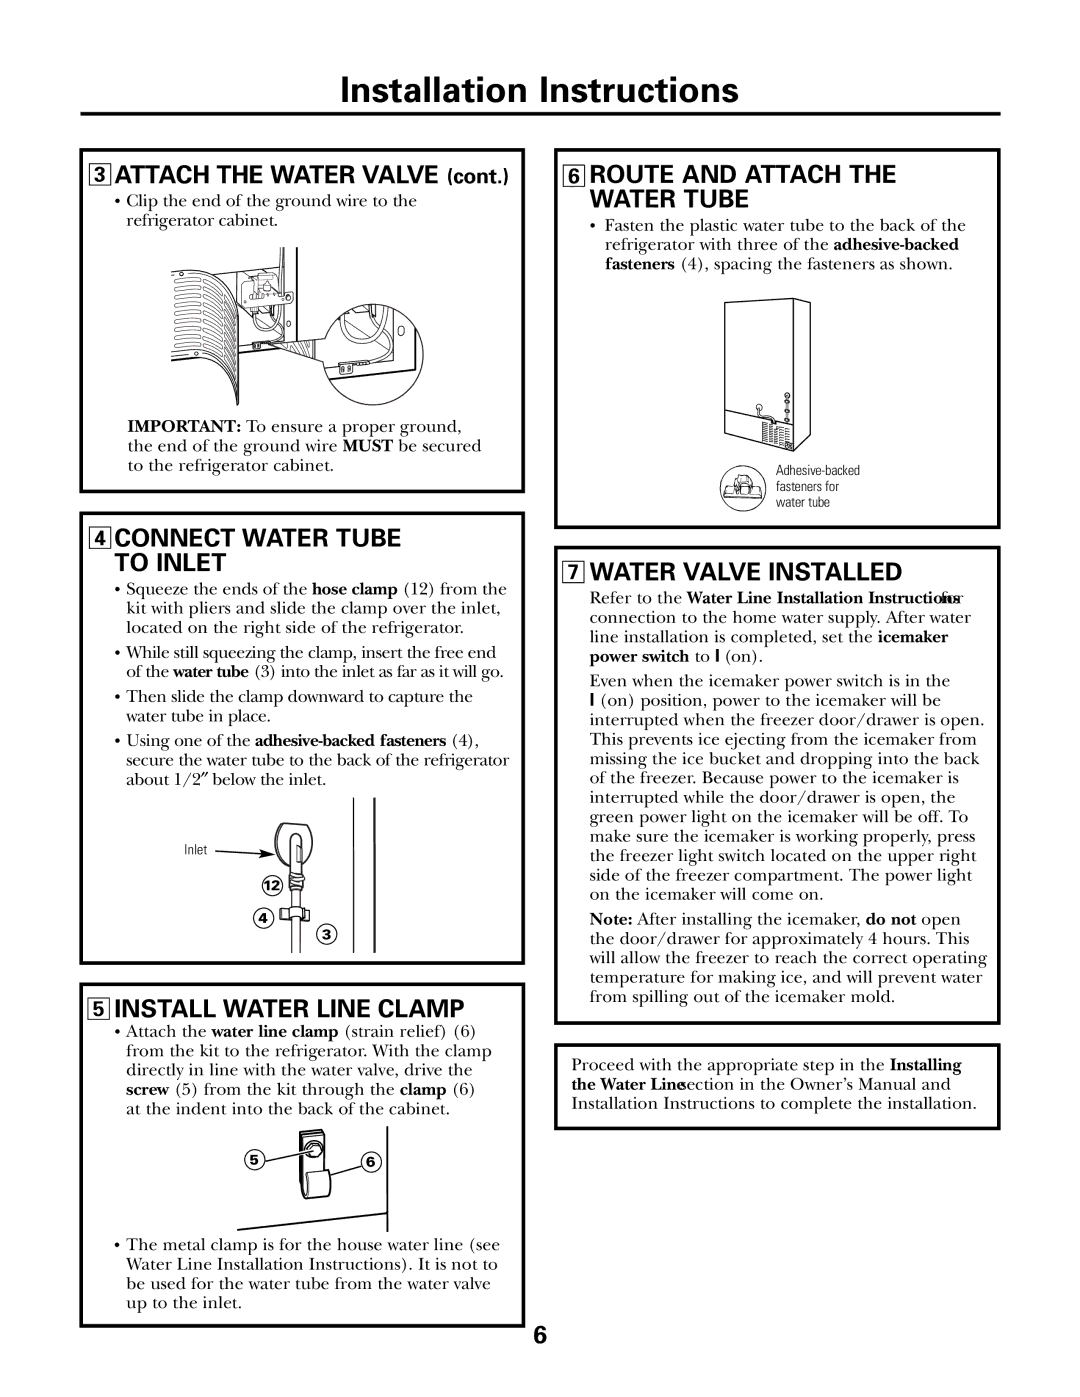
4 CONNECT WATER TUBE TO INLET

Squeeze the ends of the hose clamp (12) from the kit with pliers and slide the clamp over the inlet, located on the right side of the refrigerator.

While still squeezing the clamp, insert the free end of the water tube (3) into the inlet as far as it will go.

Then slide the clamp downward to capture the water tube in place.

Using one of the adhesive-backed fasteners (4),

secure the water tube to the back of the refrigerator about 1/2″ below the inlet.

Inlet

12

4

3

5INSTALL WATER LINE CLAMP

Attach the water line clamp (strain relief) (6) from the kit to the refrigerator. With the clamp directly in line with the water valve, drive the screw (5) from the kit through the clamp (6) at the indent into the back of the cabinet.

5

6

The metal clamp is for the house water line (see Water Line Installation Instructions). It is not to be used for the water tube from the water valve up to the inlet.

6ROUTE AND ATTACH THE WATER TUBE

Fasten the plastic water tube to the back of the refrigerator with three of the adhesive-backed fasteners (4), spacing the fasteners as shown.

Adhesive-backed

fasteners for

water tube

7WATER VALVE INSTALLED

Refer to the Water Line Installation Instructions for connection to the home water supply. After water line installation is completed, set the icemaker power switch to I (on).

Even when the icemaker power switch is in the I (on) position, power to the icemaker will be interrupted when the freezer door/drawer is open. This prevents ice ejecting from the icemaker from missing the ice bucket and dropping into the back of the freezer. Because power to the icemaker is interrupted while the door/drawer is open, the green power light on the icemaker will be off. To make sure the icemaker is working properly, press the freezer light switch located on the upper right side of the freezer compartment. The power light on the icemaker will come on.

Note: After installing the icemaker, do not open the door/drawer for approximately 4 hours. This will allow the freezer to reach the correct operating temperature for making ice, and will prevent water from spilling out of the icemaker mold.

Proceed with the appropriate step in the Installing the Water Line section in the Owner’s Manual and Installation Instructions to complete the installation.

6

Page 6
Image 6
GE GBS22HB Connect Water Tube to Inlet, Install Water Line Clamp, Route and Attach the Water Tube, Water Valve Installed

GBS22HB, GBS22KB, GBS20KB, PDS20MB, PDS22MB specifications

The GE PDS20SB, PDS22SB, PDS22MB, PDS20MB, and GBS20KB are a series of innovative side-by-side refrigerators designed to blend style, functionality, and advanced features. These models are perfect for modern kitchens where space and performance are paramount.

The PDS20SB and PDS22SB models stand out with their stainless steel finish, delivering a sleek and contemporary look. They boast a spacious interior with adjustable shelves, allowing users to customize their storage options effortlessly. Both models feature GE’s advanced cooling technologies, which ensure even temperature distribution to keep food fresh for longer periods.

One of the key technologies in these refrigerators is the Smart Cooling System. This system employs multiple air towers and vents to maintain the ideal humidity and temperature levels throughout the refrigerator and freezer compartments. This prevents temperature fluctuations and creates an optimal environment for food preservation. Additionally, the PDS models include a built-in ice maker, providing a continuous supply of ice whenever needed.

The PDS22MB and PDS20MB models cater to consumers looking for a stylish black finish. They maintain the same level of functionality as their stainless steel counterparts, with similar storage configurations and cooling technologies. These models are particularly appealing for those who prefer a matte aesthetic in their kitchen design.

The GBS20KB model offers a unique twist with its bottom freezer design. This model maximizes refrigerator space by placing frequently accessed items at eye level, while still ensuring that frozen goods are conveniently located below. The GBS20KB is equipped with adjustable baskets in the freezer to organize frozen food efficiently.

Another noteworthy feature across these models is the energy-efficient design. GE refrigerators are built with Energy Star ratings, ensuring that they consume less power without sacrificing performance. This not only saves on electricity bills but also reduces environmental impact.

Overall, the GE PDS and GBS series refrigerators combine cutting-edge technology with versatile functionality, making them an excellent choice for anyone looking to upgrade their kitchen appliance lineup. Their thoughtful design, smart cooling features, and energy efficiency make them stand out in today’s competitive market.