Manuals
/
GE
/
Kitchen Appliance
/
Ice Maker
GE
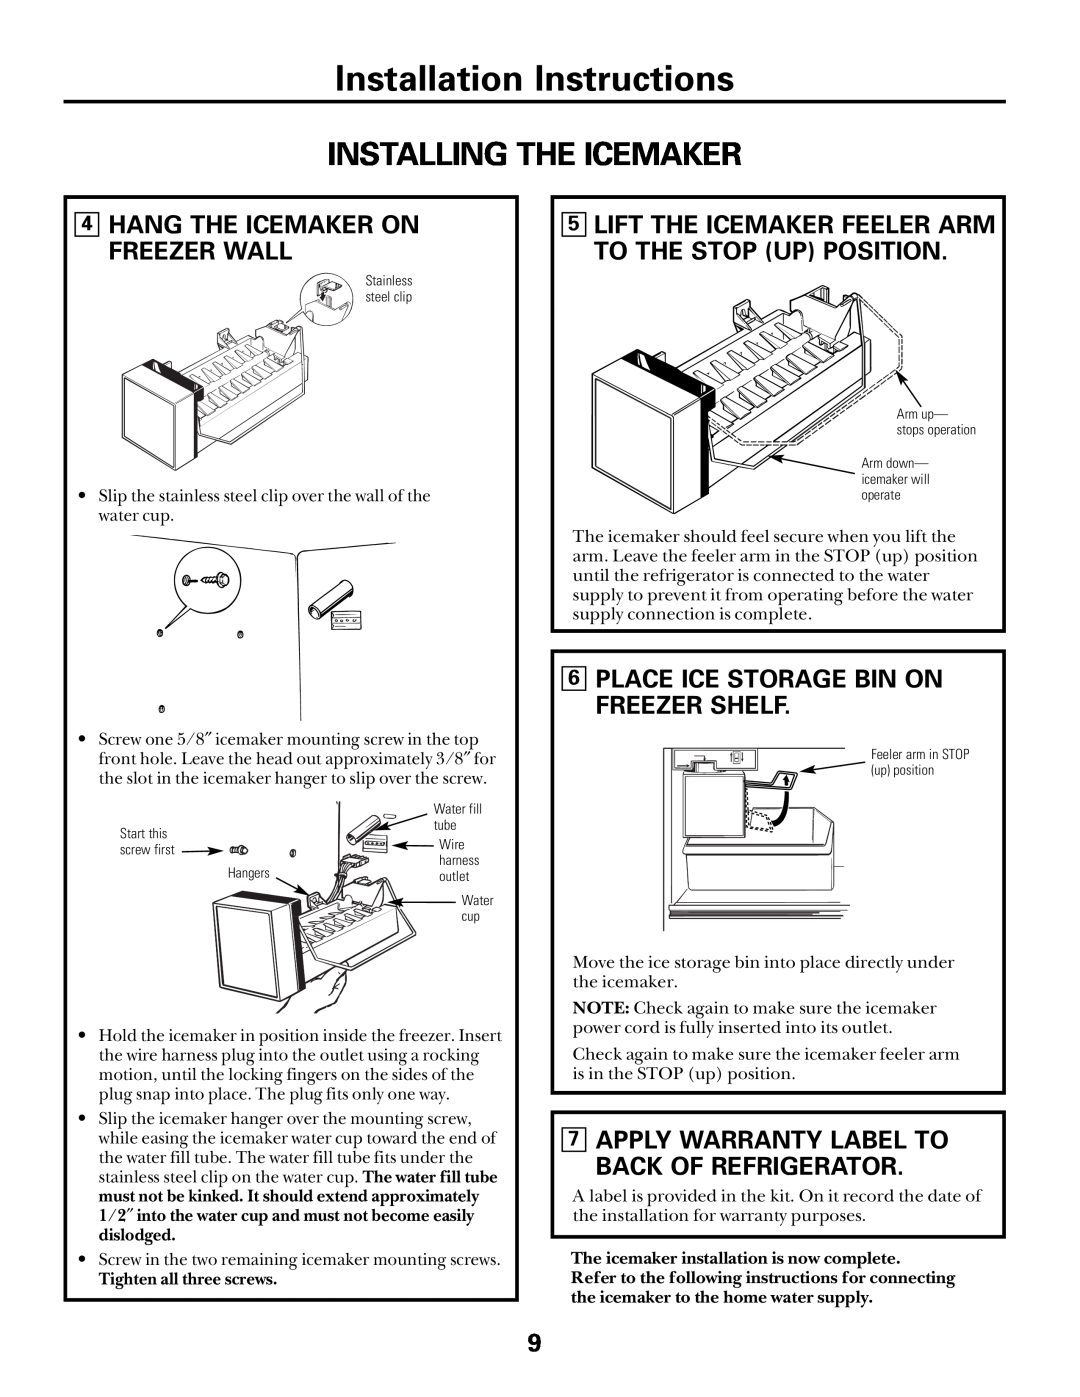
UK-KIT-3S 4HANG THE ICEMAKER ON FREEZER WALL, 6PLACE ICE STORAGE BIN ON FREEZER SHELF
Models:
UK-KIT-3S
1
9
16
16
Download
16 pages
40.05 Kb
6
7
8
9
10
11
12
13
Troubleshooting
Install
Warranty
Problem
Parts and Accessories
How to
Safety Precautions
1REMOVE THE ICE SERVICE RACK
Page 9
Image 9
Page 8
Page 10
Page 9
Image 9
Page 8
Page 10
Contents
Troubleshooting Tips
Icemaker Accessory Kit
Installation Instructions
Operating Instructions
SAFETY PRECAUTIONS
READ AND SAVE THESE INSTRUCTIONS
READ AND FOLLOW THIS SAFETY INFORMATION CAREFULLY
For Your Safety
About the automatic icemaker
How to Use Your Icemaker
How the Icemaker Works
Troubleshooting Tips
Before you call for service…
Problem
Possible Causes
or “shrink”
to icemaker on some models
Unit is leaking water
ADDITIONAL MATERIALS YOU WILL NEED
BEFORE YOU BEGIN
Installation Instructions
UK-KIT-3SIcemaker Accessory Kit
CONTENTS OF UK-KIT-3S
Installation Instructions
BEFORE YOU BEGIN
ICE MAKER
1REMOVE THE ICE SERVICE RACK
INSTALLING THE ICEMAKER
4HANG THE ICEMAKER ON FREEZER WALL
6PLACE ICE STORAGE BIN ON FREEZER SHELF
7APPLY WARRANTY LABEL TO BACK OF REFRIGERATOR
INSTALL THE WATER VALVE
WATER VALVE INSTALLATION INSTRUCTIONS
WATER LINE INSTALLATION INSTRUCTIONS
WARRANTY INFORMATION
WHAT YOU WILL NEED
TYPICAL PLUMBING INSTALLATION
WITH WATER SUPPLY KITS WX8X2, WX8X3 and WX8X4
1SHUT OFF MAIN WATER SUPPLY
6TURN ON WATER AND CHECK ALL JOINTS FOR LEAKS
5CONNECT WATER SUPPLY TUBING TO REFRIGERATOR
9MOVE THE REFRIGERATOR BACK TO THE WALL
Page
GE Will Replace
Icemaker Warranty
What GE Will Not Cover
or call 800.GE.CARES
Parts and Accessories
Schedule Service
Consumer Support
GE Appliances Website
Top
Page
Image
Contents