Manuals
/
GE Monogram
/
Kitchen Appliance
/
Refrigerator
GE Monogram
All-Refrigerators and All-Freezers Secure unit to wall, Anti-Tip Bracket Installation
Models:
All-Refrigerators and All-Freezers
1
20
28
28
Download
28 pages
49.91 Kb
17
18
19
20
21
22
23
24
Install
Door alarm
Warranty
The Problem Solver
Parts and Accessories
Adjustable
Care and Cleaning
How to
Replacement filters
Safety
Page 20
Image 20
Page 19
Page 21
Page 20
Image 20
Page 19
Page 21
Contents
07-08 JR
36 Built-In All-Refrigerators and All-Freezers
monogram.com
Contents
Before using your refrigerator/ freezer
Consumer Information
Consumer Services
If you need service
Write down the model & serial numbers
If you received a damaged refrigerator/ freezer
Save time & money
IMPORTANT SAFETY INSTRUCTIONS
READ AND SAVE THESE INSTRUCTIONS
wDANGER RISK OF CHILD ENTRAPMENT
REFRIGERANTS
LIRE ET CONSERVER CES INSTRUCTIONS
wDANGER RISQUES POUR LES ENFANTS
RÉFRIGÉRANTS
wAVERTISSEMENT
SAVE THESE INSTRUCTIONS
HOW TO CONNECT ELECTRICITY
Do not, under any circumstances
THE REFRIGERATOR/FREEZER TO A 2-PRONG OUTLET
RACCORDEMENT ÉLECTRIQUE
CONSERVEZ CES DIRECTIVES
N’UTILISEZ PAS UNE FICHE D’ADAPTATION POUR RACCORDER
LE RÉFRIGÉRATEUR/CONGÉLATEUR DANS UNE PRISE MURALE À 2 ALVÉOLES
Door alarm
Temperature Controls
Temperature
controls
Accessing the icemaker and ice storage bin
Automatic Icemaker freezer models
freezer models
Automatic icemaker
Water Filter/Storage Drawers
Water filter cartridge
Refrigerator- Sealed snack pans
Installing the Filter Cartridge
Adjustable
Shelves
Storage
drawers
Shelves/Sabbath Mode
ZSAB1 Sabbath Mode Product Kit
Removable wine rack
Door shelves
Care and Cleaning
Cleaning outside
Cleaning inside
To help prevent odors, leave
Using the master light switch
Light bulb replacement
Preparing for vacation
For upper and lower light bulb replacement, call for service
Preparation
Refrigerator/ freezer location
Clearances
Anti-tip bracket
Anti-tip bracket installation
Anti-Tip Bracket Installation
Install Screws and Bolts
cont
Install Wall Toggles
Remove Grilles for Access to Power Cord and Anti-tip Locking Hooks
Power Cord
Fresh Food Unit
Freezer Unit
PRUDENCE
Level unit
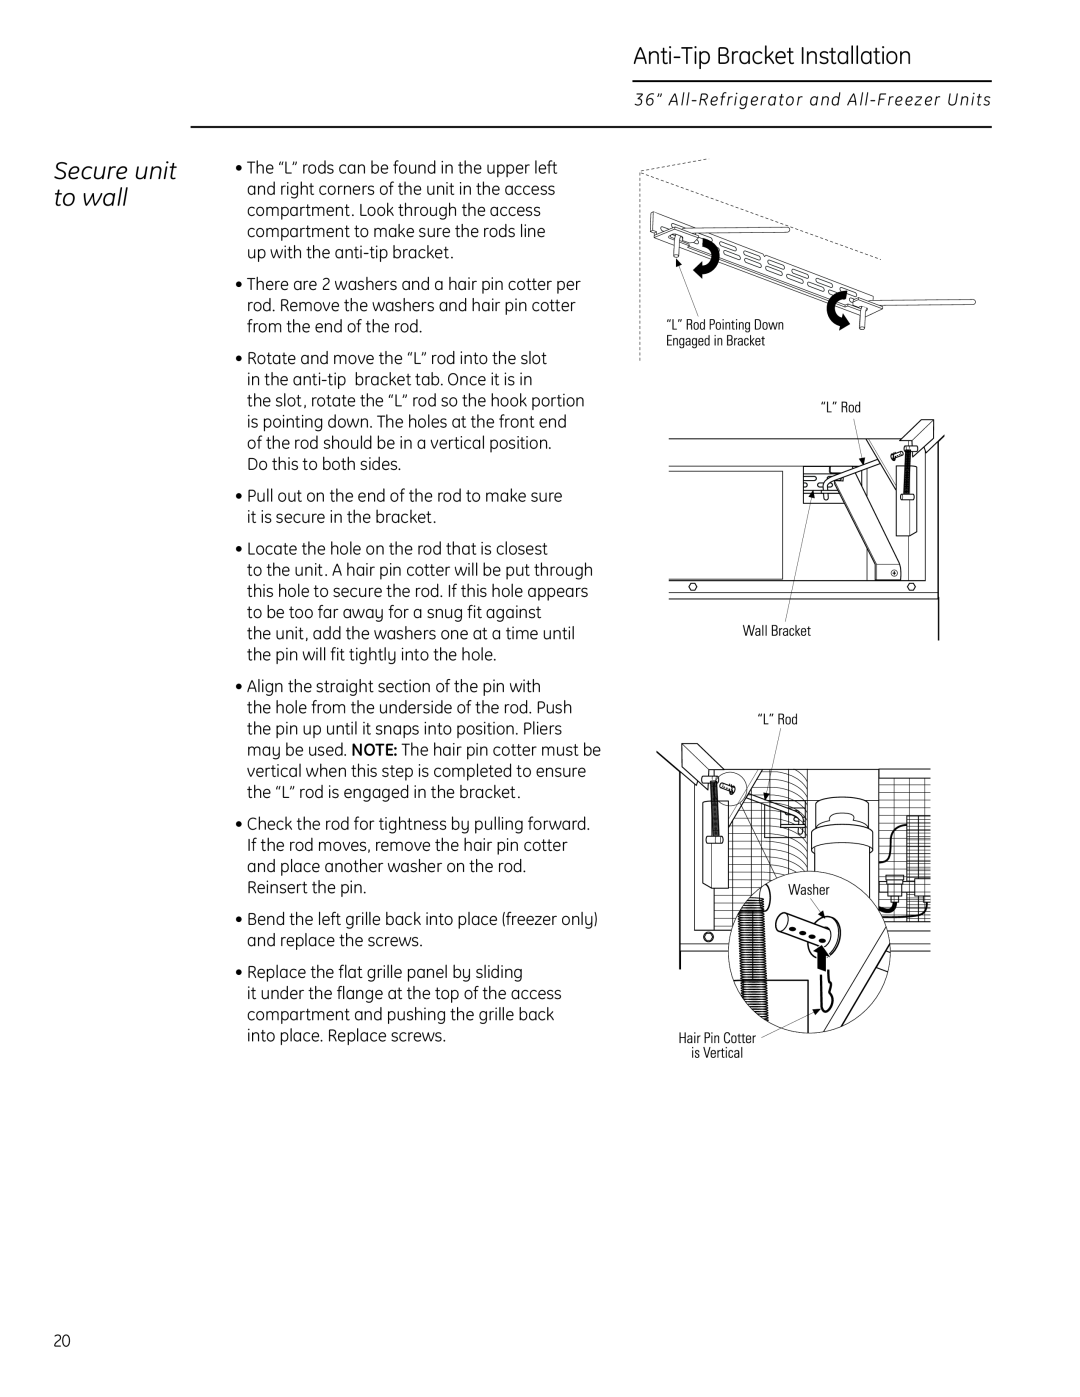
Secure unit to wall
The Problem Solver
Questions? Use this problem solver
REFRIGERATOR/FREEZER
The Sabbath Mode Kit may be installed and operating. Turn off Sabbath
ACTUAL TEMPERATURE
36” All-Refrigerator and All-Freezer Units
36” All-Refrigerator and All-Freezer Units
36” All-Refrigerator and All-Freezer Units
Department of Health Services
Certificate Number
Water Treatment Device
State of California
Consumer Services
Service
Service Contracts
Parts and Accessories
Warranty
From the Date of the Original Purchase
WHAT IS COVERED
WHAT IS NOT COVERED
Top
Page
Image
Contents