Installation
Dual Burner Outdoor Cooktop
Step3
Provide
Gas
Supply
LP GAS MODELS
Go to Step 3A
For Natural
Gas Model
Connections
![]() WARNING PRODUCT STORAGE When storing the LP burner indoors, disconnect the LP tank. Store the tank outdoors in a well ventilated area.
WARNING PRODUCT STORAGE When storing the LP burner indoors, disconnect the LP tank. Store the tank outdoors in a well ventilated area.
Do not store spare LP tanks near or below the burner installation.
For installation with a 27" LP gas grill that does not feature the new Quick Disconnect coupling.
•Completely close the main valve on the LP tank supplying the grill.
•Apply joint compound to the threaded end of the cooktop gas inlet.
•Tighten the 1/2" NPT x 3/8" flare fitting to the cooktop gas outlet. Do not use threading compound on the male threads.
•Attach hose to end of fitting and tighten.
•Route the hose through the hole with protective bushing on the side of the grill cart.
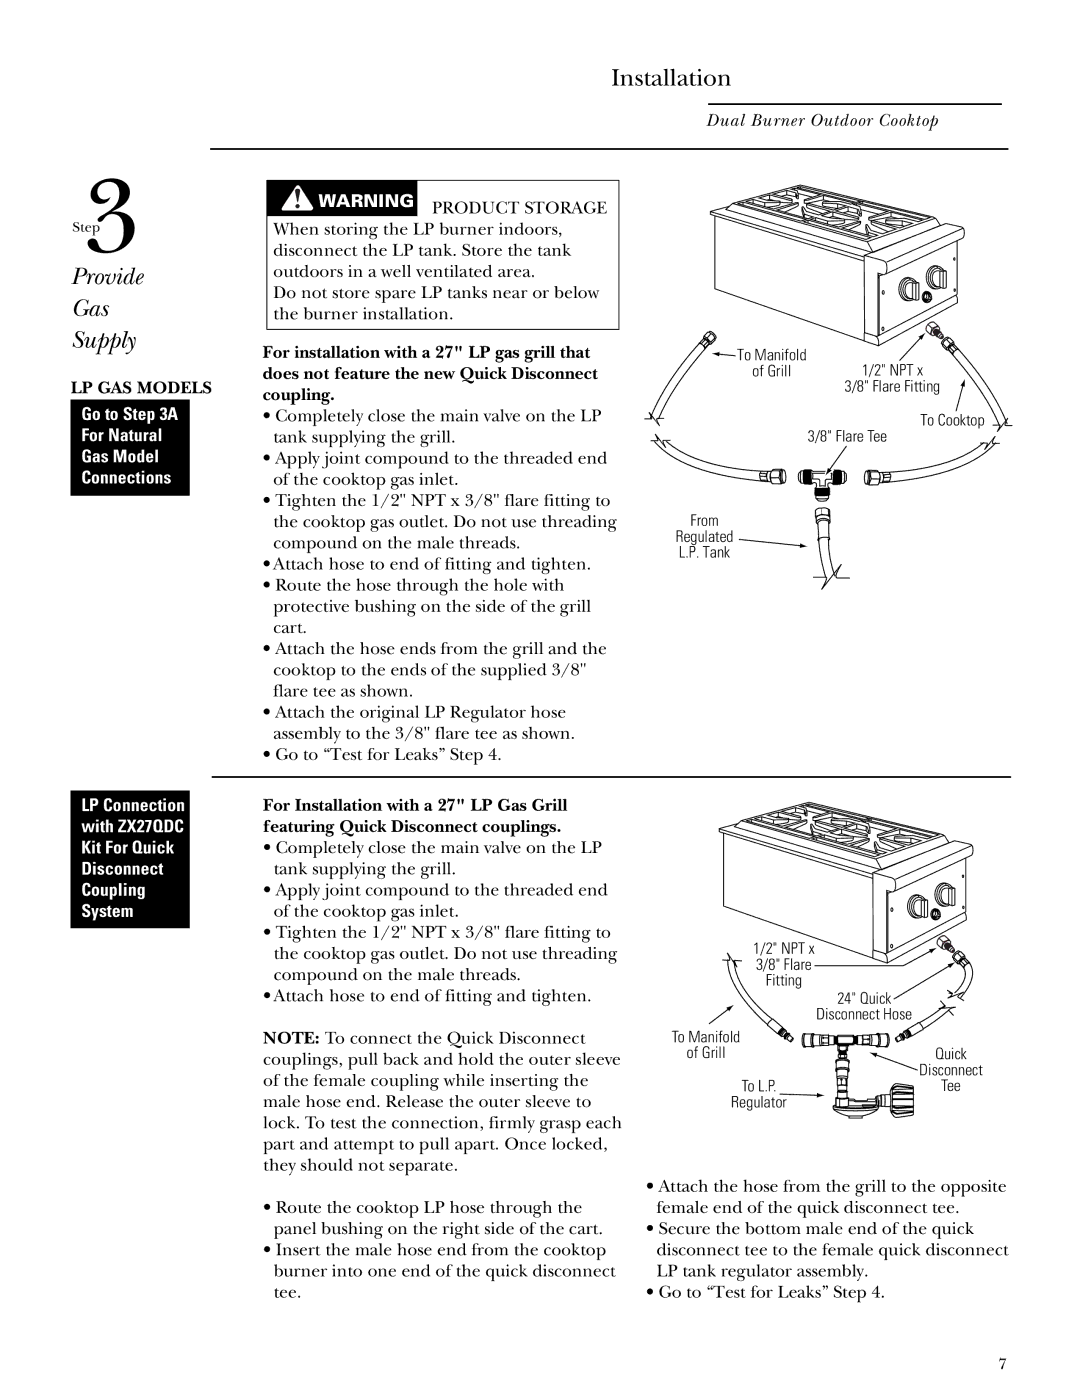
•Attach the hose ends from the grill and the cooktop to the ends of the supplied 3/8" flare tee as shown.
•Attach the original LP Regulator hose assembly to the 3/8" flare tee as shown.
•Go to “Test for Leaks” Step 4.
![]() To Manifold
To Manifold
of Grill1/2" NPT x
3/8" Flare Fitting
To Cooktop
3/8" Flare Tee
From
Regulated
L.P. Tank
LP Connection with ZX27QDC Kit For Quick Disconnect Coupling System
For Installation with a 27" LP Gas Grill featuring Quick Disconnect couplings.
•Completely close the main valve on the LP tank supplying the grill.
•Apply joint compound to the threaded end of the cooktop gas inlet.
•Tighten the 1/2" NPT x 3/8" flare fitting to the cooktop gas outlet. Do not use threading compound on the male threads.
•Attach hose to end of fitting and tighten.
NOTE: To connect the Quick Disconnect couplings, pull back and hold the outer sleeve of the female coupling while inserting the male hose end. Release the outer sleeve to lock. To test the connection, firmly grasp each part and attempt to pull apart. Once locked, they should not separate.
1/2" NPT x |
|
3/8" Flare |
|
Fitting | 24" Quick |
| |
| Disconnect Hose |
To Manifold |
|
of Grill | Quick |
| Disconnect |
To L.P. | Tee |
Regulator |
|
| • Attach the hose from the grill to the opposite |
• Route the cooktop LP hose through the | female end of the quick disconnect tee. |
panel bushing on the right side of the cart. | • Secure the bottom male end of the quick |
• Insert the male hose end from the cooktop | disconnect tee to the female quick disconnect |
burner into one end of the quick disconnect | LP tank regulator assembly. |
tee. | • Go to “Test for Leaks” Step 4. |
7
