Introduction
Thank you for choosing Geemarc’s Clearview Cordless Caller Display.
Please read the instructions carefully before use and keep this User Guide for future reference.
The Clearview stores up to 60 names and numbers in its call list. The display is extra large, allowing you to read it from across the room, without the need to walk to the display.
Also it serves as a jumbo LCD clock, which never has to be set, since it is set automatically by the caller ID information.
The Clearview can also hold a directory of 50 names and numbers. If an incoming number matches a record, the assigned name (such as FATHER, OFFICE, etc) will be mapped and shown on the display. You can build up your own directory.
The Clearview can cover a range of up to 20 metres from the base in a typical household environment.
Note - Consult your PABX supervisor before fitting this product to a PABX facility.
Caller Display service
Your Clearview Cordless Caller Display receives and displays caller information, which is transmitted over the BT network or other network providers. The information will include the date and time the call is received. And in most cases the caller’s phone number.
Note - To enable your Clearview Cordless Caller Display to display information transmitted via BT or other UK network providers you will first have to subscribe to that networks Caller Display Service. Please contact your network service provider to arrange this service.
Installation
Position your Clearview Cordless Caller ID Base Unit within 2 metres of a telephone socket.
Do not stand your Clearview Cordless Caller ID display or Base Unit on carpets or other similar surfaces which might generate fibres. Do not expose the units to high temperatures by siting near radiators etc. Keep the units dry and do not operate in
outdoor conditions.
Do not cover or enclose the machine. Allow a free flow of air to its surfaces.
NOTE: We advise that the units be placed on a table cloth or similar, as rubber feet can mark some surfaces.
Connect the adaptor to the base unit
Plug the adaptor into the mains socket and connect the small plug into the 9vAC/DC socket at the rear of the Clearview base unit. Switch on the supply.
NOTE: Do not attempt to use or replace the mains adaptor supplied with this product other than a Geemarc AC/DC adaptor type 09200DG.
Connect the line cord
Connect the small plug on the line cord into the Line Cord In socket. Connect other end of line cord into the telephone socket. To connect a telephone to your Clearview Cordless Caller Display base unit, plug the telephone line cord into the spare socket of the doubler at the end of the Clearview line cord. Should you not have a modular telephone socket as shown, please contact your local British Telecom or other Network Operator.
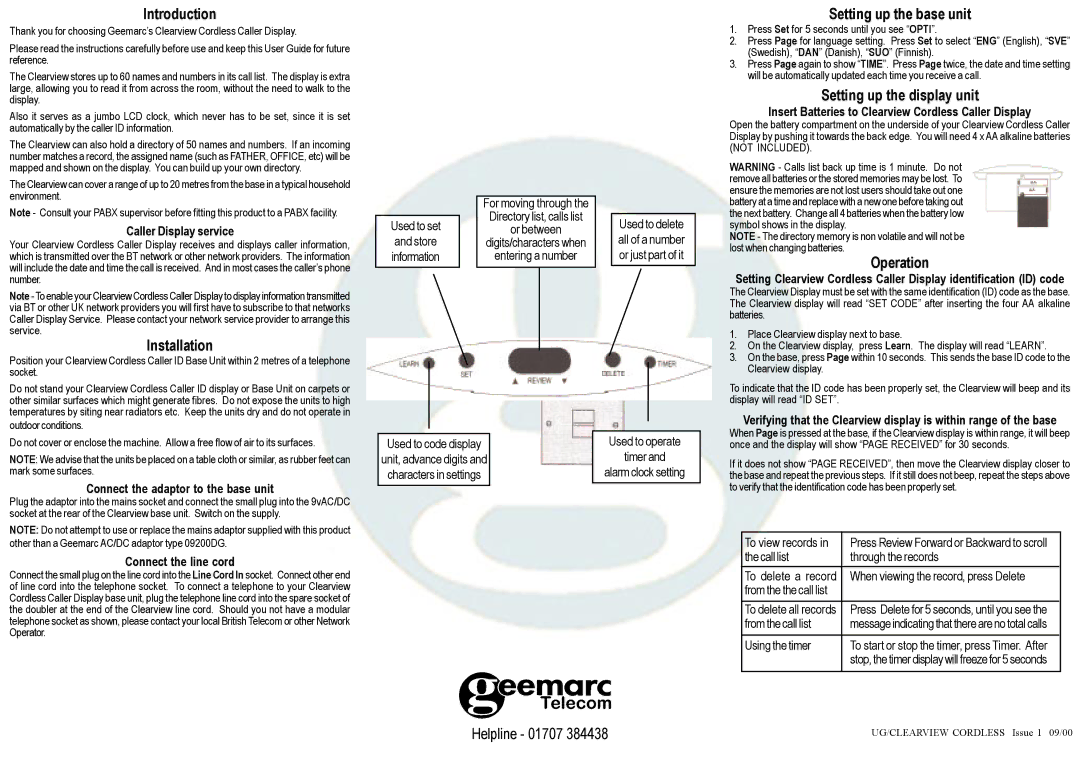
|
| For moving through the |
|
|
|
| Directory list, calls list |
|
|
Used to set |
|
| Used to delete | |
| or between |
| ||
and store |
| digits/characters when |
| all of a number |
information |
| entering a number |
| or just part of it |
|
| Used to operate |
Used to code display |
| |
unit, advance digits and |
| timer and |
characters in settings |
| alarm clock setting |
|
|
|
Setting up the base unit
1.Press Set for 5 seconds until you see “OPTI”.
2.Press Page for language setting. Press Set to select “ENG” (English), “SVE” (Swedish), “DAN” (Danish), “SUO” (Finnish).
3.Press Page again to show “TIME”. Press Page twice, the date and time setting will be automatically updated each time you receive a call.
Setting up the display unit
Insert Batteries to Clearview Cordless Caller Display
Open the battery compartment on the underside of your Clearview Cordless Caller Display by pushing it towards the back edge. You will need 4 x AA alkaline batteries (NOT INCLUDED).
WARNING - Calls list back up time is 1 minute. Do not remove all batteries or the stored memories may be lost. To ensure the memories are not lost users should take out one battery at a time and replace with a new one before taking out the next battery. Change all 4 batteries when the battery low symbol shows in the display.
NOTE - The directory memory is non volatile and will not be lost when changing batteries.
Operation
Setting Clearview Cordless Caller Display identification (ID) code
The Clearview Display must be set with the same identification (ID) code as the base. The Clearview display will read “SET CODE” after inserting the four AA alkaline batteries.
1.Place Clearview display next to base.
2.On the Clearview display, press Learn. The display will read “LEARN”.
3.On the base, press Page within 10 seconds. This sends the base ID code to the Clearview display.
To indicate that the ID code has been properly set, the Clearview will beep and its display will read “ID SET”.
Verifying that the Clearview display is within range of the base
When Page is pressed at the base, if the Clearview display is within range, it will beep once and the display will show “PAGE RECEIVED” for 30 seconds.
If it does not show “PAGE RECEIVED”, then move the Clearview display closer to the base and repeat the previous steps. If it still does not beep, repeat the steps above to verify that the identification code has been properly set.
To view records in | Press Review Forward or Backward to scroll | |
the call list | through the records | |
To delete a record | When viewing the record, press Delete |
|
from the the call list |
|
|
To delete all records | Press Delete for 5 seconds, until you see the |
|
from the call list | message indicating that there are no total calls |
|
Using the timer | To start or stop the timer, press Timer. After | |
| stop, the timer display will freeze for 5 seconds | |
Helpline - 01707 384438
UG/CLEARVIEW CORDLESS Issue 1 09/00