Introduction
Congratulations on purchasing a Gemini wireless system. This state of the art unit includes the latest features backed by a three year limited warranty. Prior to use, we suggest that you carefully read all the instructions.
Cautions
1.All operating instructions should be read before using this equipment.
2.To reduce the risk of electrical shock, do not open the unit. There are NO USER REPLACEABLE PARTS INSIDE. Please refer servicing to a qualified service technician.
3.Do not expose this unit to direct sunlight or to a heat source such as a radiator or stove.
4.Dust, dirt and debris can interfere with the performance of this unit. Make an effort to keep the unit away from dusty, dirty environments, and cover the unit when it is not in use. Dust it regularly with a soft, clean brush.
5.When moving this equipment, it should be placed in its original carton and packaging. This will reduce the risk of damage during transit.
6.DO NOT EXPOSE THIS UNIT TO RAIN OR MOISTURE.
7.DO NOT USE ANY SPRAY CLEANER OR LUBRICANT ON ANY CONTROLS OR SWITCHES.
FCC Rules and Regulations
Gemini wireless systems are the type accepted under FCC rules parts 74 and 15. Licensing of Gemini equipment is the user’s responsibility and licensability depends on the user’s classification and application.
UX-1610 Wireless System
The
The systems available all operate on a UHF high band frequency between 790.375 MHZ to 805.875 MHZ.
The systems available are:
Receiver Operation
1.Remove all packing materials. Save the box and packing material to transport the unit in the unlikely event that the unit requires service.
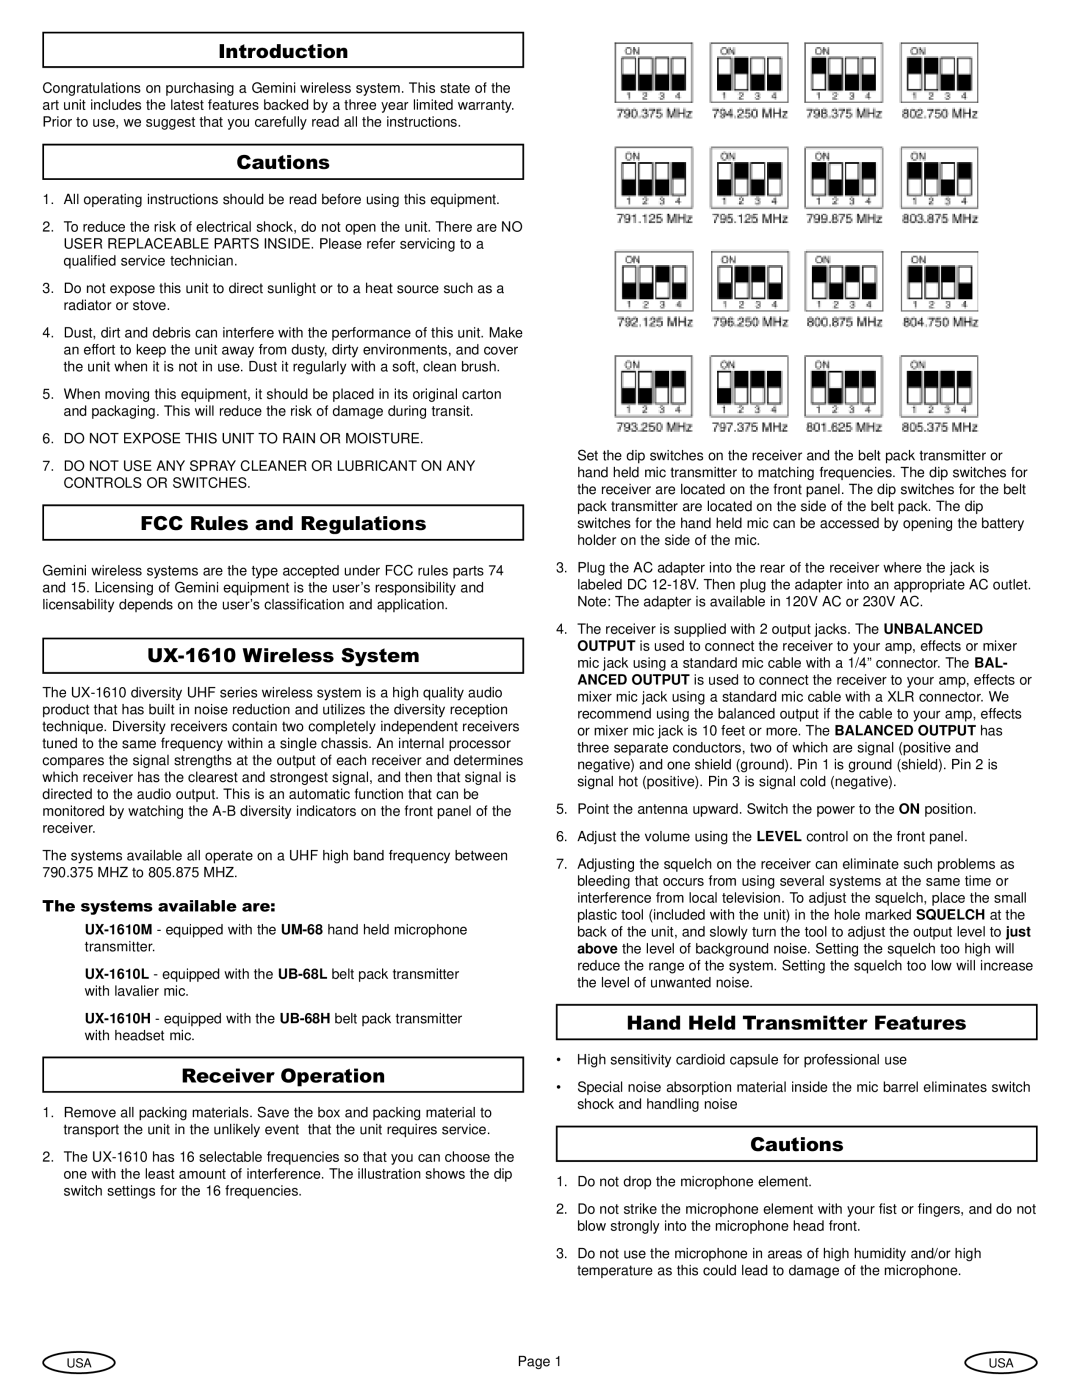
2.The
Set the dip switches on the receiver and the belt pack transmitter or hand held mic transmitter to matching frequencies. The dip switches for the receiver are located on the front panel. The dip switches for the belt pack transmitter are located on the side of the belt pack. The dip switches for the hand held mic can be accessed by opening the battery holder on the side of the mic.
3.Plug the AC adapter into the rear of the receiver where the jack is labeled DC
4.The receiver is supplied with 2 output jacks. The UNBALANCED OUTPUT is used to connect the receiver to your amp, effects or mixer mic jack using a standard mic cable with a 1/4” connector. The BAL- ANCED OUTPUT is used to connect the receiver to your amp, effects or mixer mic jack using a standard mic cable with a XLR connector. We recommend using the balanced output if the cable to your amp, effects or mixer mic jack is 10 feet or more. The BALANCED OUTPUT has three separate conductors, two of which are signal (positive and negative) and one shield (ground). Pin 1 is ground (shield). Pin 2 is signal hot (positive). Pin 3 is signal cold (negative).
5.Point the antenna upward. Switch the power to the ON position.
6.Adjust the volume using the LEVEL control on the front panel.
7.Adjusting the squelch on the receiver can eliminate such problems as bleeding that occurs from using several systems at the same time or interference from local television. To adjust the squelch, place the small plastic tool (included with the unit) in the hole marked SQUELCH at the back of the unit, and slowly turn the tool to adjust the output level to just above the level of background noise. Setting the squelch too high will reduce the range of the system. Setting the squelch too low will increase the level of unwanted noise.
Hand Held Transmitter Features
•High sensitivity cardioid capsule for professional use
•Special noise absorption material inside the mic barrel eliminates switch shock and handling noise
Cautions
1.Do not drop the microphone element.
2.Do not strike the microphone element with your fist or fingers, and do not blow strongly into the microphone head front.
3.Do not use the microphone in areas of high humidity and/or high temperature as this could lead to damage of the microphone.
USA | Page 1 | USA |