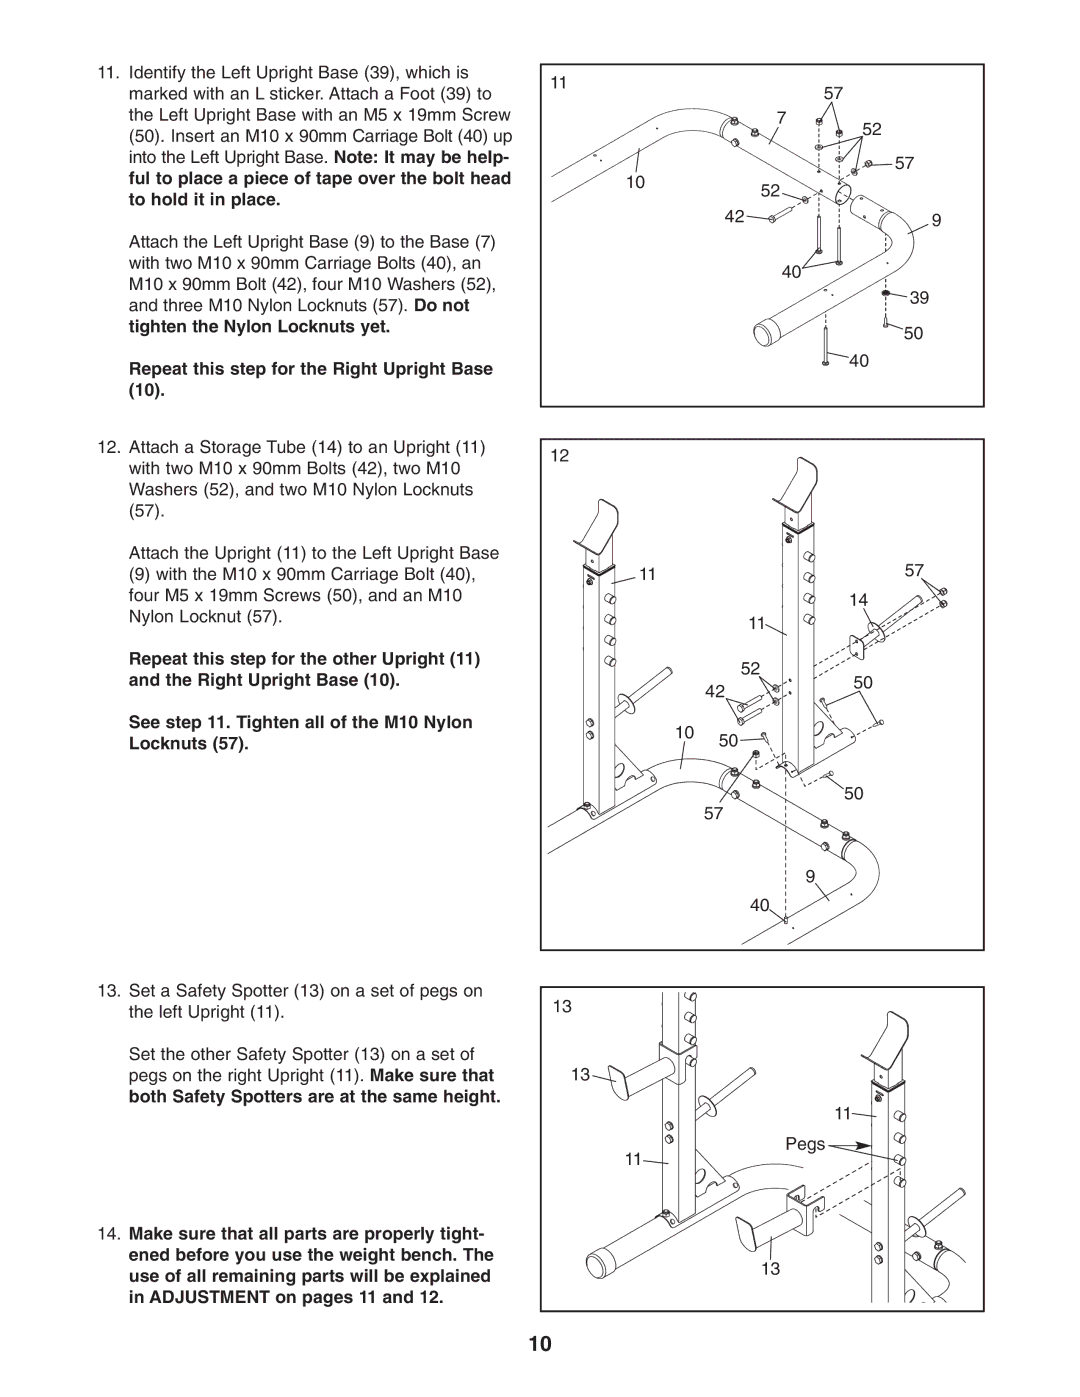
11. | Identify the Left Upright Base (39), which is | 11 |
|
|
|
|
|
| marked with an L sticker. Attach a Foot (39) to |
|
|
| 57 |
| |
|
|
|
|
|
| ||
| the Left Upright Base with an M5 x 19mm Screw |
|
|
|
| 7 |
|
| (50). Insert an M10 x 90mm Carriage Bolt (40) up |
|
|
|
| 52 |
|
|
|
|
|
|
|
| |
| into the Left Upright Base. Note: It may be help- |
|
|
|
|
| 57 |
| ful to place a piece of tape over the bolt head |
| 10 |
|
|
| |
|
|
|
| 52 |
| ||
| to hold it in place. |
|
|
|
|
| |
|
|
|
|
| 42 |
| |
|
|
|
|
|
| 9 | |
| Attach the Left Upright Base (9) to the Base (7) |
|
|
|
|
|
|
| with two M10 x 90mm Carriage Bolts (40), an |
|
|
|
| 40 |
|
| M10 x 90mm Bolt (42), four M10 Washers (52), |
|
|
|
|
| |
|
|
|
|
|
| 39 | |
| and three M10 Nylon Locknuts (57). Do not |
|
|
|
|
| |
|
|
|
|
|
|
| |
| tighten the Nylon Locknuts yet. |
|
|
|
|
| 50 |
|
|
|
|
|
|
| |
| Repeat this step for the Right Upright Base |
|
|
|
| 40 |
|
|
|
|
|
|
|
| |
| (10). |
|
|
|
|
|
|
12. | Attach a Storage Tube (14) to an Upright (11) | 12 |
|
|
|
|
|
| with two M10 x 90mm Bolts (42), two M10 |
|
|
|
|
| |
|
|
|
|
|
|
| |
| Washers (52), and two M10 Nylon Locknuts |
|
|
|
|
|
|
| (57). |
|
|
|
|
|
|
| Attach the Upright (11) to the Left Upright Base |
|
|
|
|
| 57 |
| (9) with the M10 x 90mm Carriage Bolt (40), |
| 11 |
|
|
| |
| four M5 x 19mm Screws (50), and an M10 |
|
|
|
| 14 |
|
| Nylon Locknut (57). |
|
|
|
| 11 |
|
|
|
|
|
|
|
| |
| Repeat this step for the other Upright (11) |
|
|
|
| 52 |
|
| and the Right Upright Base (10). |
|
|
|
|
| |
|
|
|
| 42 | 50 |
| |
|
|
|
|
|
|
| |
| See step 11. Tighten all of the M10 Nylon |
|
| 10 | 50 |
| |
| Locknuts (57). |
|
|
| |||
|
|
|
|
| |||
|
|
|
|
| 57 | 50 |
|
|
|
|
|
|
|
| |
|
|
|
|
|
| 9 |
|
|
|
|
|
|
| 40 |
|
13. | Set a Safety Spotter (13) on a set of pegs on | 13 |
|
|
|
|
|
| the left Upright (11). |
|
|
|
|
| |
|
|
|
|
|
|
| |
| Set the other Safety Spotter (13) on a set of |
|
|
|
|
|
|
| pegs on the right Upright (11). Make sure that | 13 |
|
|
|
|
|
| both Safety Spotters are at the same height. |
|
|
|
| 11 |
|
|
|
|
|
|
|
| |
|
|
| 11 |
|
| Pegs |
|
|
|
|
|
|
|
| |
14. | Make sure that all parts are properly tight- |
|
|
|
|
|
|
| ened before you use the weight bench. The |
|
|
|
| 13 |
|
| use of all remaining parts will be explained |
|
|
|
|
| |
|
|
|
|
|
|
| |
| in ADJUSTMENT on pages 11 and 12. |
|
|
|
|
|
|
|
| 10 |
|
|
|
|
|
