VCR Operation Setup (Continued)

Setting the Clock

The DVD+VCR gives you two ways to set the time and date: 1) Auto Clock Set, or 2) Manual Clock Set. The Auto Clock Set feature enables the DVD+VCR to set the clock while the DVD+VCR is turned off.

ote

There are cases where the TV station does not send or sends wrong date and/or time information and the DVD+VCR sets the incorrect time.

If this happens we recommend that you set the clock manually.

Things to know before starting

The clock uses the 12-hour system. Be sure to set AM and PM cor- rectly (AM does not appear on the front panel display). The initial Clock Setting is JANUARY 1, 2003, 12:00 AM.

Auto Clock Set

The Auto Clock Set feature is set to ON at the factory. In the ON setting, the DVD+VCR searches for a channel carrying XDS (Extended Data Services) information.

The Auto Clock feature enables the DVD+VCR to set the clock while the DVD+VCR is turned off.

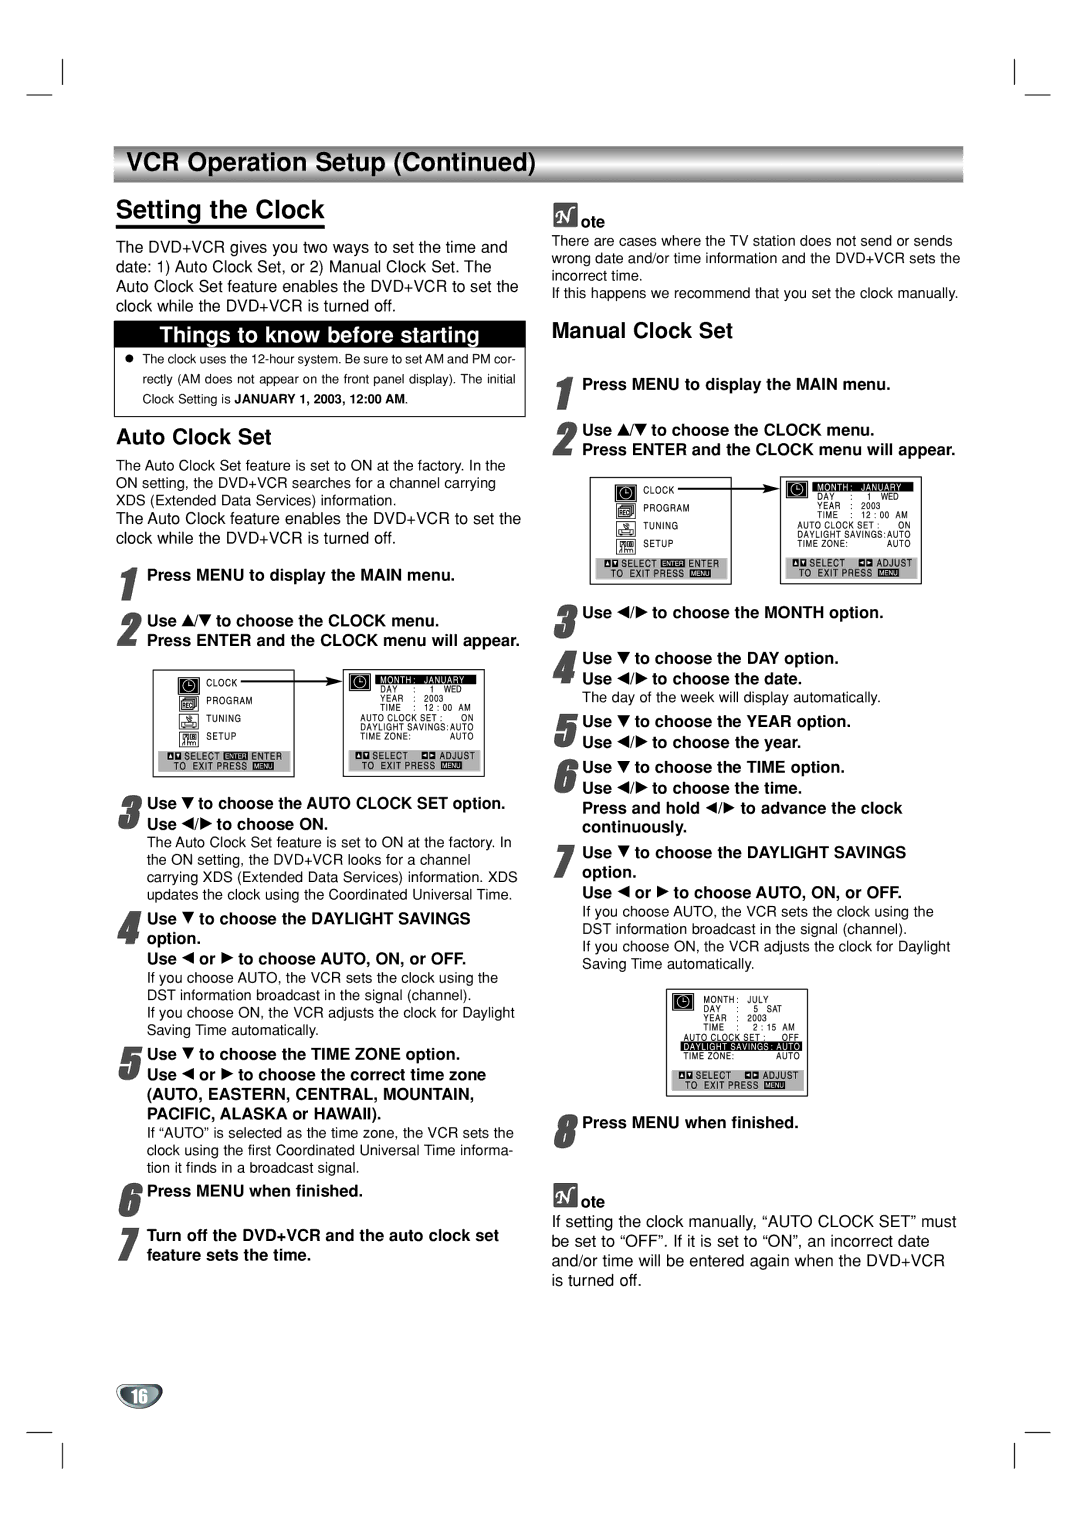
1Press MENU to display the MAIN menu.

2Press ENTER and the CLOCK menu will appear.Use v/V to choose the CLOCK menu.

Manual Clock Set

1Press MENU to display the MAIN menu.

2Press ENTER and the CLOCK menu will appear.Use v/V to choose the CLOCK menu.

3Use b/B to choose the MONTH option.

4Use b/B to choose the date.

The day of the week will display automatically.Use V to choose the DAY option.

3Use b/B to choose ON.

The Auto Clock Set feature is set to ON at the factory. In the ON setting, the DVD+VCR looks for a channel

carrying XDS (Extended Data Services) information. XDS updates the clock using the Coordinated Universal Time.Use V to choose the AUTO CLOCK SET option.

4option.

Use F or G to choose AUTO, ON, or OFF.

If you choose AUTO, the VCR sets the clock using the DST information broadcast in the signal (channel).

If you choose ON, the VCR adjusts the clock for Daylight

Saving Time automatically.Use E to choose the DAYLIGHT SAVINGS

5Use F or G to choose the correct time zone

(AUTO, EASTERN, CENTRAL, MOUNTAIN, PACIFIC, ALASKA or HAWAII).

If “AUTO” is selected as the time zone, the VCR sets the

clock using the first Coordinated Universal Time informa- tion it finds in a broadcast signal.Use E to choose the TIME ZONE option.

6Press MENU when finished.

7 Turn off the DVD+VCR and the auto clock set feature sets the time.

5 Use V to choose the YEAR option. Use b/B to choose the year.

6Use b/B to choose the time.

Press and hold b/B to advance the clock continuously.Use V to choose the TIME option.

7option.

Use F or G to choose AUTO, ON, or OFF.

If you choose AUTO, the VCR sets the clock using the DST information broadcast in the signal (channel).

If you choose ON, the VCR adjusts the clock for Daylight

Saving Time automatically.Use E to choose the DAYLIGHT SAVINGS

8Press MENU when finished.

ote

If setting the clock manually, “AUTO CLOCK SET” must be set to “OFF”. If it is set to “ON”, an incorrect date and/or time will be entered again when the DVD+VCR is turned off.

16

Page 16
Image 16
GoVideo DVR1000 manual VCR Operation Setup Setting the Clock, Auto Clock Set, Manual Clock Set

DVR1000 specifications

The GoVideo DVR1000 is a highly versatile digital video recorder that has revolutionized the way users capture and manage their media. This innovative device is designed to meet the needs of both casual users and serious videographers, thanks to its advanced features and intuitive interface.

One of the standout features of the DVR1000 is its high-definition recording capability. With the ability to capture video at resolutions up to 1080p, users can enjoy sharp and clear playback, making it perfect for recording home videos, live events, or capturing favorite television shows. The DVR1000 also supports various video formats, allowing for seamless playback on multiple devices.

Another significant technological advancement in the GoVideo DVR1000 is its built-in hard drive. With substantial storage capacity, users can record and save hundreds of hours of footage without the need for additional storage devices. This convenience eliminates the worry of running out of space during critical moments, enhancing the overall user experience.

The DVR1000 is equipped with a user-friendly interface that simplifies navigation through its extensive features. The remote control is designed for ease of use, allowing users to quickly access settings, playback options, and recording functions with minimal effort. This seamless integration of technology and design makes it an attractive option for users of all experience levels.

Additionally, the GoVideo DVR1000 features pause, rewind, and fast-forward capabilities, empowering users to take control of their viewing experience. The Time Shift function allows users to pause live television and resume watching later, ensuring they never miss a moment when life gets busy.

Compatibility is vital, and the DVR1000 does not disappoint. The device can connect to various external devices via USB and composite inputs, making it easy to transfer video files or connect with cameras and gaming systems. This versatility allows users to harness the full potential of their media.

In summary, the GoVideo DVR1000 is a cutting-edge digital video recorder that combines high-definition recording, extensive storage capabilities, and a user-friendly interface. Its compatibility with various devices and advanced features like Time Shift ensure that whether you're recording important events or enjoying your favorite shows, the DVR1000 is equipped to handle all your media needs effortlessly. Whether for personal or professional use, the GoVideo DVR1000 is sure to impress.