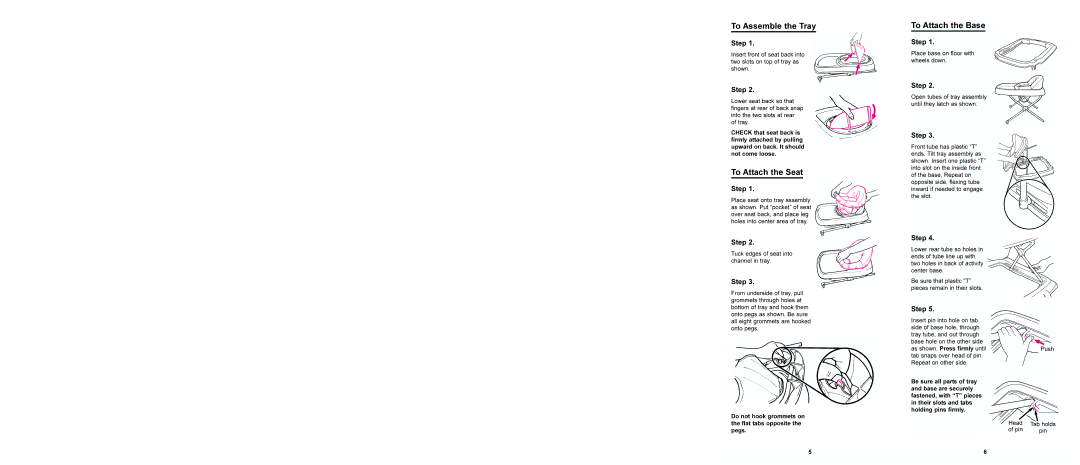
To Assemble the Tray
Step 1.
Insert front of seat back into two slots on top of tray as shown.
Step 2.
Lower seat back so that fingers at rear of back snap into the two slots at rear of tray.
CHECK that seat back is firmly attached by pulling upward on back. It should not come loose.
To Attach the Seat
Step 1.
Place seat onto tray assembly as shown. Put “pocket” of seat over seat back, and place leg holes into center area of tray.
Step 2.
Tuck edges of seat into channel in tray.
Step 3.
From underside of tray, pull grommets through holes at bottom of tray and hook them onto pegs as shown. Be sure all eight grommets are hooked onto pegs.
Do not hook grommets on the flat tabs opposite the pegs.
To Attach the Base
Step 1.
Place base on floor with wheels down.
Step 2.
Open tubes of tray assembly until they latch as shown.
Step 3.
Front tube has plastic “T” ends. Tilt tray assembly as shown. Insert one plastic “T” into slot on the inside front of the base. Repeat on opposite side, flexing tube inward if needed to engage the slot.
Step 4.
Lower rear tube so holes in ends of tube line up with two holes in back of activity center base.
Be sure that plastic “T” pieces remain in their slots.
Step 5.
Insert pin into hole on tab side of base hole, through tray tube, and out through base hole on the other side as shown. Press firmly until tab snaps over head of pin. Repeat on other side.
Be sure all parts of tray and base are securely fastened, with “T” pieces in their slots and tabs holding pins firmly.
![]() Push
Push
Head | Tab holds |
of pin | pin |
|
|
5 | 6 |
|
|
