Cutaway View

Air Motor and Throat Service


15

31

13


15


M 23


22*


25


21*


16


32*


17*

Turn


12

lock-

L


wires


up.


32*

27

28

14

26*

21*

04422


Fig. 4


Cut off tops


of poppets as


indicated by

31

13

dotted lines.

14


26*


32*


21*


17*


21*


19*


0.125”


(3.18 mm)


32*


27

Cutaway View

05612


Reassembly

1.Place the piston rod (29) flats in the vice with the air motor up.

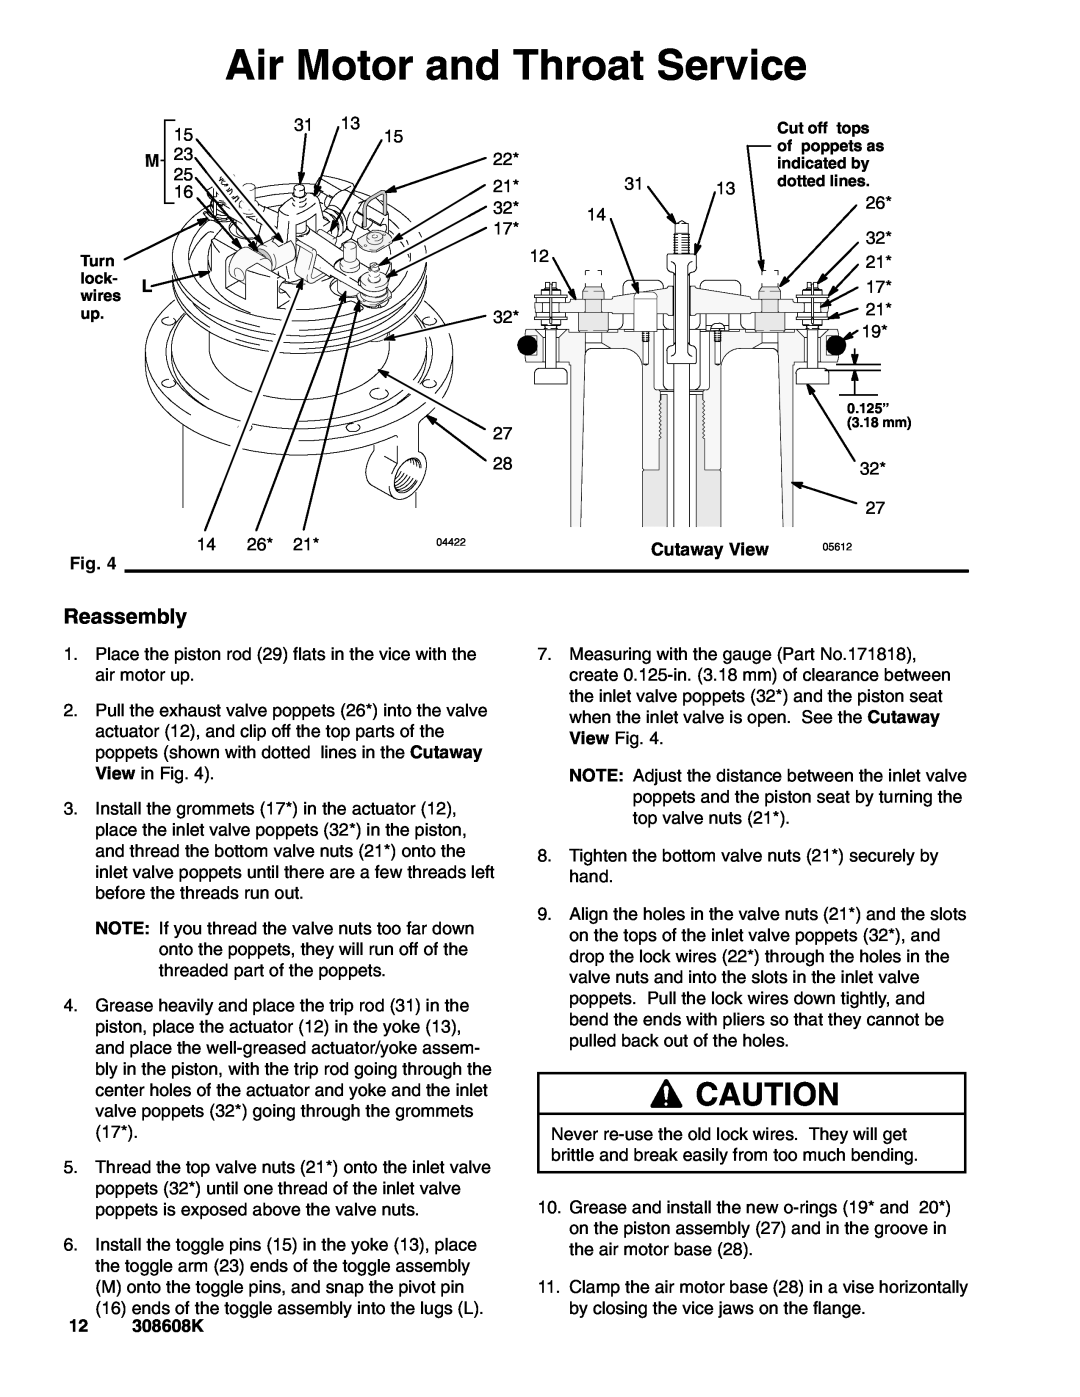
2.Pull the exhaust valve poppets (26*) into the valve actuator (12), and clip off the top parts of the poppets (shown with dotted lines in the Cutaway View in Fig. 4).

3.Install the grommets (17*) in the actuator (12), place the inlet valve poppets (32*) in the piston, and thread the bottom valve nuts (21*) onto the inlet valve poppets until there are a few threads left before the threads run out.

NOTE: If you thread the valve nuts too far down onto the poppets, they will run off of the threaded part of the poppets.

4.Grease heavily and place the trip rod (31) in the piston, place the actuator (12) in the yoke (13), and place the well-greased actuator/yoke assem- bly in the piston, with the trip rod going through the center holes of the actuator and yoke and the inlet valve poppets (32*) going through the grommets (17*).

5.Thread the top valve nuts (21*) onto the inlet valve poppets (32*) until one thread of the inlet valve poppets is exposed above the valve nuts.

6.Install the toggle pins (15) in the yoke (13), place the toggle arm (23) ends of the toggle assembly

(M) onto the toggle pins, and snap the pivot pin

(16)ends of the toggle assembly into the lugs (L).

12 308608K

7.Measuring with the gauge (Part No.171818), create 0.125-in. (3.18 mm) of clearance between the inlet valve poppets (32*) and the piston seat when the inlet valve is open. See the Cutaway View Fig. 4.

NOTE: Adjust the distance between the inlet valve poppets and the piston seat by turning the top valve nuts (21*).

8.Tighten the bottom valve nuts (21*) securely by hand.

9.Align the holes in the valve nuts (21*) and the slots on the tops of the inlet valve poppets (32*), and drop the lock wires (22*) through the holes in the valve nuts and into the slots in the inlet valve poppets. Pull the lock wires down tightly, and bend the ends with pliers so that they cannot be pulled back out of the holes.

Reassembly CAUTION

Never re-use the old lock wires. They will get brittle and break easily from too much bending.

10.Grease and install the new o-rings (19* and 20*) on the piston assembly (27) and in the groove in the air motor base (28).

11.Clamp the air motor base (28) in a vise horizontally by closing the vice jaws on the flange.

Page 12
Image 12
Graco Series D, 238108 important safety instructions Reassembly, Cutaway View, 12 308608K, Air Motor and Throat Service

238108, Series D specifications

Graco 223177, Series D is a high-performance spray gun designed for professional-grade painting and finishing applications. This versatile tool is valued for its precision, efficiency, and user-friendly features, making it a favorite among contractors, painters, and DIY enthusiasts alike.

One of the standout features of the Graco 223177 is its innovative Airless technology. This technology eliminates the need for compressed air, allowing for a smooth and even spray pattern. This results in a finer finish with fewer overspray issues, saving time during cleanup and minimizing paint waste. The Airless system also ensures that the paint is atomized effectively, providing a flawless application that reduces the need for multiple coats.

The gun offers adjustable pressure control, enabling users to tailor the spray output according to specific project requirements. This feature is particularly beneficial when working with different materials, as it allows for precise control over the thickness of the paint being applied. The Graco 223177 can handle a wide range of coatings, including latex, oil-based paints, and stains, offering versatility for various applications.

The ergonomic design of the Graco 223177 enhances user comfort during extended use. It is lightweight and features a comfortable grip, reducing hand fatigue. The design also includes an integrated filter that prevents clogs, ensuring consistent performance without interruptions. Additionally, the gun's easy-to-clean components streamline maintenance, allowing users to quickly prepare for their next task.

Another notable characteristic of the Graco 223177 is its durability. Built with high-quality materials, this spray gun is designed to withstand the rigors of daily use while maintaining its performance standards. It is compatible with a range of spray tips, offering flexibility in terms of spray patterns and widths, catering to the needs of different projects—from large surfaces to intricate details.

In conclusion, the Graco 223177, Series D stands out for its advanced Airless technology, adjustable pressure control, ergonomic design, and durability. These features make it an ideal choice for professionals seeking efficiency and quality in their painting tasks, as well as for homeowners looking to achieve a professional finish. With its broad capabilities, the Graco 223177 is a reliable tool that enhances productivity and delivers excellent results across various painting applications.