Model 231±390
Model 231±001, Series B
Model 231±018
Model 220±726, Series C
Spray Gun Safety Devices
General Safety
Spray Tip Safety
Medical Alert±±Airless Spray Wounds
System Pressure
Flushing Safety
Fluid and Solvent Compatibility
Hose Grounding Continuity
Soins médicaux
Consignes générales de sécurité
Dispositifs de sécurité du pistolet
Consignes de sécurité concernant lajutage du pulvérisateur
Compatibilité chimique des corps
Pression
Mise à la terre ou à la masse
Continuité de la mise à la terre des tuyaux
Seguridad general
EL Rociado a Alta Presion Puede Causar Graves Lesiones
Tratamiento médico
Aparatos de seguridad de la pistola pulverizadora
Compatibilidad de fluido
Presión del sistema
Puesta a tierra
Continuidad del circuito de puesta a tierra de la manguera
Check the electrical service
Setup
Connect the hose and gun. See ±1
Plug in the sprayer
Operation
Pressure Relief Procedure
Prime the sprayer with paint
Install the spray tip and tip guard
Cleaning a Clogged Tip
Adjust the spray pattern
Shutdown and Care
Startup after storage
When to Flush
HOW to Flush
Right Wrong
Application Methods
Troubleshooting Guide
Pressure Relief Procedure
Problem Cause Solution
Fluid supply often to prevent running the pump
Reassembly Notes
Displacement Pump
Reinstalling the Pump. See ±1
Removing the Pump. See ±1
204
Reassembly Procedure
206
222
Replacing the Connecting ROD and Bearing
55d 55a
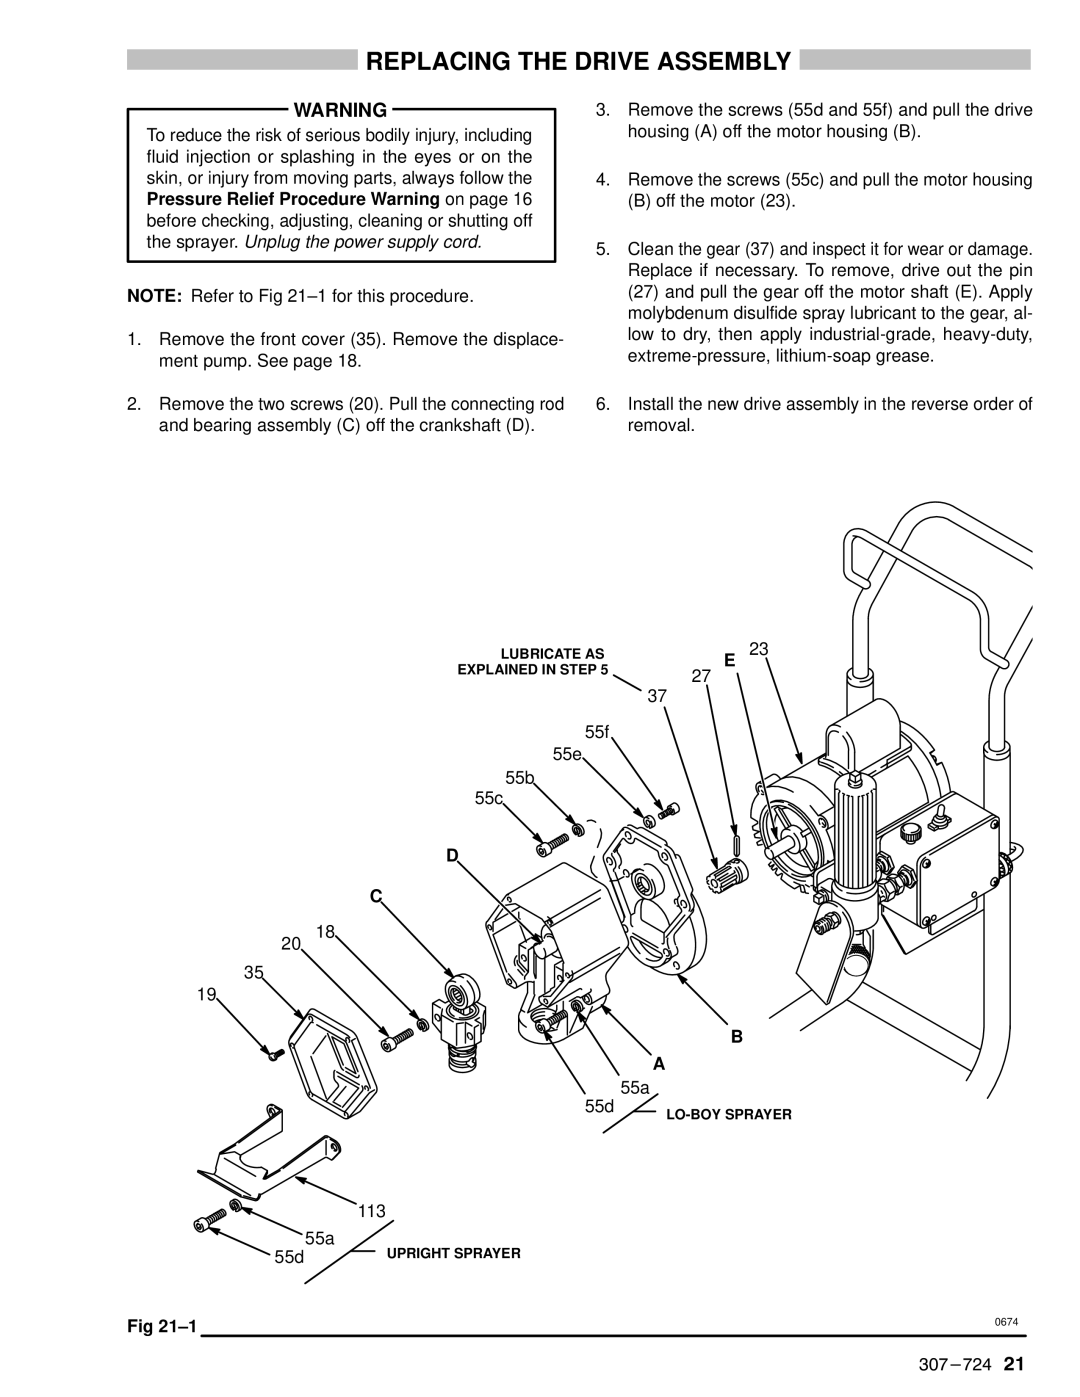
Replacing the Drive Assembly
Capacitor
Replacing the Electric Motor & Capacitor
303
23f
Replacing the Pressure Control & Circuit Board
Circuit Board Removal
Pressure Control Removal
Pressure Control Adjustment
Service Tools Needed
Follow the Pressure Relief Procedure Warning, above
0750
Circuit Board Applications
Parts Drawing & List ± Pressure Control
Displacement Pump Parts Drawing & List
Model 218±215, Series C Carbon Steel Displacement Pump
Description Qty
Model 231±001, Series B, Basic Sprayer
Parts List ± Sprayer with Upright Cart
Model 231±001, Series B
Parts Drawing ± Sprayer with Upright Cart
Model 220±726, Series C, Basic Sprayer
Parts List ± Sprayer with LO-BOY Cart
Parts Drawing ± Sprayer with LO-BOY Cart
Model 220±726, Series C
Detail a
Model 231±390 Complete Upright Sprayer with Flex Gun
Parts Drawing & List ± Complete Sprayers
Model 231±018 Complete Upright Sprayer with Contractor Gun
Model 231±051 Complete Lo±Boy Sprayer with Flex Gun
Manual Change Summary
Accessories
Dimensions
Technical Data
Important Phone Numbers
To you 1±800±328±0211 Toll Free
307-724
Graco Warranty and Disclaimers
Table of Contents
Graco INC. P.O. BOX
Model 231±390 shown
MINNEAPOLIS, MN 55440±1441
Upright LoBoy
Packing Repair Kit 222±587
Injection Hazard