ASSEMBLY

WARNING: AVOID INJURY. Read and understand Assembly Safety Rules in Safety section before attempting to assemble unit.

Unpacking Unit

IMPORTANT: Remove contents from carton carefully. Place cover assembly on a flat piece of cardboard to avoid scratching it.

Tools Required

Wrenches: 1/2", 9/16", 3/4", 15/16"

Drill: 11/16"

ASSEMBLY

Refer to Parts section for illustrations and parts locations.

NOTE: Installation requires a separate mower boot kit, p/n 04916000 for 60" decks, p/n 04916100 for

50" decks.

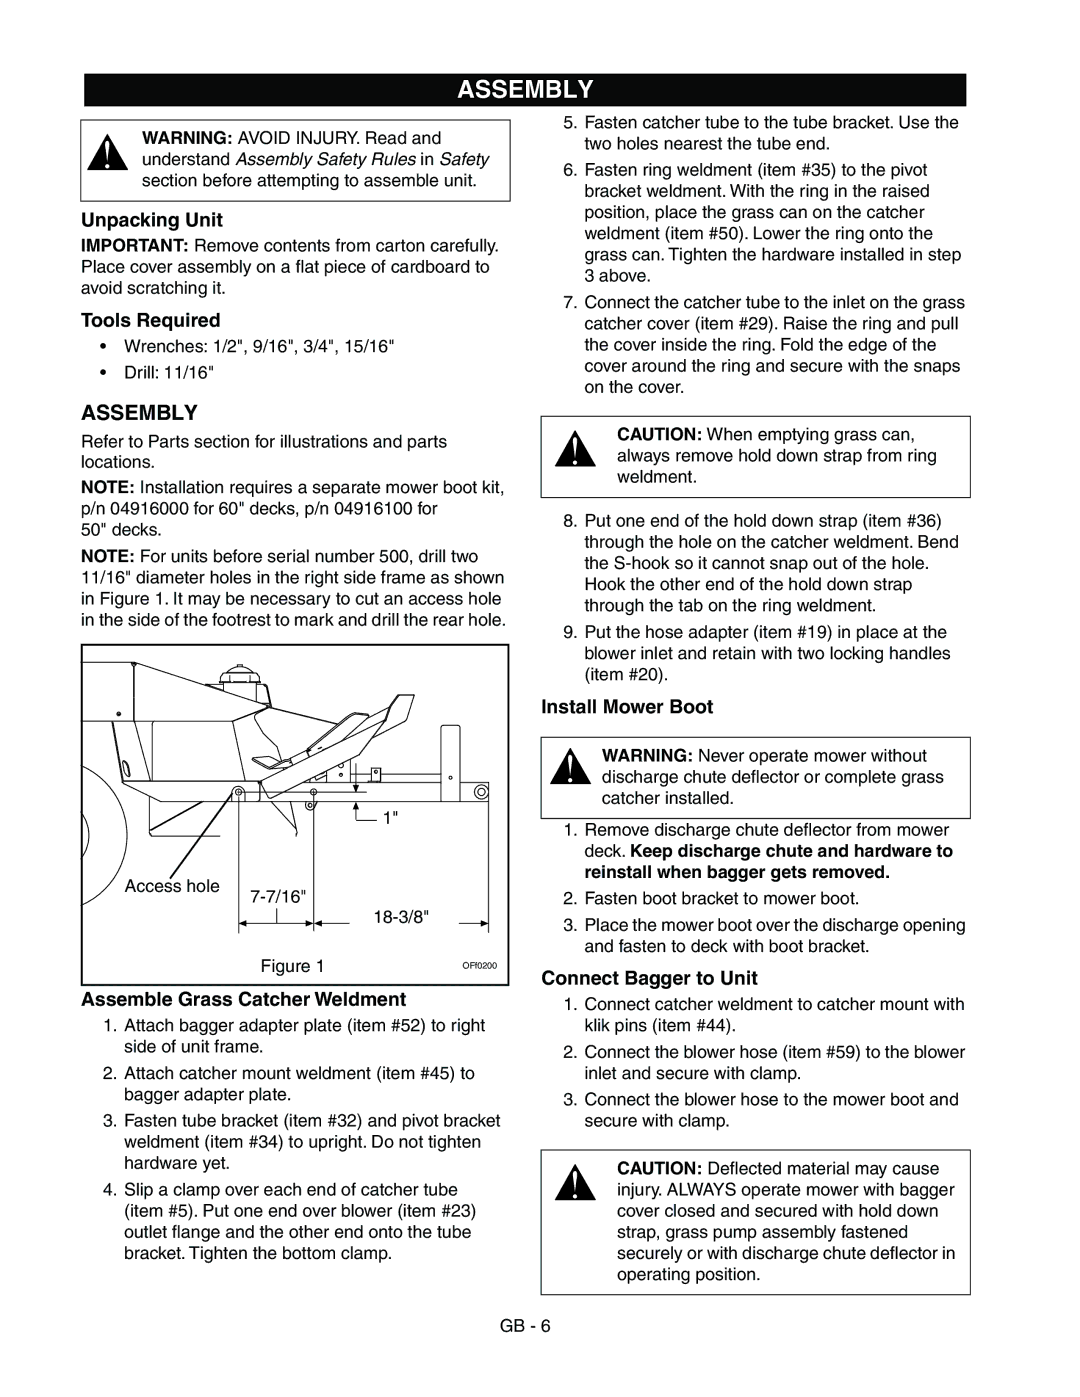
NOTE: For units before serial number 500, drill two 11/16" diameter holes in the right side frame as shown in Figure 1. It may be necessary to cut an access hole in the side of the footrest to mark and drill the rear hole.


1"

Access hole

7-7/16"


18-3/8"


Figure 1

OFf0200


Assemble Grass Catcher Weldment

1.Attach bagger adapter plate (item #52) to right side of unit frame.

2.Attach catcher mount weldment (item #45) to bagger adapter plate.

3.Fasten tube bracket (item #32) and pivot bracket weldment (item #34) to upright. Do not tighten hardware yet.

4.Slip a clamp over each end of catcher tube (item #5). Put one end over blower (item #23) outlet flange and the other end onto the tube bracket. Tighten the bottom clamp.

5.Fasten catcher tube to the tube bracket. Use the two holes nearest the tube end.

6.Fasten ring weldment (item #35) to the pivot bracket weldment. With the ring in the raised position, place the grass can on the catcher weldment (item #50). Lower the ring onto the grass can. Tighten the hardware installed in step 3 above.

7.Connect the catcher tube to the inlet on the grass catcher cover (item #29). Raise the ring and pull the cover inside the ring. Fold the edge of the cover around the ring and secure with the snaps on the cover.

CAUTION: When emptying grass can, always remove hold down strap from ring weldment.

8.Put one end of the hold down strap (item #36) through the hole on the catcher weldment. Bend the S-hook so it cannot snap out of the hole. Hook the other end of the hold down strap through the tab on the ring weldment.

9.Put the hose adapter (item #19) in place at the blower inlet and retain with two locking handles (item #20).

Install Mower Boot

WARNING: Never operate mower without discharge chute deflector or complete grass catcher installed.

1.Remove discharge chute deflector from mower deck. Keep discharge chute and hardware to reinstall when bagger gets removed.

2.Fasten boot bracket to mower boot.

3.Place the mower boot over the discharge opening and fasten to deck with boot bracket.

Connect Bagger to Unit

1.Connect catcher weldment to catcher mount with klik pins (item #44).

2.Connect the blower hose (item #59) to the blower inlet and secure with clamp.

3.Connect the blower hose to the mower boot and secure with clamp.

CAUTION: Deflected material may cause injury. ALWAYS operate mower with bagger cover closed and secured with hold down strap, grass pump assembly fastened securely or with discharge chute deflector in operating position.

GB - 6

Page 6
Image 6
Gravely 890015* manual Assembly

890015* specifications

The Gravely 890015* is a sophisticated lawn mower that stands out in the landscape of commercial and residential turf care solutions. Designed to meet the demands of both professional landscapers and homeowners with large yards, this mower combines durability, efficiency, and cutting precision.

One of the key features of the Gravely 890015* is its powerful engine. Equipped with a robust engine option, it delivers high torque and impressive horsepower, thereby ensuring that even the most challenging mowing tasks are completed with ease. This power translates into faster mowing speeds, reducing the overall time spent on lawn maintenance.

The cutting deck of the Gravely 890015* is engineered with precision. The mower features a wide cutting surface that allows users to cover more ground in less time. It is designed to produce a clean and even cut, which enhances the overall aesthetic of the lawn. With an adjustable cutting height, users can easily customize the mowing process according to the specific needs of their turf, ensuring optimal results throughout different seasons.

Innovation sets the Gravely 890015* apart from its competitors. The mower integrates advanced technologies such as a smart cooling system that helps to prevent overheating during extended use. This feature not only extends the life of the engine but also enhances performance on hot, sunny days when lawns typically require more frequent mowing.

In addition, the Gravely 890015* prioritizes user comfort. The ergonomic seat, coupled with vibration-dampening technology, ensures a smooth ride even over rough terrains. Easy-to-reach controls allow the operator to adjust speeds and cutting height without having to leave the seat, making the mowing experience more efficient and enjoyable.

Durability is another hallmark of the Gravely brand, and the 890015* model is no exception. Constructed with high-quality materials that resist wear and tear, this mower can withstand the rigors of daily use. The robust frame and heavy-duty components promise reliability, making it a worthwhile investment for anyone serious about lawn care.

In summary, the Gravely 890015* encapsulates performance, innovative technology, and user-driven design. With its powerful engine, wide cutting deck, and focus on durability and comfort, this mower is an excellent choice for those looking to achieve a pristine lawn with minimal effort. Whether for residential use or commercial landscaping, the Gravely 890015* represents a smart solution for all mowing needs.