English | 27/98- |
Steam generator | 085463 |
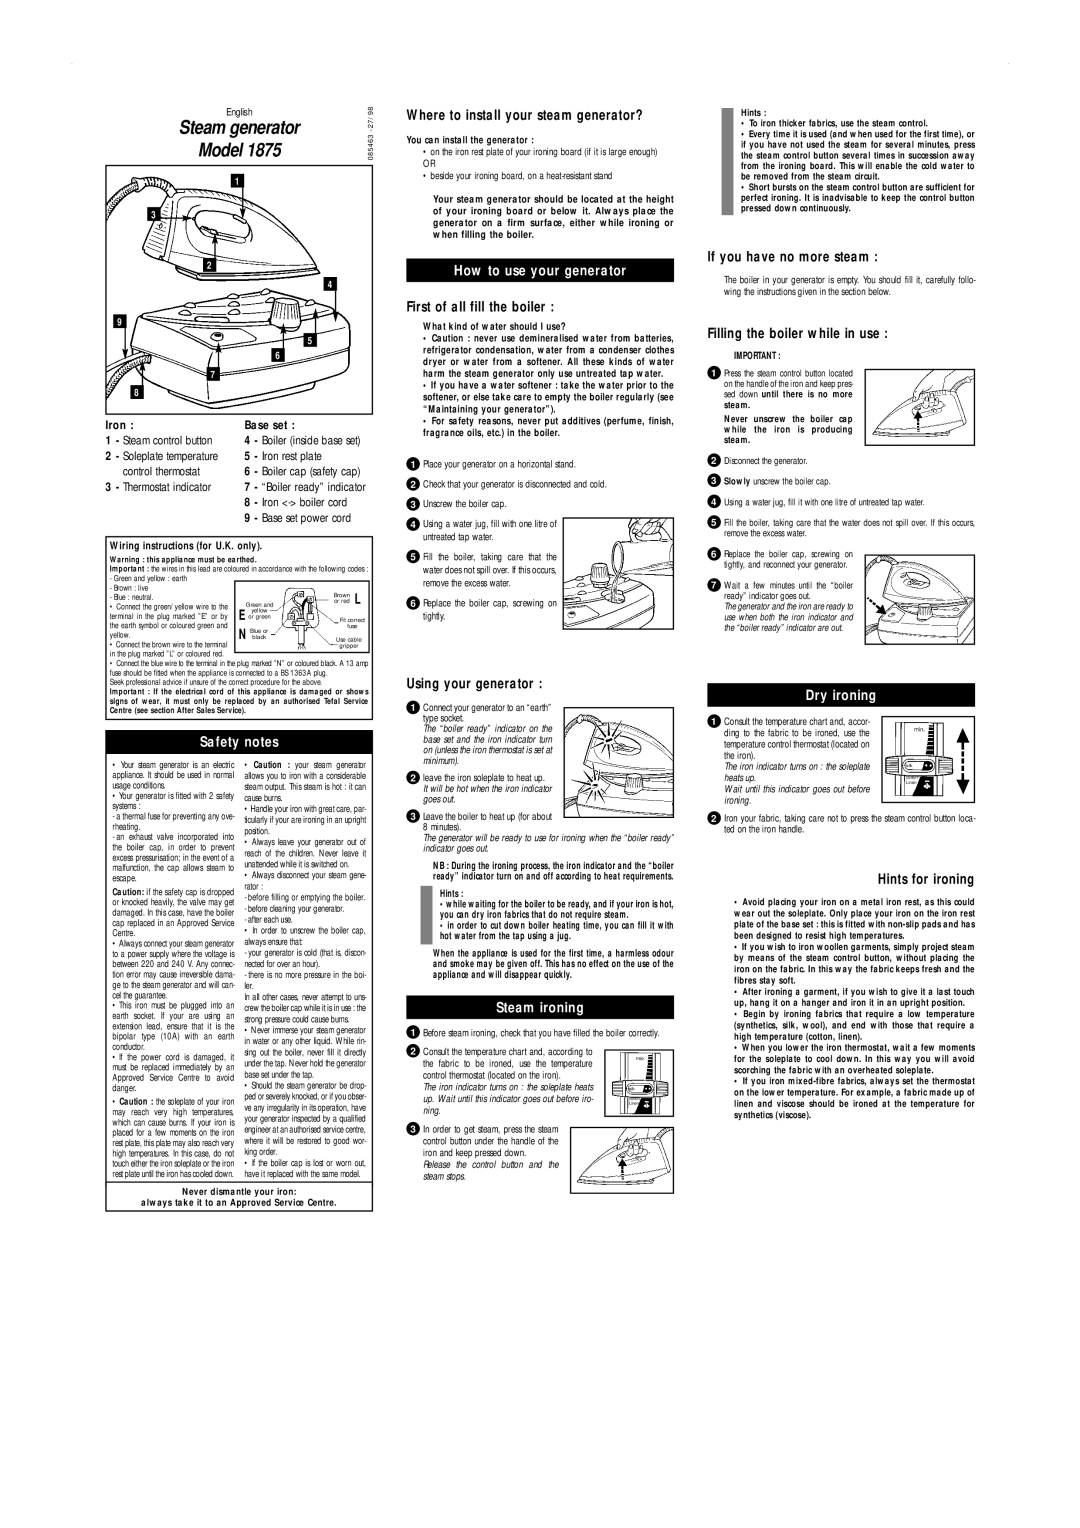
Model 1875 |
Hints :
• To iron thicker fabrics, use the steam control. |
• Every time it is used (and when used for the first time), or |
if you have not used the steam for several minutes, press |
the steam control button several times in succession away |
from the ironing board. This will enable the cold water to |
be removed from the steam circuit. |
9
8
3
2
7
1
4
5
6
• Short bursts on the steam control button are sufficient for |
perfect ironing. It is inadvisable to keep the control button |
pressed down continuously. |
If you have no more steam :
The boiler in your generator is empty. You should fill it, carefully follo- wing the instructions given in the section below.
Filling the boiler while in use :
IMPORTANT :
1 Press the steam control button located |
on the handle of the iron and keep pres- |
sed down until there is no more |
steam. |
Never unscrew the boiler cap |
Iron : | Base set : | ||
1 | - Steam control button | 4 | - Boiler (inside base set) |
2 | - Soleplate temperature | 5 | - Iron rest plate |
| control thermostat | 6 | - Boiler cap (safety cap) |
3 | - Thermostat indicator | 7 | - “Boiler ready” indicator |
|
| 8 | - Iron |
|
| 9 | - Base set power cord |
Wiring instructions (for U.K. only).
Warning : this appliance must be earthed.
Important : the wires in this lead are coloured in accordance with the following codes :
- Green and yellow : earth |
|
|
|
|
|
|
|
- Brown : live |
|
|
|
| Brown | L |
|
- Blue : neutral. |
|
|
|
|
| ||
| Green and | or red |
| ||||
• Connect the green/yellow wire to the |
|
| |||||
E |
| yellow |
|
|
| ||
terminal in the plug marked ”E” or by |
|
|
|
| |||
| or green | Fit correct |
| ||||
the earth symbol or coloured green and | N | Blue or |
| fuse |
| ||
yellow. |
|
|
|
| |||
black |
| Use cable |
| ||||
• Connect the brown wire to the terminal |
|
|
|
| gripper |
| |
in the plug marked ”L” or coloured red. |
|
|
|
|
|
|
|
|
|
|
|
|
|
| |
•Connect the blue wire to the terminal in the plug marked ”N” or coloured black. A 13 amp fuse should be fitted when the appliance is connected to a BS 1363A plug.
Seek professional advice if unsure of the correct procedure for the above.
Important : If the electrical cord of this appliance is damaged or shows signs of wear, it must only be replaced by an authorised Tefal Service Centre (see section After Sales Service).
Safety notes
| while the iron is producing | ||
| steam. |
|
|
2 | Disconnect the generator. | ||
3 | Slowly unscrew the boiler cap. | ||
4 | Using a water jug, fill it with one litre of untreated tap water. | ||
5 | Fill the boiler, taking care that the water does not spill over. If this occurs, | ||
| remove the excess water. | ||
6 | Replace the boiler cap, screwing on |
|
|
| tightly, and reconnect your generator. |
|
|
7 | Wait a few minutes until the “boiler |
|
|
| ready” indicator goes out. |
|
|
| The generator and the iron are ready to |
|
|
| use when both the iron indicator and |
|
|
| the “boiler ready” indicator are out. |
|
|
|
|
|
|
Dry ironing
1Consult the temperature chart and, accor- ding to the fabric to be ironed, use the temperature control thermostat (located on
•Your steam generator is an electric appliance. It should be used in normal usage conditions.
•Your generator is fitted with 2 safety systems :
- a thermal fuse for preventing any ove- rheating.
- an exhaust valve incorporated into the boiler cap, in order to prevent excess pressurisation; in the event of a malfunction, the cap allows steam to escape.
Caution: if the safety cap is dropped or knocked heavily, the valve may get damaged. In this case, have the boiler cap replaced in an Approved Service Centre.
•Always connect your steam generator to a power supply where the voltage is between 220 and 240 V. Any connec- tion error may cause irreversible dama- ge to the steam generator and will can- cel the guarantee.
•This iron must be plugged into an earth socket. If your are using an extension lead, ensure that it is the bipolar type (10A) with an earth conductor.
•If the power cord is damaged, it must be replaced immediately by an Approved Service Centre to avoid danger.
•Caution : the soleplate of your iron may reach very high temperatures, which can cause burns. If your iron is placed for a few moments on the iron rest plate, this plate may also reach very high temperatures. In this case, do not touch either the iron soleplate or the iron rest plate until the iron has cooled down.
•Caution : your steam generator allows you to iron with a considerable steam output. This steam is hot : it can cause burns.
•Handle your iron with great care, par- ticularly if your are ironing in an upright position.
•Always leave your generator out of reach of the children. Never leave it unattended while it is switched on.
•Always disconnect your steam gene- rator :
- before filling or emptying the boiler. - before cleaning your generator.
- after each use.
•In order to unscrew the boiler cap, always ensure that:
- your generator is cold (that is, discon- nected for over an hour).
- there is no more pressure in the boi- ler.
In all other cases, never attempt to uns- crew the boiler cap while it is in use : the strong pressure could cause burns.
•Never immerse your steam generator in water or any other liquid. While rin- sing out the boiler, never fill it directly under the tap. Never hold the generator base set under the tap.
•Should the steam generator be drop- ped or severely knocked, or if you obser- ve any irregularity in its operation, have your generator inspected by a qualified engineer at an authorised service centre, where it will be restored to good wor- king order.
•If the boiler cap is lost or worn out, have it replaced with the same model.
the iron). |
|
The iron indicator turns on : the soleplate | silk |
heats up. | Linen |
| cotton |
Wait until this indicator goes out before |
|
ironing. |
|
|
2Iron your fabric, taking care not to press the steam control button loca- ted on the iron handle.
Hints for ironing
•Avoid placing your iron on a metal iron rest, as this could wear out the soleplate. Only place your iron on the iron rest plate of the base set : this is fitted with
•If you wish to iron woollen garments, simply project steam by means of the steam control button, without placing the iron on the fabric. In this way the fabric keeps fresh and the fibres stay soft.
•After ironing a garment, if you wish to give it a last touch up, hang it on a hanger and iron it in an upright position.
•Begin by ironing fabrics that require a low temperature (synthetics, silk, wool), and end with those that require a high temperature (cotton, linen).
•When you lower the iron thermostat, wait a few moments for the soleplate to cool down. In this way you will avoid scorching the fabric with an overheated soleplate.
•If you iron
Never dismantle your iron:
always take it to an Approved Service Centre.