Manuals
/
Guardian Technologies
/
Household Appliance
/
Air Cleaner
Guardian Technologies
AC6000
warranty
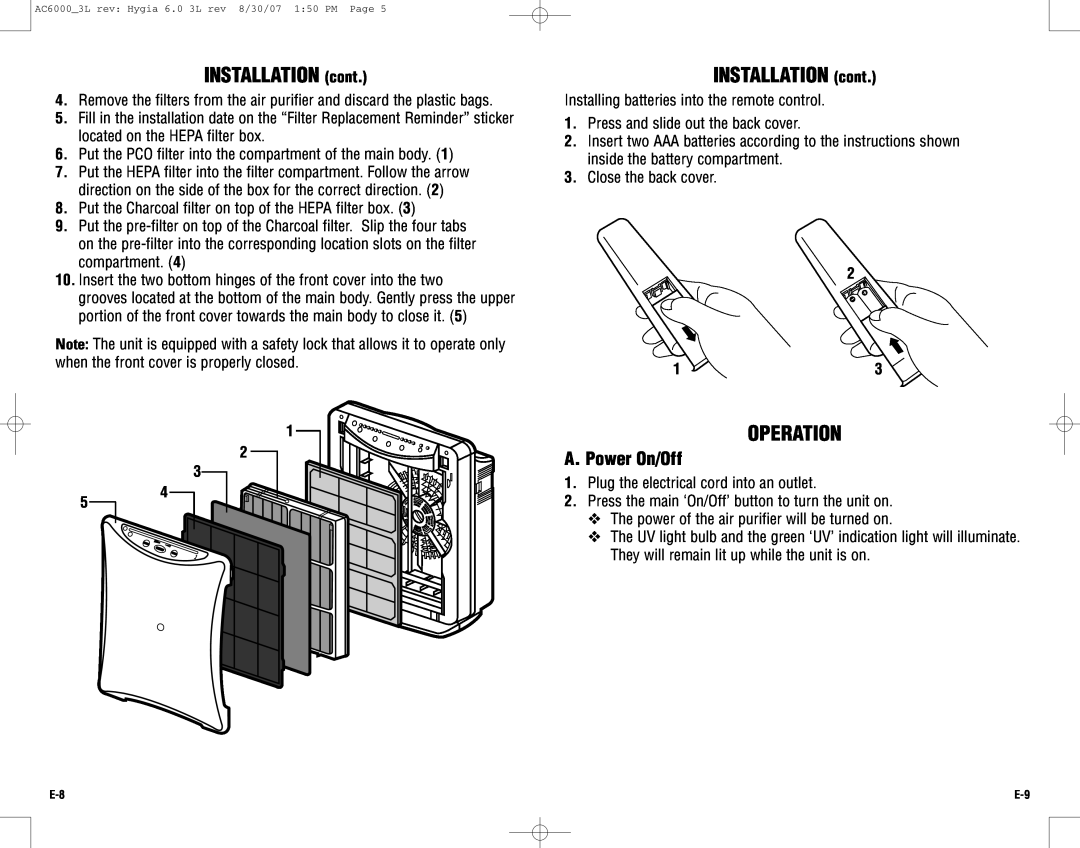
INSTALLATION cont, Operation, A. Power On/Off
Models:
AC6000
1
5
24
24
Download
24 pages
62.05 Kb
1
2
3
4
5
6
7
8
Troubleshooting
Specifications
Install
C. Selection of Timer Setting
Maintenance
Guía De Solución De Problemas
Panneau de commande
Complete Air Cleansing System
A. Power On/Off
Solution
Page 5
Image 5
Page 4
Page 6
Page 5
Image 5
Page 4
Page 6
Contents
ESPECIFICACIONES TÉCNICAS
Germ Guardian
PIEZAS DE REPUESTO
GARANTÍA LIMITADA
Complete Air Cleansing System
SAFETY PRECAUTIONS
CONTENTS
Model Number: AC6000
IDENTIFICATION OF PARTS cont
IDENTIFICATION OF PARTS
Main Unit
Control Panel
Remote Control
INSTALLATION
What is CADR?
Installing the Filters
A. Power On/Off
INSTALLATION cont
OPERATION
INSTALLATION cont
E. Resetting the Filter Check Indication Light
C. Selection of Timer Setting
OPERATION cont
B. Selection of Fan Speed
A. Front Cover
MAINTENANCE
B.Pre-Filter
C. Charcoal Filter
TROUBLESHOOTING GUIDE
MAINTENANCE cont
G. UV Light Bulb
PROBLEM
REPLACEMENT PARTS
TECHNICAL SPECIFICATIONS
LIMITED WARRANTY
Système complet d’assainissementde l’air
TABLE DES MATIÈRES
MESURES DE SÉCURITÉ
d’assainissement de l’air
système complet
IDENTIFICATION DES PIÈCES
Panneau de commande
IDENTIFICATION DES PIÈCES suite
Unité principale
Installation des filtres
Télécommande
Quel est CADR?
INSTALLATION
FONCTIONNEMENT
INSTALLATION suite
A. Mise en marche et arrêt de lappareil
INSTALLATION suite
B. Sélection de la vitesse du ventilateur
FONCTIONNEMENT suite
C. Réglage de la minuterie
D. Mise en marche du ionisateur
A. Couvercle avant
ENTRETIEN
B.Préfiltre
C. Filtre au charbon
SOLUTION
GUIDE DE DÉPANNAGE
FONCTIONNEMENT suite
PROBLÈME
SPÉCIFICATIONS TECHNIQUES
Sistema Completo de Purificación de Aire
PIÈCES DE RECHANGE
GARANTIE LIMITÉE
Número de modelo AC6000
Sistema Completo de Purificación de Aire
PRECAUCIONES DE SEGURIDAD
CONTENIDO
Unidad principal
IDENTIFICACIÓN DE PARTES Continuación
Panel de Control
IDENTIFICACIÓN DE PARTES Continuación
IDENTIFICACIÓN DE PARTES Continuación
INSTALACIÓN
Control remoto
¿Qué es CADR?
A. Encendido/Apagado
FUNCIONAMIENTO
B. Cómo seleccionar la velocidad del ventilador
FUNCIONAMIENTO continuación
C. Cómo seleccionar el ajuste del temporizador
D. Cómo seleccionar el ionizador
A. Cubierta frontal
MANTENIMIENTO
B.Prefiltro
C. Filtro de carbón activado
MANTENIMIENTO continuación
GUÍA DE SOLUCIÓN DE PROBLEMAS
G. Foco de luz UV
PROBLEMA
Top
Page
Image
Contents