Componentes y funciones


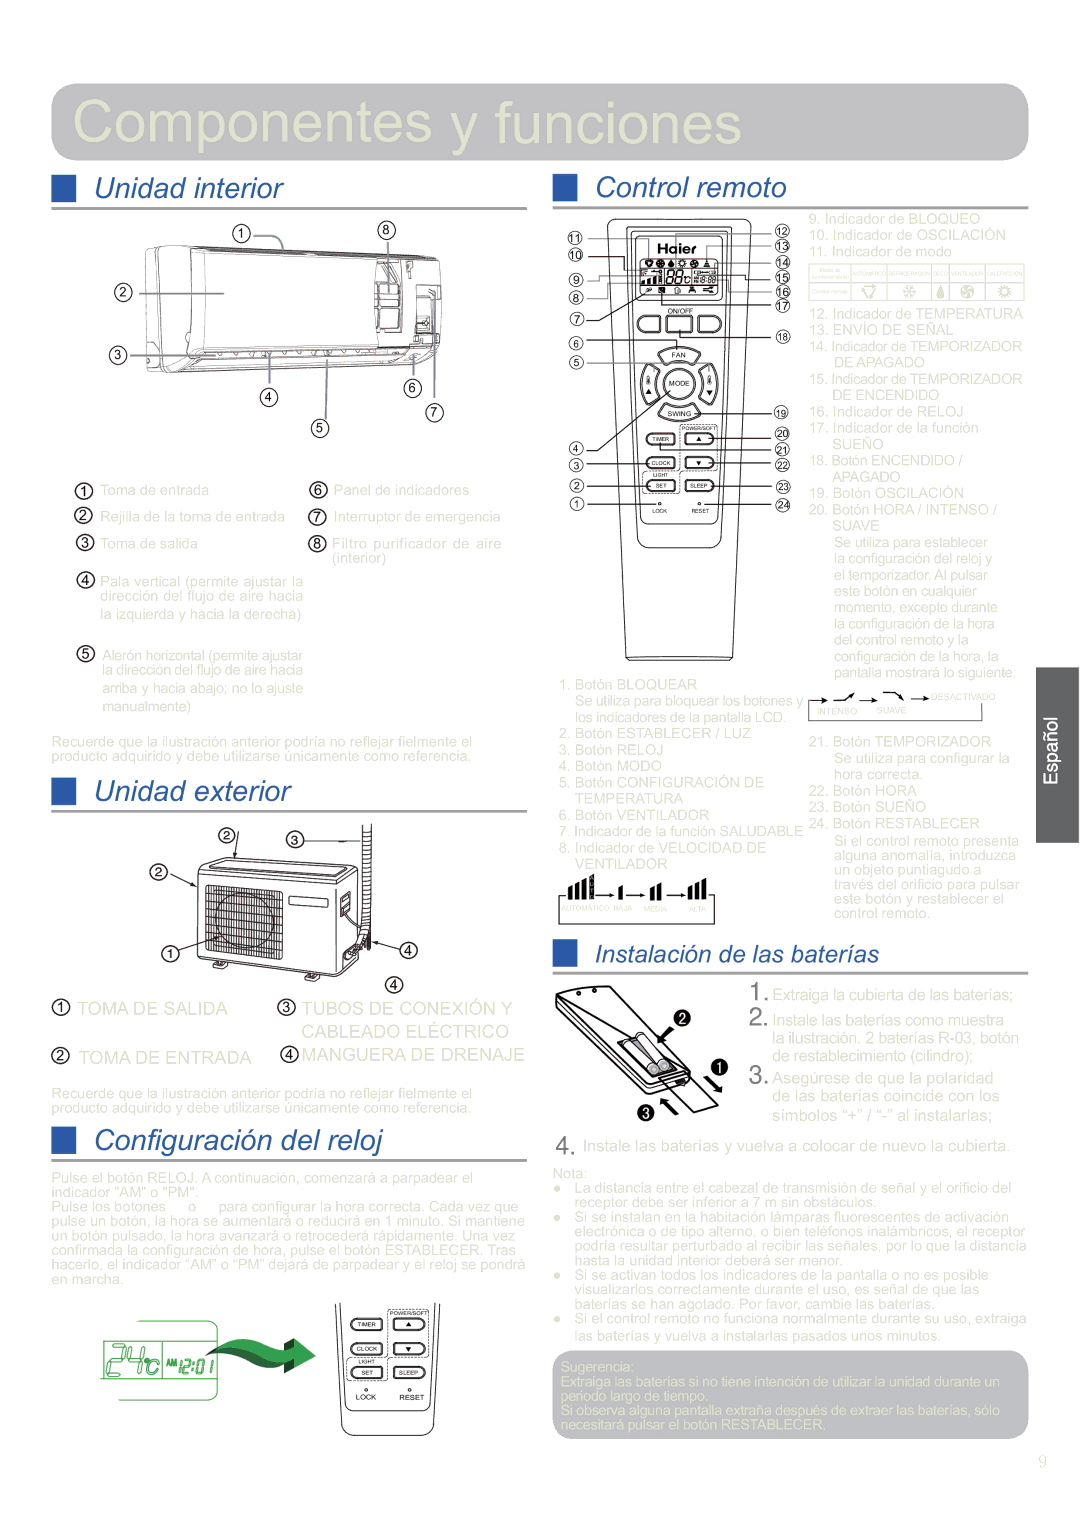
Unidad interior


Control remoto


1


8


12

9. Indicador de BLOQUEO


11


10. Indicador de OSCILACIÓN


10


13

11. Indicador de modo


14


Modo de


9


15

funcionamiento AUTOMÁTICO REFRIGERACIÓN SECO VENTILADOR CALEFACCIÓN


2


8


16

Control remoto


17

12. Indicador de TEMPERATURA


7


ON/OFF


13. ENVÍO DE SEÑAL


18


6


14. Indicador de TEMPORIZADOR


3


FAN


5


DE APAGADO


6


MODE


15. Indicador de TEMPORIZADOR


4


DE ENCENDIDO


5

7


SWING

19

16. Indicador de RELOJ


POWER/SOFT

20

17. Indicador de la función


4

TIMER


SUEÑO


21


3

CLOCK

22

18. Botón ENCENDIDO /


2

LIGHT

23

APAGADO

1

Toma de entrada

6

Panel de indicadores

SET

SLEEP

19. Botón OSCILACIÓN

1


24

2

Rejilla de la toma de entrada

7

Interruptor de emergencia

LOCK

RESET

20. Botón HORA / INTENSO /


SUAVE


3

Toma de salida

8

Filtro purificador de aire


Se utiliza para establecer


(interior)


la configuración del reloj y

4 Pala vertical (permite ajustar la


el temporizador. Al pulsar


este botón en cualquier


dirección del flujo de aire hacia


momento, excepto durante


la izquierda y hacia la derecha)


la configuración de la hora


5 Alerón horizontal (permite ajustar


del control remoto y la


configuración de la hora, la


la dirección del flujo de aire hacia


pantalla mostrará lo siguiente:

arriba y hacia abajo; no lo ajuste

1. Botón BLOQUEAR

DESACTIVADO

manualmente)

Se utiliza para bloquear los botones y

INTENSO SUAVE

los indicadores de la pantalla LCD.


Recuerde que la ilustración anterior podría no reflejar fielmente el

2. Botón ESTABLECER / LUZ

21. Botón TEMPORIZADOR

3. Botón RELOJ

producto adquirido y debe utilizarse únicamente como referencia.

Se utiliza para configurar la

4. Botón MODO

Unidad exterior

hora correcta.

5. Botón CONFIGURACIÓN DE

22. Botón HORA

TEMPERATURA


6. Botón VENTILADOR

23. Botón SUEÑO


24. Botón RESTABLECER


7. Indicador de la función SALUDABLE


8. Indicador de VELOCIDAD DE

Si el control remoto presenta


alguna anomalía, introduzca


VENTILADOR


un objeto puntiagudo a


través del orificio para pulsar


AUTOMÁTICO BAJA MEDIA ALTA

este botón y restablecer el


control remoto.


4


4

1

TOMA DE SALIDA

3

TUBOS DE CONEXIÓN Y


CABLEADO ELÉCTRICO

2

TOMA DE ENTRADA

4

MANGUERA DE DRENAJE

Recuerde que la ilustración anterior podría no reflejar fielmente el producto adquirido y debe utilizarse únicamente como referencia.

Instalación de las baterías

1.Extraiga la cubierta de las baterías;

2. Instale las baterías como muestra la ilustración. 2 baterías R-03, botón de restablecimiento (cilindro);

3.Asegúrese de que la polaridad de las baterías coincide con los símbolos “+” / “-” al instalarlas;

Configuración del reloj

Pulse el botón RELOJ. A continuación, comenzará a parpadear el indicador "AM" o "PM".

Pulse los botones ￿ o ￿ para configurar la hora correcta. Cada vez que pulse un botón, la hora se aumentará o reducirá en 1 minuto. Si mantiene un botón pulsado, la hora avanzará o retrocederá rápidamente. Una vez confirmada la configuración de hora, pulse el botón ESTABLECER. Tras hacerlo, el indicador “AM” o “PM” dejará de parpadear y el reloj se pondrá en marcha.

POWER/SOFT

TIMER

CLOCK

LIGHT

SET SLEEP

LOCK RESET

4. Instale las baterías y vuelva a colocar de nuevo la cubierta.

Nota:

La distancia entre el cabezal de transmisión de señal y el orificio del receptor debe ser inferior a 7 m sin obstáculos.

Si se instalan en la habitación lámparas fluorescentes de activación electrónica o de tipo alterno, o bien teléfonos inalámbricos, el receptor podría resultar perturbado al recibir las señales, por lo que la distancia hasta la unidad interior deberá ser menor.

Si se activan todos los indicadores de la pantalla o no es posible visualizarlos correctamente durante el uso, es señal de que las baterías se han agotado. Por favor, cambie las baterías.

Si el control remoto no funciona normalmente durante su uso, extraiga las baterías y vuelva a instalarlas pasados unos minutos.

Sugerencia:

Extraiga las baterías si no tiene intención de utilizar la unidad durante un periodo largo de tiempo.

Si observa alguna pantalla extraña después de extraer las baterías, sólo necesitará pulsar el botón RESTABLECER.


Page 9
Image 9
Haier 0010530627 Componentes y funciones, Unidad interior Control remoto, Unidad exterior, Configuración del reloj

HSU-24HEK03/R2, 0010530627 specifications

The Haier HSU-24HEK03/R2 is a cutting-edge air conditioning unit that combines efficiency, advanced technology, and user-friendly features, making it a popular choice for residential and commercial spaces. Designed to provide superior cooling and heating performance, this model is an excellent addition to any indoor environment, ensuring comfort year-round.

One of the standout features of the HSU-24HEK03/R2 is its impressive cooling capacity of 24,000 BTU, which makes it suitable for larger rooms or open-concept spaces. This powerful cooling system allows it to quickly lower indoor temperatures, ensuring a comfortable atmosphere even during the hottest summer days. Its heating function complements this by providing warmth during colder months, making it a versatile option for climate control.

Energy efficiency is a key characteristic of the Haier HSU-24HEK03/R2. Equipped with advanced inverter technology, this air conditioner optimizes power consumption by adjusting the compressor speed according to the cooling demand. This not only reduces energy bills but also contributes to a more sustainable environment. The unit often boasts a high EER (Energy Efficiency Ratio) rating, indicative of its ability to provide effective cooling with lower energy usage.

The multifunctional remote control enhances user convenience, allowing individuals to easily adjust settings from anywhere in the room. The easy-to-read display provides quick access to temperature settings, timer functions, and modes. Additionally, the unit features an intelligent auto-restart function that retains the last settings after a power interruption, providing seamless operation without constant readjustment.

Moreover, the HSU-24HEK03/R2 is designed to operate quietly, ensuring minimal disruption in daily activities. Its low noise level is especially beneficial for bedrooms, offices, and other quiet spaces where sound sensitivity is a concern.

Another essential feature is the comprehensive air filtration system. The unit is equipped with filters that effectively eliminate dust, allergens, and other airborne particles, ensuring that the air circulated in the room remains clean and healthy. Regular maintenance is also simplified with easy-to-clean, removable filters.

In summary, the Haier HSU-24HEK03/R2 stands out due to its powerful cooling and heating capabilities, energy efficiency, convenient remote operation, and effective air filtration. Its combination of technological advancements and user-friendly features makes it a compelling solution for climate control in various environments.