Fence Adjustments

The Fence (part #11) is assembled to the front of the Infeed Table (#33). The Fence can be moved across the Table and can be tilted 45 degrees right or left by using the Handle Pole (#29).

Step 1) To move the Fence (#11) across the Table, turn the Handle Pole (#29) to loosen. Slide the Socket (#30) over the Nut (#26). Use the Socket (#30) to loosen the Nut (#26). Slide the Table to its desired position. Tighten the Socket (#30) in place and tighten back down the Handle.

Step 2) To tilt the Fence (#11), loosen the Handle Pole (#29). Slide the Socket (#30) over the

Cap (#31). Loosen the Cap and tilt the Fence to the desired position. Tighten the Cap (#31) into place and tighten back down the Handle Pole (#29)-see Figure 6.

Most Common Operations

Jointing cuts or edges as well as Planing are the two most common operations which can be done with your Jointer. For Jointing, set the fence square with the table. Hold the best face of your work piece firmly against the fence throughout the feed.

Note: Do not perform jointing on material shorter than 10 “, narrower than 3/4”, or thinner than 1/2".

Planing is similar to jointing except that the workpiece is placed differently. The flat surface of the piece is placed on the infeed table with the narrow edge of the piece against the fence. Move the piece from the infeed table, acr0oss the cutterhead to the outfeed table. Always use the push blocks when planing. Never pass your hands directly over the cutterhead.

Grain Direction

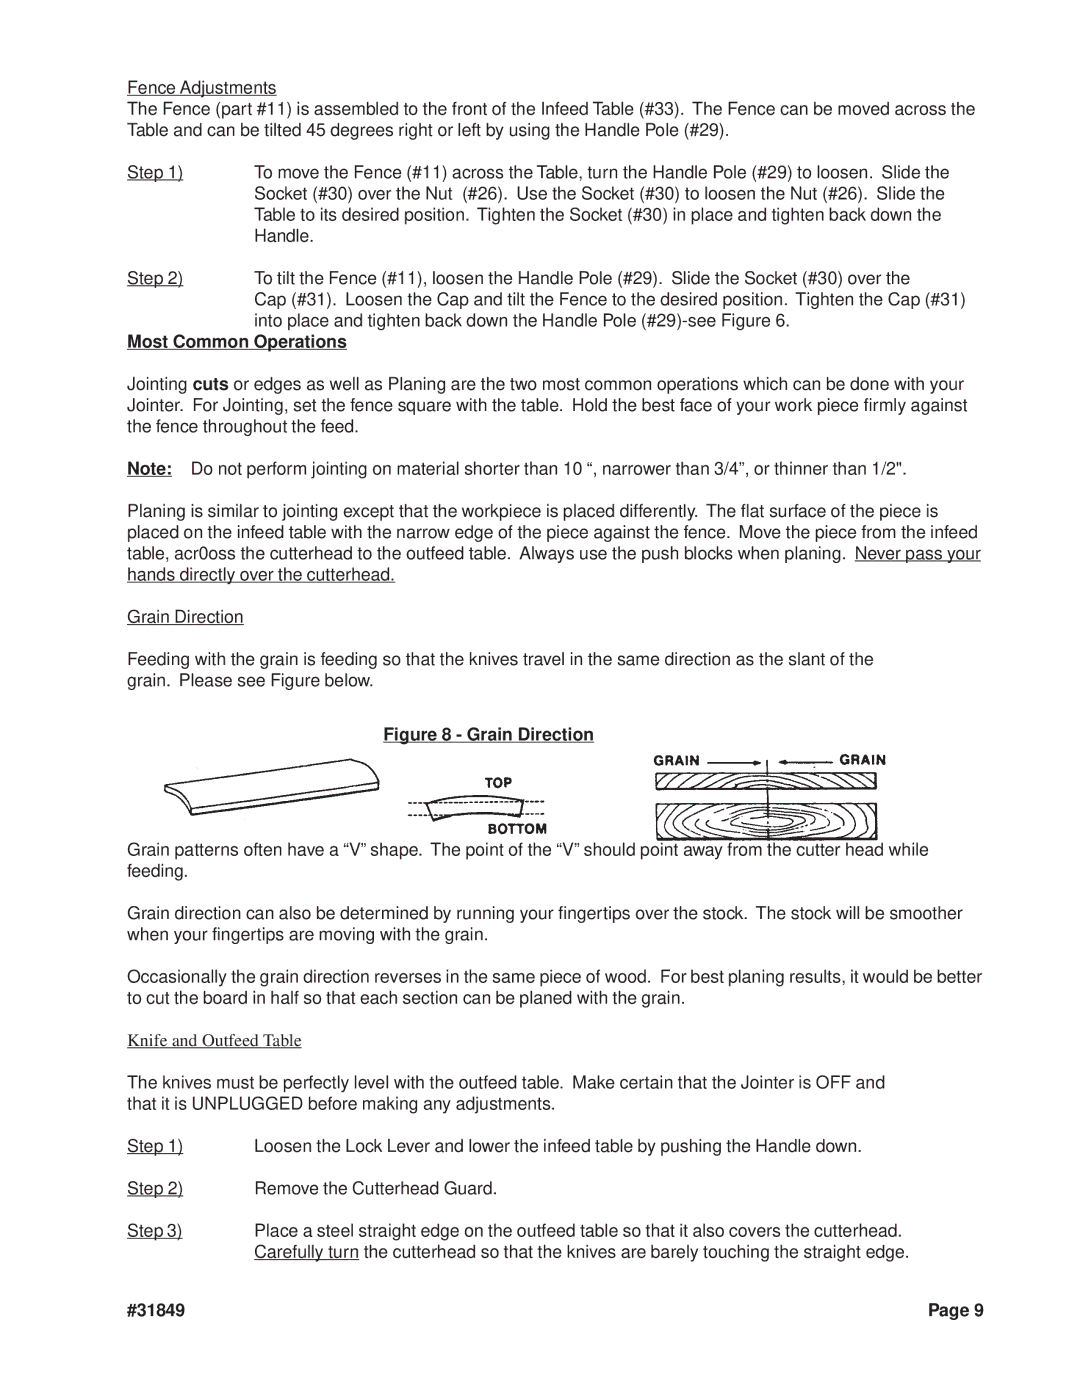
Feeding with the grain is feeding so that the knives travel in the same direction as the slant of the grain. Please see Figure below.

Figure 8 - Grain Direction

Grain patterns often have a “V” shape. The point of the “V” should point away from the cutter head while feeding.

Grain direction can also be determined by running your fingertips over the stock. The stock will be smoother when your fingertips are moving with the grain.

Occasionally the grain direction reverses in the same piece of wood. For best planing results, it would be better to cut the board in half so that each section can be planed with the grain.

Knife and Outfeed Table

The knives must be perfectly level with the outfeed table. Make certain that the Jointer is OFF and that it is UNPLUGGED before making any adjustments.

Step 1) Loosen the Lock Lever and lower the infeed table by pushing the Handle down.

Step 2) Remove the Cutterhead Guard.

Step 3) Place a steel straight edge on the outfeed table so that it also covers the cutterhead. Carefully turn the cutterhead so that the knives are barely touching the straight edge.

#31849

Page 9

Page 9
Image 9
Harbor Freight Tools 31849 operating instructions Most Common Operations, Grain Direction

31849 specifications

Harbor Freight Tools is known for its vast array of quality tools at affordable prices, and one standout item from their lineup is the Harbor Freight Tools 31849. This item is designed for professionals and DIY enthusiasts alike, seeking efficiency and precision in their work.

The Harbor Freight Tools 31849 features a robust construction, ensuring durability and longevity even under heavy use. The tool is equipped with advanced materials that withstand wear and tear, making it a reliable option for various projects. Its ergonomic design enhances comfort, reducing fatigue during extended usage. This consideration for user comfort is a hallmark of Harbor Freight's commitment to quality.

One of the main characteristics of the 31849 is its versatility. This tool is engineered to handle a wide range of tasks, from heavy-duty jobs to fine, intricate work. The adjustable components allow users to fine-tune the tool to their specific needs, making it ideal for both general use and specialized tasks. This adaptability can significantly streamline workflows, saving time and effort.

Technologically, the Harbor Freight Tools 31849 incorporates innovations that improve its performance. Features such as integrated safety mechanisms enhance user protection, providing peace of mind during operation. The tool's design also emphasizes easy maintenance, allowing users to keep it in top condition with minimal effort. Routine upkeep is simplified, further extending the life of the tool.

Furthermore, the 31849 is lightweight and portable, making it convenient for those who need to transport their tools to different job sites. Its compact size doesn’t compromise its powerful performance; users will find it an excellent addition to their toolkit.

Additionally, Harbor Freight Tools prides itself on offering excellent customer support and warranty options, ensuring that customers have assistance if needed. This focus on customer satisfaction reinforces why many choose Harbor Freight for their tool needs.

In summary, the Harbor Freight Tools 31849 stands out for its durability, versatility, and user-centric design. With its advanced features and technologies, this tool proves to be an essential asset for any toolkit, appealing to both seasoned professionals and enthusiastic amateurs. Whether you’re tackling weekend projects at home or professionals assignments on the job, the 31849 is built to deliver reliable performance every time.