Remote

Figure 5


Control (11)

Ribbon


Battery


(27)


indicator


light

Elevator


Rudder

control


control

Elevator


Rudder

trim


trim

Reverse

toggles

“On/Off”

Figure 6

Back of Remote

Control (11)

Plane Speed

control

Figure 7

Elevator Controls

trim control adjustment stick

Setting up The Controls

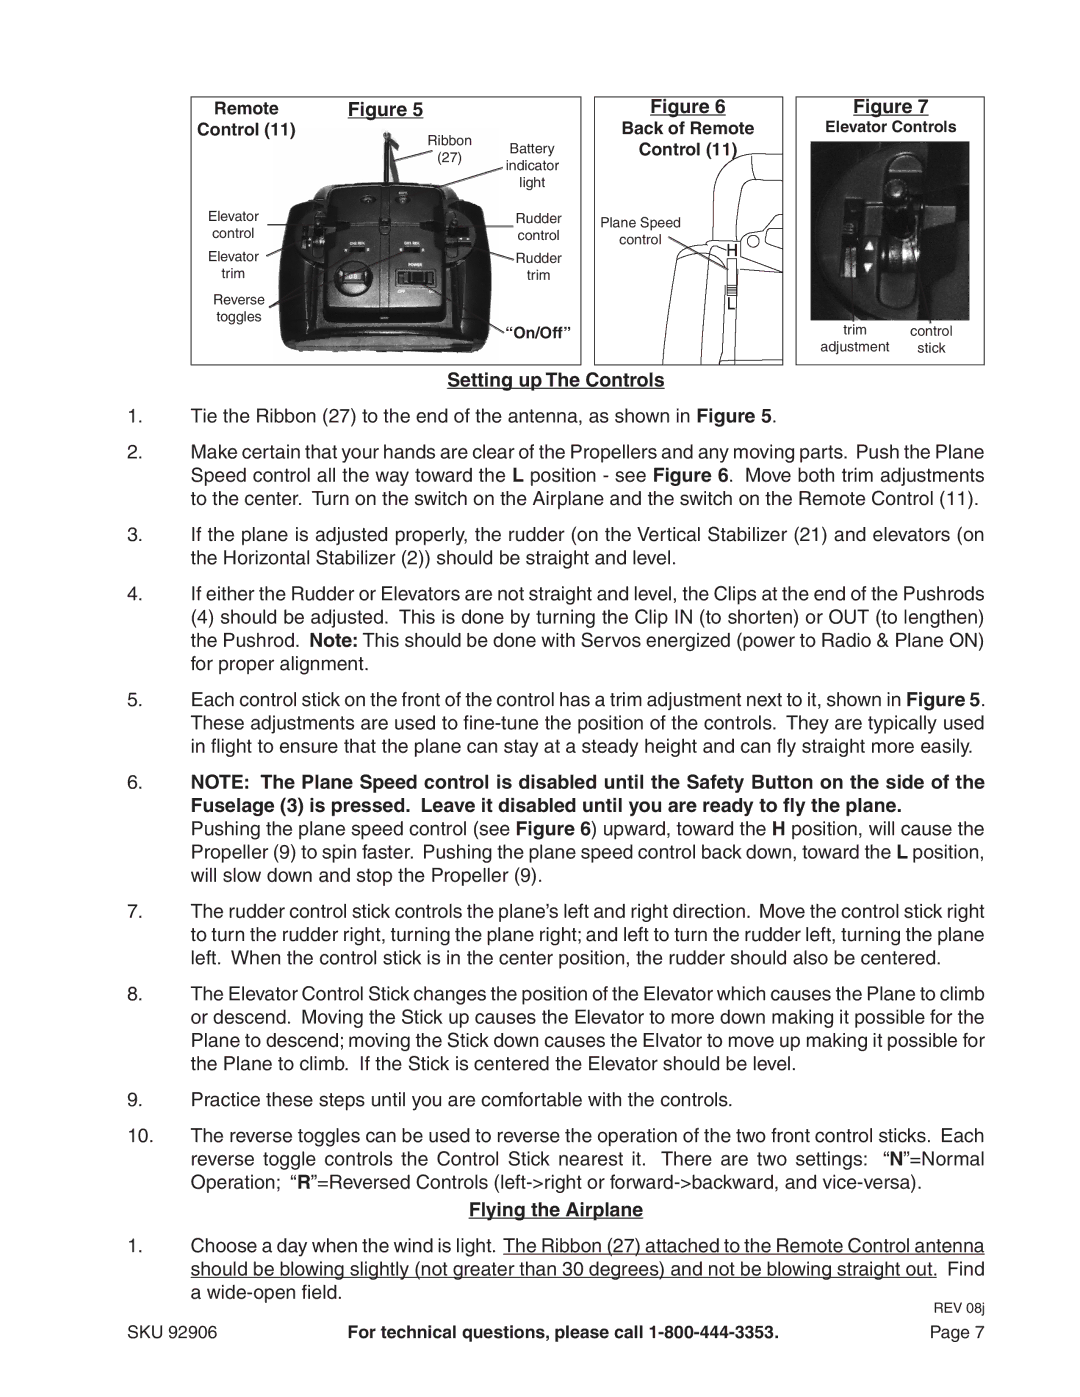
1.Tie the Ribbon (27) to the end of the antenna, as shown in Figure 5.

2.Make certain that your hands are clear of the Propellers and any moving parts. Push the Plane Speed control all the way toward the L position - see Figure 6. Move both trim adjustments to the center. Turn on the switch on the Airplane and the switch on the Remote Control (11).

3.If the plane is adjusted properly, the rudder (on the Vertical Stabilizer (21) and elevators (on the Horizontal Stabilizer (2)) should be straight and level.

4.If either the Rudder or Elevators are not straight and level, the Clips at the end of the Pushrods

(4) should be adjusted. This is done by turning the Clip IN (to shorten) or OUT (to lengthen) the Pushrod. Note: This should be done with Servos energized (power to Radio & Plane ON) for proper alignment.

5.Each control stick on the front of the control has a trim adjustment next to it, shown in Figure 5. These adjustments are used to fine-tune the position of the controls. They are typically used in flight to ensure that the plane can stay at a steady height and can fly straight more easily.

6.NOTE: The Plane Speed control is disabled until the Safety Button on the side of the Fuselage (3) is pressed. Leave it disabled until you are ready to fly the plane.

Pushing the plane speed control (see Figure 6) upward, toward the H position, will cause the Propeller (9) to spin faster. Pushing the plane speed control back down, toward the L position, will slow down and stop the Propeller (9).

7.The rudder control stick controls the plane’s left and right direction. Move the control stick right to turn the rudder right, turning the plane right; and left to turn the rudder left, turning the plane left. When the control stick is in the center position, the rudder should also be centered.

8.The Elevator Control Stick changes the position of the Elevator which causes the Plane to climb or descend. Moving the Stick up causes the Elevator to more down making it possible for the Plane to descend; moving the Stick down causes the Elvator to move up making it possible for the Plane to climb. If the Stick is centered the Elevator should be level.

9.Practice these steps until you are comfortable with the controls.

10.The reverse toggles can be used to reverse the operation of the two front control sticks. Each reverse toggle controls the Control Stick nearest it. There are two settings: “N”=Normal Operation; “R”=Reversed Controls (left->right or forward->backward, and vice-versa).

Flying the Airplane

1.Choose a day when the wind is light. The Ribbon (27) attached to the Remote Control antenna should be blowing slightly (not greater than 30 degrees) and not be blowing straight out. Find a wide-open field.

REV 08j

SKU 92906

For technical questions, please call 1-800-444-3353.

Page 7

Page 7
Image 7
Harbor Freight Tools 92906 operating instructions Setting up The Controls, Flying the Airplane

92906 specifications

Harbor Freight Tools 92906 is a versatile tool known for its reliability and affordability, making it a favorite among DIY enthusiasts and professional contractors alike. This particular tool, a portable generator, offers a robust performance designed to cater to various power needs, whether for home backup, camping, or job site energy requirements.

One of the standout features of the 92906 is its powerful 6.5 HP engine, which ensures that it can deliver ample power. The generator produces a maximum output of 4000 watts, which is sufficient for running several household appliances simultaneously, including refrigerators, lights, and power tools. Its running wattage of 3500 watts allows for extended use without overheating or overloading.

The 92906 boasts a lightweight design, weighing around 90 pounds, which enhances its portability. Users can easily transport it to various locations, making it ideal for outdoor activities or emergency situations. It also comes with a comfortable handle and flat-free tires, which facilitate easy maneuverability.

In terms of technology, the generator features an efficient low-oil shutdown mechanism. This technology is designed to protect the engine by automatically turning off the generator when oil levels become too low, preventing potential damage and extending the unit's lifespan. Additionally, the generator includes a built-in surge protector, safeguarding connected devices from power surges during operation.

The Harbor Freight Tools 92906 is equipped with several outlets, including multiple 120V AC outlets and a 12V DC outlet, providing versatility for different power needs. The control panel is user-friendly, allowing for easy operation and monitoring of power output.

Furthermore, this generator has a noise-reducing design, making it quieter than comparable models, thus making it more suitable for residential areas or quiet camping trips. The fuel tank capacity of 3.5 gallons ensures that users can enjoy extended run times without frequent refueling, allowing for uninterrupted power supply during critical times.

In conclusion, the Harbor Freight Tools 92906 portable generator stands out for its combination of power, portability, and user-friendly features. With reliable performance for home and outdoor use, it is an excellent investment for anyone needing a dependable power source.