Manuals
/
Harbor Freight Tools
/
Household Appliance
/
Water Pump
Harbor Freight Tools
93819 See Figure E, For technical questions, please call, Power Cord & Plug
Models:
93819
93820
1
9
14
14
Download
14 pages
56.85 Kb
6
7
8
9
10
11
12
13
Troubleshooting
Specification
Parts list
Assembly Diagram
Symbology
Safety
Power Cord & Plug
Service
Page 9
Image 9
Page 8
Page 10
Page 9
Image 9
Page 8
Page 10
Contents
ASSEMBLY AND OPERATING INSTRUCTIONS
For technical questions, please call
SUBMERSIBLE DIRTY WATER PUMP
Model 93819 - 1 HP Model 93820 - 1.2 HP
GENERAL SAFETY RULES
PRODUCT SPECIFICATIONS
SAVE THIS MANUAL
WORK AREA
ELECTRICAL SAFETY
PERSONAL SAFETY
2. Do not operate power tools in explosive atmospheres, such as in the presence of flammable liquids, gases, or dust. Power tools create sparks which may ignite the dust or fumes
SPECIFIC SAFETY RULES
SERVICE
TOOL USE AND CARE
Drip Loop
8. Make sure to position the Pump on a flat, level, solid surface
FIGURE A
OUTLET PUMP DEVICE OUTLET CORD
GROUNDING
11. NEVER raise or lower the Pump by its electrical Power Cord
14. Industrial applications must follow OSHA requirements
SAVE THESE INSTRUCTIONS
FIGURE B DOUBLE INSULATED TOOLS TOOLS WITH TWO PRONG PLUGS
GROUNDED TOOLS TOOLS WITH THREE PRONG PLUGS
FIGURE C
THIS PRODUCT USES A 3-PRONG ELECTRICAL PLUG 120 VOLT GROUNDED
ASSEMBLY AND OPERATING INSTRUCTIONS
SYMBOLOGY
UNPACKING
FIGURE D
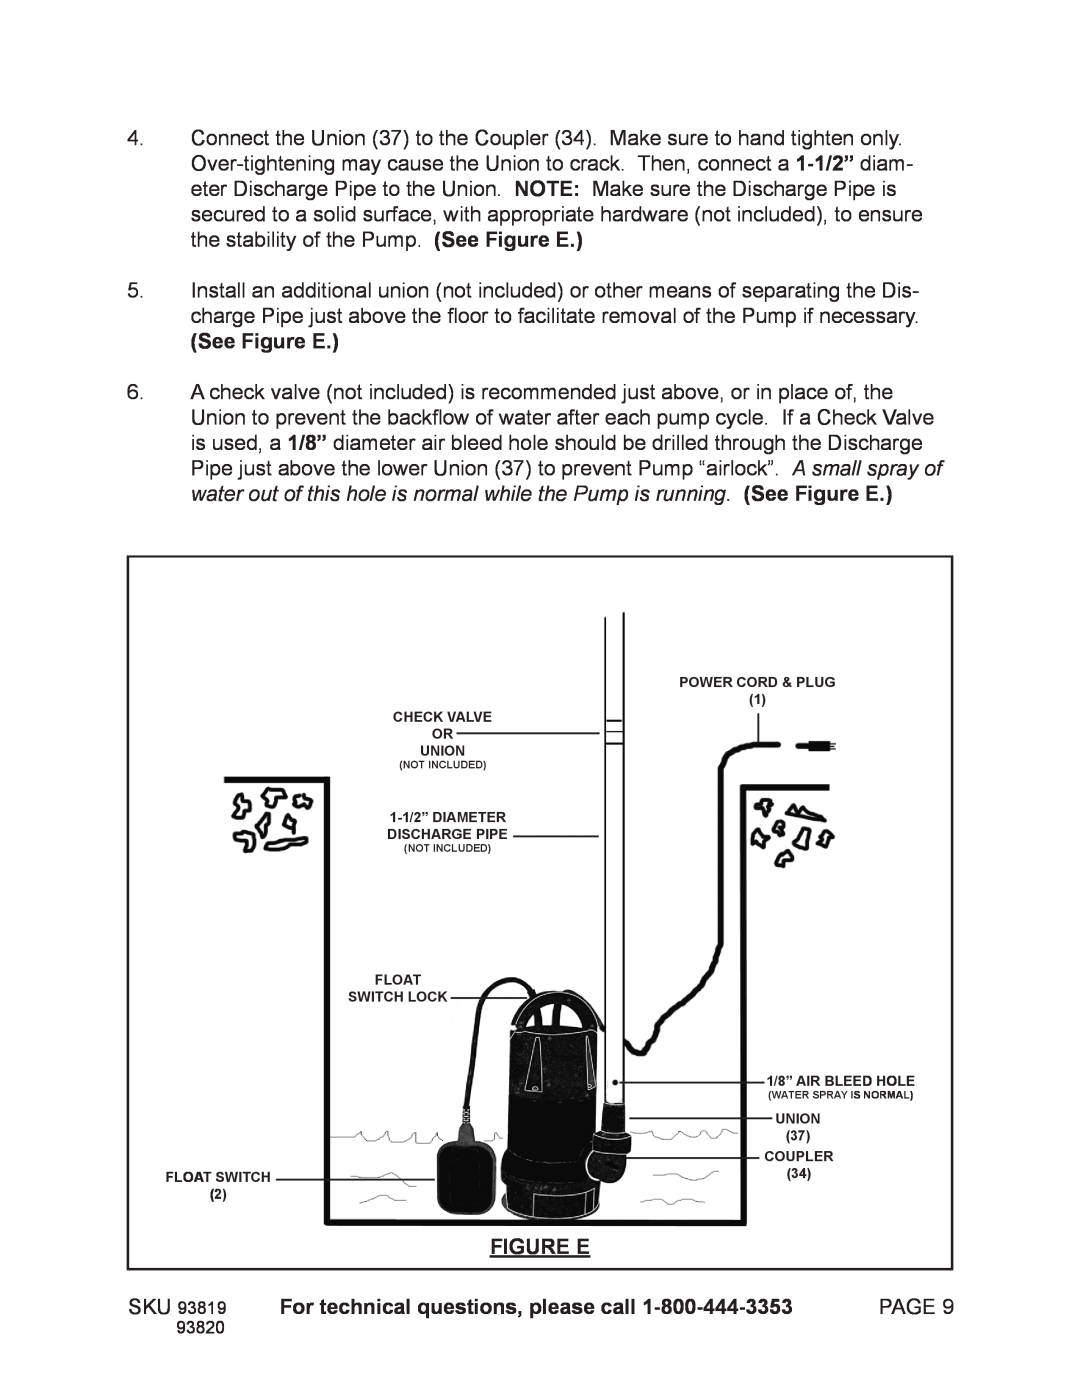
FIGURE E
See Figure E
POWER CORD & PLUG
FLOAT SWITCH LOCK 1/8” AIR BLEED HOLE
INSPECTION, MAINTENANCE, AND CLEANING
Cord 1 or Discharge Pipe. See Figure E
1 HP Model 93819 = 26 Feet 1.2 HP Model 93820 = 28 Feet
See Figure F and Assy. Diagram
TROUBLESHOOTING
FIGURE F
Problem
PLEASE READ THE FOLLOWING CAREFULLY
PARTS LIST
ASSEMBLY DIAGRAM
and are not available individually as replacement parts
Some parts are listed and shown for illustration purposes only
Limited 1 year / 90 Day warranty
3491 Mission Oaks Blvd. PO Box 6009 Camarillo, CA 93011 800
Top
Page
Image
Contents