MOWER MAINTENANCE
Securing Nuts & Bolts
Regularly check that all securing nuts and bolts are tight. Replace missing or damaged items immediately.
Lubrication
Lubricate the wheels, pivot points and linkages with engine oil every 25 operating hours.
Apply a good quality medium grease to the inner control cables at the point of entry and exit from their outer cas- ing.
Cutterblade Removal
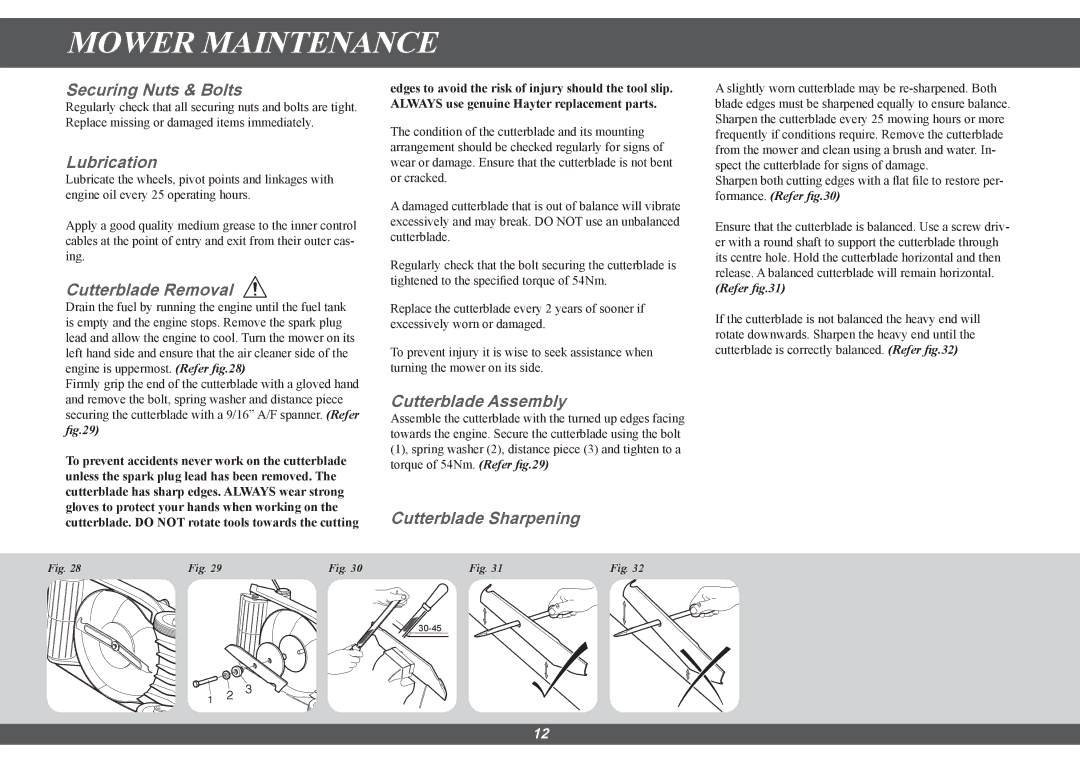
Drain the fuel by running the engine until the fuel tank is empty and the engine stops. Remove the spark plug lead and allow the engine to cool. Turn the mower on its left hand side and ensure that the air cleaner side of the engine is uppermost. (Refer fig.28)
Firmly grip the end of the cutterblade with a gloved hand and remove the bolt, spring washer and distance piece securing the cutterblade with a 9/16” A/F spanner. (Refer fig.29)
To prevent accidents never work on the cutterblade unless the spark plug lead has been removed. The cutterblade has sharp edges. ALWAYS wear strong gloves to protect your hands when working on the cutterblade. DO NOT rotate tools towards the cutting
Fig. 28 | Fig. 29 | Fig. 30 |
edges to avoid the risk of injury should the tool slip. ALWAYS use genuine Hayter replacement parts.
The condition of the cutterblade and its mounting arrangement should be checked regularly for signs of wear or damage. Ensure that the cutterblade is not bent or cracked.
A damaged cutterblade that is out of balance will vibrate excessively and may break. DO NOT use an unbalanced cutterblade.
Regularly check that the bolt securing the cutterblade is tightened to the specified torque of 54Nm.
Replace the cutterblade every 2 years of sooner if excessively worn or damaged.
To prevent injury it is wise to seek assistance when turning the mower on its side.
Cutterblade Assembly
Assemble the cutterblade with the turned up edges facing towards the engine. Secure the cutterblade using the bolt (1), spring washer (2), distance piece (3) and tighten to a torque of 54Nm. (Refer fig.29)
Cutterblade Sharpening
Fig. 31 | Fig. 32 |
A slightly worn cutterblade may be
Sharpen both cutting edges with a flat file to restore per- formance. (Refer fig.30)
Ensure that the cutterblade is balanced. Use a screw driv- er with a round shaft to support the cutterblade through its centre hole. Hold the cutterblade horizontal and then release. A balanced cutterblade will remain horizontal.
(Refer fig.31)
If the cutterblade is not balanced the heavy end will rotate downwards. Sharpen the heavy end until the cutterblade is correctly balanced. (Refer fig.32)
1 2 ![]() 3
3
12