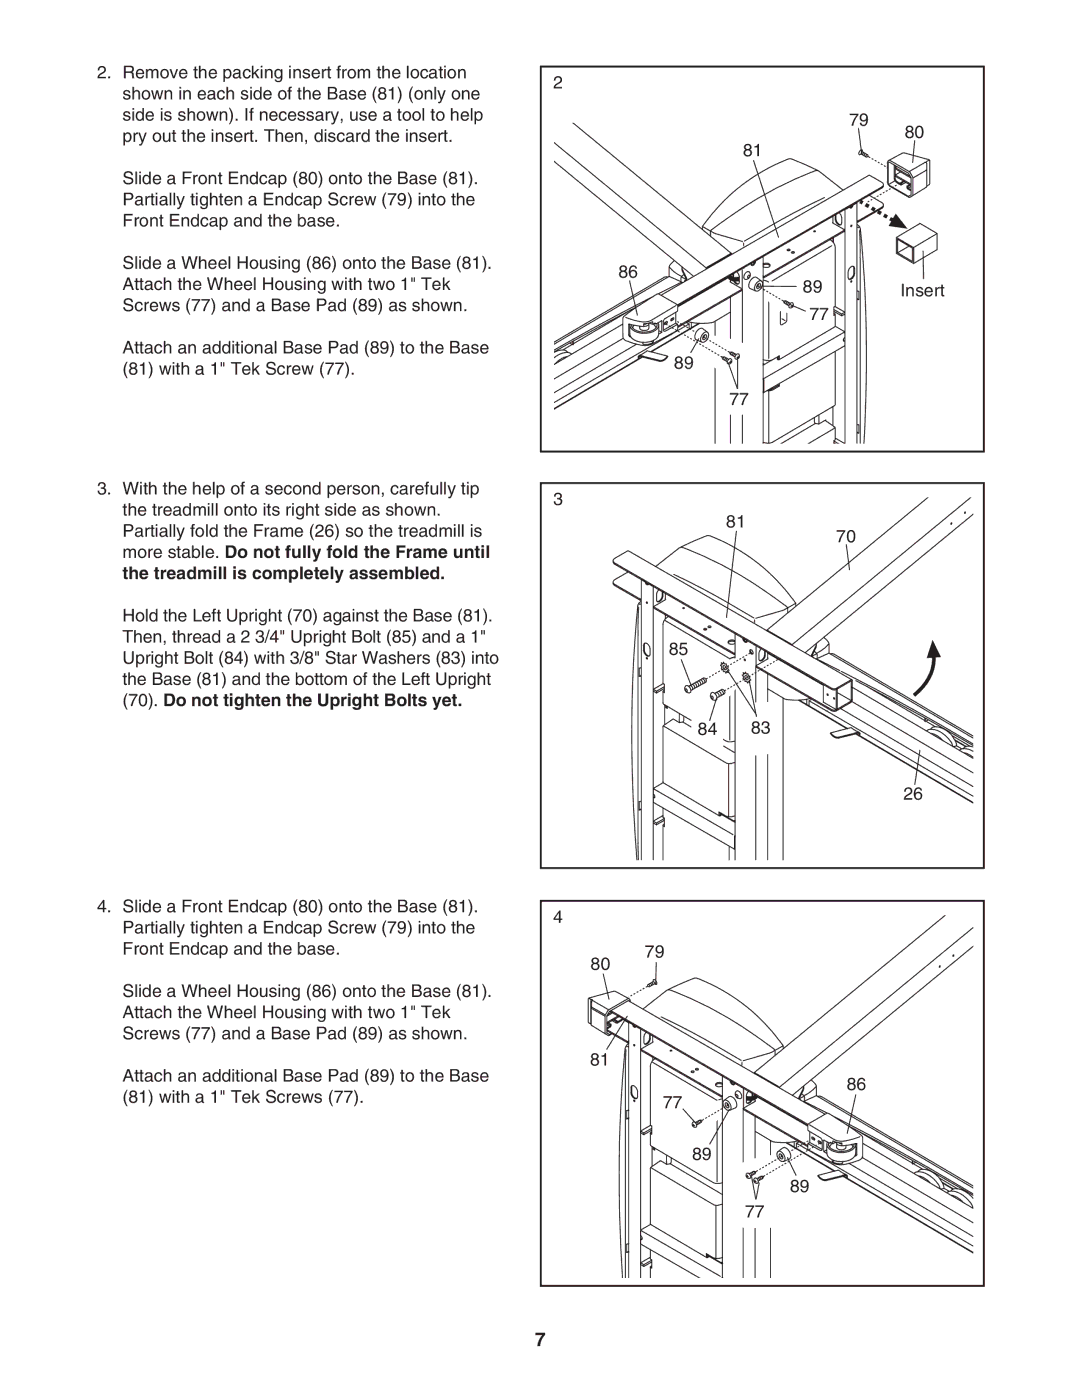
2. Remove the packing insert from the location | 2 |
|
| |
shown in each side of the Base (81) (only one |
|
| ||
|
|
| ||
side is shown). If necessary, use a tool to help |
|
| 79 | |
pry out the insert. Then, discard the insert. |
| 81 | 80 | |
|
|
| ||
Slide a Front Endcap (80) onto the Base (81). |
|
|
| |
Partially tighten a Endcap Screw (79) into the |
|
|
| |
Front Endcap and the base. |
|
|
| |
Slide a Wheel Housing (86) onto the Base (81). | 86 |
|
| |
Attach the Wheel Housing with two 1" Tek | 89 | Insert | ||
| ||||
Screws (77) and a Base Pad (89) as shown. |
| 77 |
| |
|
|
| ||
Attach an additional Base Pad (89) to the Base | 89 |
|
| |
(81) with a 1" Tek Screw (77). |
|
| ||
|
|
| ||
|
| 77 |
| |
3. With the help of a second person, carefully tip | 3 |
|
| |
the treadmill onto its right side as shown. |
|
| ||
| 81 |
| ||
Partially fold the Frame (26) so the treadmill is |
| 70 | ||
|
| |||
more stable. Do not fully fold the Frame until |
|
| ||
|
|
| ||
the treadmill is completely assembled. |
|
|
| |
Hold the Left Upright (70) against the Base (81). |
|
|
| |
Then, thread a 2 3/4" Upright Bolt (85) and a 1" | 85 |
|
| |
Upright Bolt (84) with 3/8" Star Washers (83) into |
|
| ||
|
|
| ||
the Base (81) and the bottom of the Left Upright |
|
|
| |
(70). Do not tighten the Upright Bolts yet. |
|
|
| |
| 84 | 83 |
| |
|
|
| 26 | |
4. Slide a Front Endcap (80) onto the Base (81). | 4 |
|
| |
Partially tighten a Endcap Screw (79) into the |
|
| ||
|
|
| ||
Front Endcap and the base. | 79 |
|
| |
| 80 |
|
| |
Slide a Wheel Housing (86) onto the Base (81). |
|
|
| |
Attach the Wheel Housing with two 1" Tek |
|
|
| |
Screws (77) and a Base Pad (89) as shown. |
|
|
| |
Attach an additional Base Pad (89) to the Base | 81 |
|
| |
|
| 86 | ||
(81) with a 1" Tek Screws (77). | 77 |
| ||
|
| |||
|
|
| ||
| 89 |
|
| |
|
| 89 |
| |
|
| 77 |
| |
| 7 |
|
|