Step 1.

Before cutting any holes, assemble the desired sections of direct vent pipe to determine the center of the masonry penetration.

Step 2.

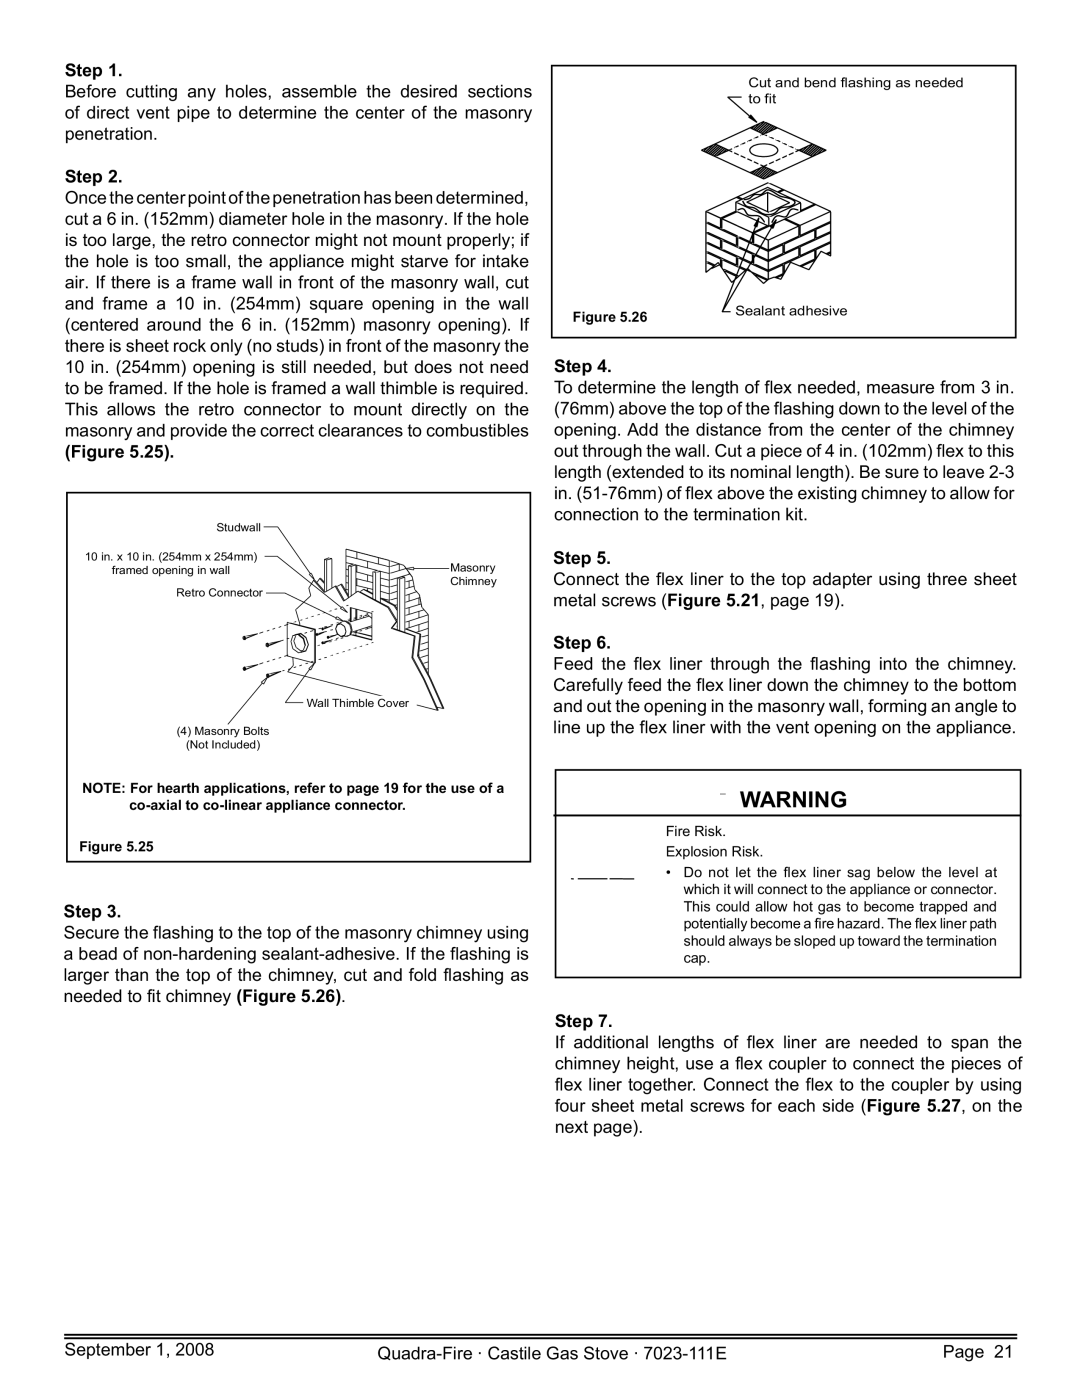
Once the center point of the penetration has been determined, cut a 6 in. (152mm) diameter hole in the masonry. If the hole is too large, the retro connector might not mount properly; if the hole is too small, the appliance might starve for intake air. If there is a frame wall in front of the masonry wall, cut and frame a 10 in. (254mm) square opening in the wall (centered around the 6 in. (152mm) masonry opening). If there is sheet rock only (no studs) in front of the masonry the 10 in. (254mm) opening is still needed, but does not need to be framed. If the hole is framed a wall thimble is required. This allows the retro connector to mount directly on the masonry and provide the correct clearances to combustibles

(Figure 5.25).

Cut and bend flashing as needed to fit

Figure 5.26


Sealant adhesive


Step 4.

To determine the length of flex needed, measure from 3 in. (76mm) above the top of the flashing down to the level of the opening. Add the distance from the center of the chimney out through the wall. Cut a piece of 4 in. (102mm) flex to this length (extended to its nominal length). Be sure to leave 2-3 in. (51-76mm) of flex above the existing chimney to allow for connection to the termination kit.

Studwall

10 in. x 10 in. (254mm x 254mm)

framed opening in wall

Retro Connector

(4) Masonry Bolts

(Not Included)

Masonry Chimney

Wall Thimble Cover

Step 5.

Connect the flex liner to the top adapter using three sheet metal screws (Figure 5.21, page 19).

Step 6.

Feed the flex liner through the flashing into the chimney. Carefully feed the flex liner down the chimney to the bottom and out the opening in the masonry wall, forming an angle to line up the flex liner with the vent opening on the appliance.

NOTE: For hearth applications, refer to page 19 for the use of a co-axial to co-linear appliance connector.

Figure 5.25

Step 3.

Secure the flashing to the top of the masonry chimney using a bead of non-hardening sealant-adhesive. If the flashing is larger than the top of the chimney, cut and fold flashing as needed to fit chimney (Figure 5.26).

WARNING

Fire Risk.

Explosion Risk.

Do not let the flex liner sag below the level at which it will connect to the appliance or connector. This could allow hot gas to become trapped and potentially become a fire hazard. The flex liner path should always be sloped up toward the termination cap.

Step 7.

If additional lengths of flex liner are needed to span the chimney height, use a flex coupler to connect the pieces of flex liner together. Connect the flex to the coupler by using four sheet metal screws for each side (Figure 5.27, on the next page).

September 1, 2008

Quadra-Fire · Castile Gas Stove · 7023-111E

Page 21

Page 21
Image 21
Hearth and Home Technologies CASTILE-GAS-MBK, CASTILE-GAS-PMH Cut and bend flashing as needed to fit Sealant adhesive

CASTILE-GAS-CSB, CASTILE-GAS-MBK, CASTILE-GAS-PMH, CASTILE-GAS-CWL specifications

Hearth and Home Technologies (HHT) has made significant strides in the world of gas stoves, offering a range of stylish and efficient options tailored to elevate any living space. Among their impressive lineup are the CASTILE-GAS-CWL, CASTILE-GAS-PMH, CASTILE-GAS-MBK, and CASTILE-GAS-CSB models. Each of these gas stoves combines modern technology with classic design, making them a popular choice for homeowners looking to add warmth and comfort to their homes.

The CASTILE-GAS-CWL features a classic design with elegant lines, making it suitable for both traditional and contemporary spaces. This model comes equipped with a powerful heat exchanger that efficiently distributes warmth throughout the room while maintaining optimal energy consumption. The intuitive control panel allows users to easily adjust the temperature settings and flame height, providing a customized heating experience.

Next, the CASTILE-GAS-PMH model stands out with its sleek and modern aesthetics. With an emphasis on efficiency, this gas stove incorporates advanced combustion technology to ensure cleaner burning and reduced emissions. Its programmable thermostat feature allows for precise temperature control, which can be operated remotely, providing convenience to users. Enhanced safety features, such as an automatic shut-off system, give homeowners peace of mind.

The CASTILE-GAS-MBK model showcases a bold and contemporary design, featuring a large viewing window that allows users to enjoy the mesmerizing flames. Known for its robust build quality, this model is designed to withstand the test of time. The adjustable flame height and remote control operation further enhance user convenience. Additionally, the high-efficiency rating of this model makes it an environmentally friendly choice, reducing the overall carbon footprint.

Finally, the CASTILE-GAS-CSB brings a touch of rustic charm to its design while incorporating advanced heating technologies. This model offers exceptional heat output and a large firebox, ensuring maximum warmth in larger areas. The vent-free technology allows for greater flexibility in installation, enabling homeowners to place it in a variety of locations without the need for external venting systems.

Overall, Hearth and Home Technologies has successfully created a line of gas stoves that blend aesthetic appeal with reliability and efficiency. Each model in the CASTILE range comes equipped with unique features that cater to diverse consumer needs, making them an excellent addition to any home desiring energy-efficient heating solutions. Whether you're looking for classic elegance or modern flair, HHT's CASTILE series has something for everyone.