I. Install Vertical Termination Cap

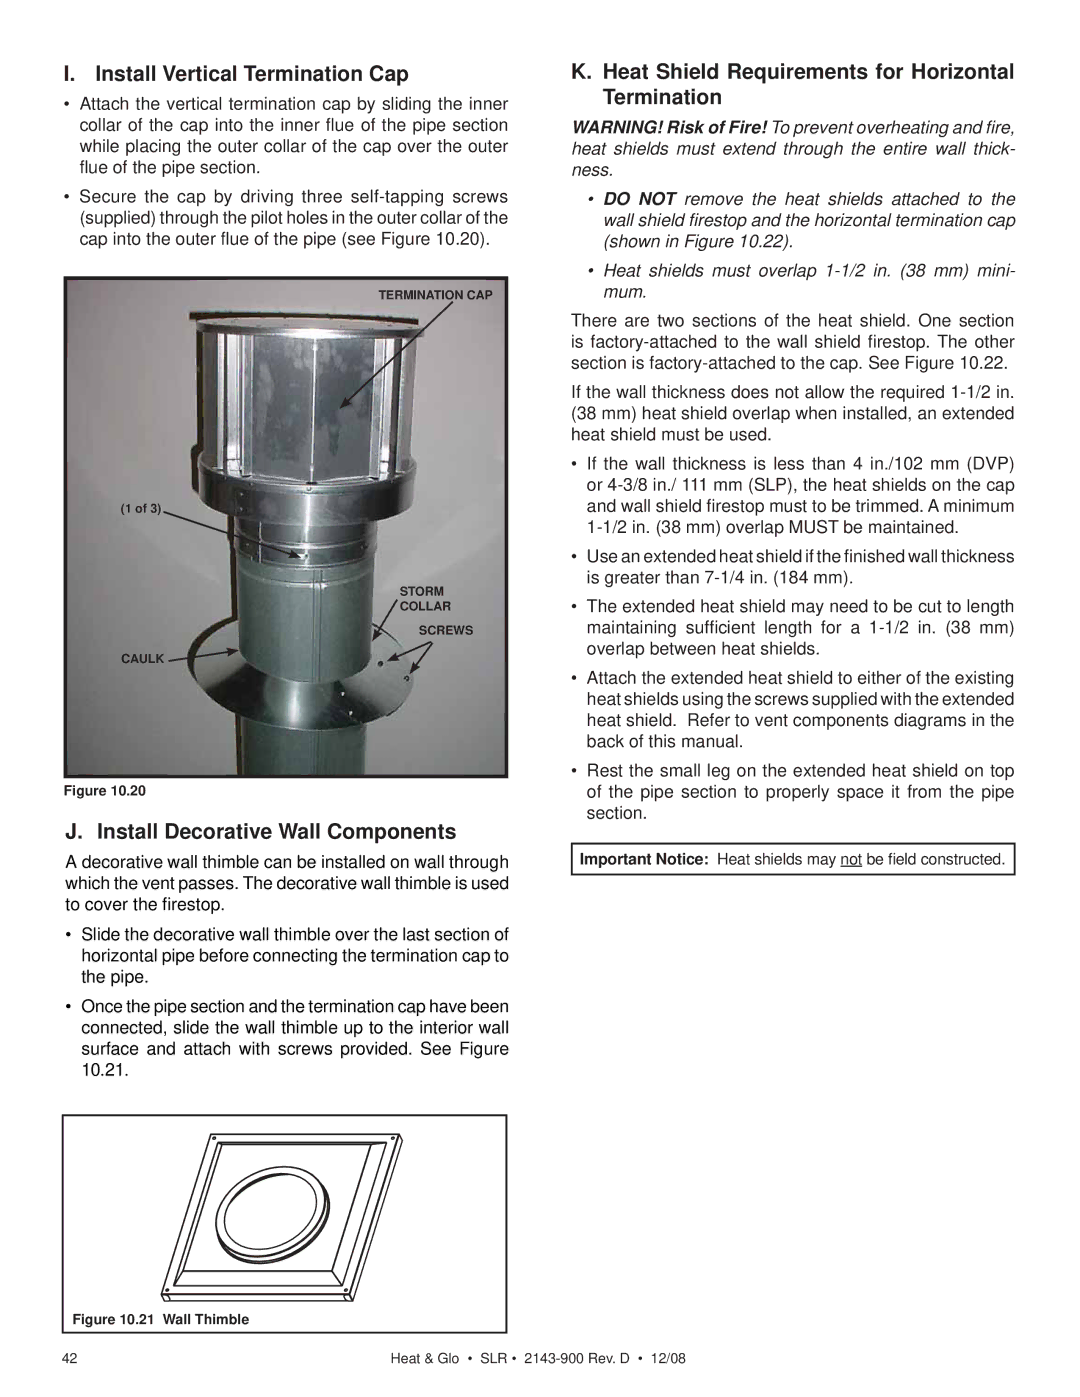
Attach the vertical termination cap by sliding the inner collar of the cap into the inner flue of the pipe section while placing the outer collar of the cap over the outer flue of the pipe section.

Secure the cap by driving three self-tapping screws (supplied) through the pilot holes in the outer collar of the cap into the outer flue of the pipe (see Figure 10.20).

TERMINATION CAP

(1 of 3)

STORM

COLLAR

SCREWS

CAULK

Figure 10.20

J. Install Decorative Wall Components

A decorative wall thimble can be installed on wall through which the vent passes. The decorative wall thimble is used to cover the firestop.

Slide the decorative wall thimble over the last section of horizontal pipe before connecting the termination cap to the pipe.

Once the pipe section and the termination cap have been connected, slide the wall thimble up to the interior wall surface and attach with screws provided. See Figure 10.21.

K.Heat Shield Requirements for Horizontal Termination

WARNING! Risk of Fire! To prevent overheating and fire, heat shields must extend through the entire wall thick- ness.

DO NOT remove the heat shields attached to the wall shield firestop and the horizontal termination cap (shown in Figure 10.22).

Heat shields must overlap 1-1/2 in. (38 mm) mini- mum.

There are two sections of the heat shield. One section is factory-attached to the wall shield firestop. The other section is factory-attached to the cap. See Figure 10.22.

If the wall thickness does not allow the required 1-1/2 in. (38 mm) heat shield overlap when installed, an extended heat shield must be used.

If the wall thickness is less than 4 in./102 mm (DVP) or 4-3/8 in./ 111 mm (SLP), the heat shields on the cap and wall shield firestop must to be trimmed. A minimum 1-1/2 in. (38 mm) overlap MUST be maintained.

Use an extended heat shield if the finished wall thickness is greater than 7-1/4 in. (184 mm).

The extended heat shield may need to be cut to length maintaining sufficient length for a 1-1/2 in. (38 mm) overlap between heat shields.

Attach the extended heat shield to either of the existing heat shields using the screws supplied with the extended heat shield. Refer to vent components diagrams in the back of this manual.

Rest the small leg on the extended heat shield on top of the pipe section to properly space it from the pipe section.

Important Notice: Heat shields may not be field constructed.

Figure 10.21 Wall Thimble

42

Heat & Glo • SLR • 2143-900 Rev. D • 12/08

Page 42
Image 42
Hearth and Home Technologies SLR (Cosmo) owner manual Install Vertical Termination Cap, Install Decorative Wall Components

SLR (Cosmo) specifications

Hearth and Home Technologies (HHT) is a leading manufacturer of hearth and home products, known for their innovative designs and commitment to quality. One of their standout products is the Cosmo series of stoves, particularly the SLR model. This product embodies the perfect blend of aesthetics, efficiency, and modern technology, making it a popular choice among homeowners looking to enhance their living spaces.

The Cosmo SLR stove features a sleek and contemporary design that complements various interior styles. Its clean lines and sophisticated finish make it a statement piece in any room. The unit is available in different colors and finishes, allowing consumers to select a model that best suits their decorative theme. The glass front provides a large view of the flames, creating a cozy atmosphere while allowing for efficient heat distribution.

One of the main features of the Cosmo SLR is its high-efficiency performance. The stove is engineered with advanced combustion technology that allows it to produce more heat with less fuel, making it an eco-friendly option. This efficiency not only reduces emissions but also lowers heating costs, making it an economical choice for homeowners. The combustion chamber is designed to maximize airflow, ensuring that the fire burns cleanly and effectively.

In addition to its efficiency, the Cosmo SLR incorporates smart technology that enhances user experience. The optional remote control allows users to adjust the heat and flame settings effortlessly. This feature adds convenience, especially in cold weather when users want to quickly warm up their space without having to leave their cozy spot.

Another noteworthy characteristic of the Cosmo SLR is its versatile installation options. It can be installed as a freestanding unit or inserted into an existing fireplace, providing flexibility for homeowners with diverse space requirements. The SLR model is also designed to be compatible with a variety of venting systems, ensuring that it can fit into different home layouts easily.

Overall, the Hearth and Home Technologies Cosmo SLR stove combines style, efficiency, and advanced technology, making it an attractive heating solution for modern households. Its commitment to sustainability, customization options, and user-friendly features set it apart in the market, appealing to a wide range of consumers looking to enhance their comfort and style.