2FT.

MIN.

TERMINATION

CAP


HORIZONTAL


OVERHANG

20 INCH MIN.

VERTICAL


LOWEST

WALL


DISCHARGE


OPENING


X

12

ROOF PITCH

IS X/ 12

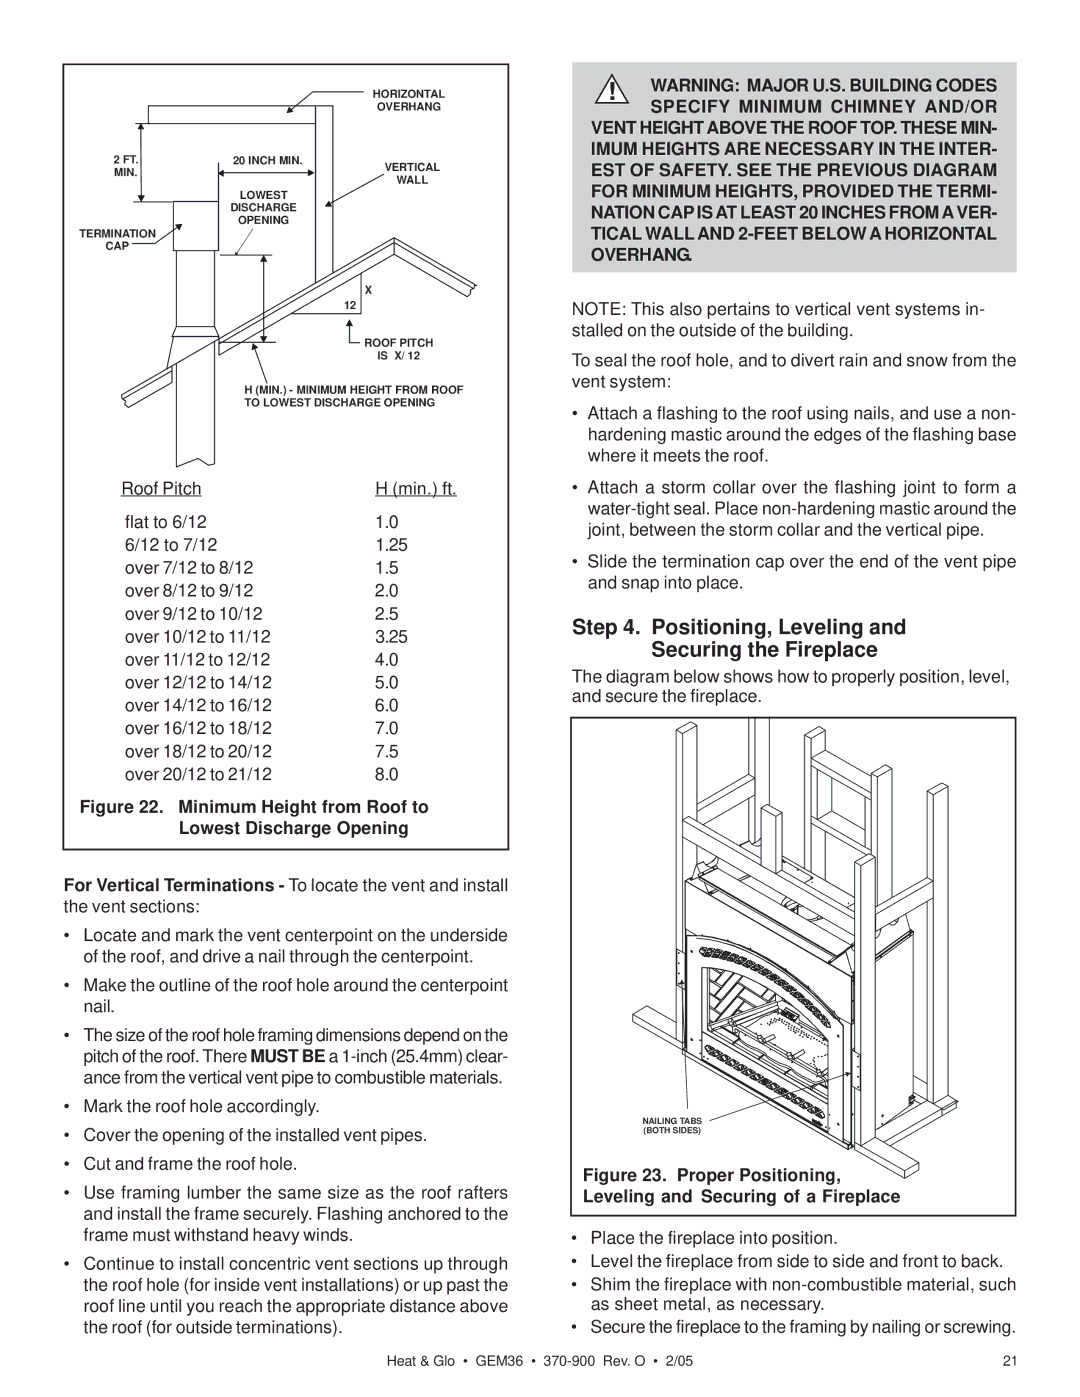
H (MIN.) - MINIMUM HEIGHT FROM ROOF TO LOWEST DISCHARGE OPENING

!WARNING: MAJOR U.S. BUILDING CODES SPECIFY MINIMUM CHIMNEY AND/OR

VENT HEIGHT ABOVE THE ROOF TOP. THESE MIN- IMUM HEIGHTS ARE NECESSARY IN THE INTER- EST OF SAFETY. SEE THE PREVIOUS DIAGRAM FOR MINIMUM HEIGHTS, PROVIDED THE TERMI- NATION CAP IS AT LEAST 20 INCHES FROM A VER- TICAL WALL AND 2-FEET BELOW A HORIZONTAL OVERHANG.

NOTE: This also pertains to vertical vent systems in- stalled on the outside of the building.

To seal the roof hole, and to divert rain and snow from the vent system:

• Attach a flashing to the roof using nails, and use a non-

hardening mastic around the edges of the flashing base

where it meets the roof.

Roof Pitch

H (min.) ft.

flat to 6/12

1.0

6/12 to 7/12

1.25

over 7/12 to 8/12

1.5

over 8/12 to 9/12

2.0

over 9/12 to 10/12

2.5

over 10/12 to 11/12

3.25

over 11/12 to 12/12

4.0

over 12/12 to 14/12

5.0

over 14/12 to 16/12

6.0

over 16/12 to 18/12

7.0

over 18/12 to 20/12

7.5

over 20/12 to 21/12

8.0

Figure 22. Minimum Height from Roof to Lowest Discharge Opening

For Vertical Terminations - To locate the vent and install the vent sections:

Locate and mark the vent centerpoint on the underside of the roof, and drive a nail through the centerpoint.

Make the outline of the roof hole around the centerpoint nail.

The size of the roof hole framing dimensions depend on the pitch of the roof. There MUST BE a 1-inch (25.4mm) clear- ance from the vertical vent pipe to combustible materials.

Mark the roof hole accordingly.

Cover the opening of the installed vent pipes.

Cut and frame the roof hole.

Use framing lumber the same size as the roof rafters and install the frame securely. Flashing anchored to the frame must withstand heavy winds.

Continue to install concentric vent sections up through the roof hole (for inside vent installations) or up past the roof line until you reach the appropriate distance above the roof (for outside terminations).

Attach a storm collar over the flashing joint to form a


water-tight seal. Place non-hardening mastic around the


joint, between the storm collar and the vertical pipe.

Slide the termination cap over the end of the vent pipe


and snap into place.

Step 4. Positioning, Leveling and Securing the Fireplace

The diagram below shows how to properly position, level, and secure the fireplace.

NAILING TABS

(BOTH SIDES)

Figure 23. Proper Positioning,

Leveling and Securing of a Fireplace

Place the fireplace into position.

Level the fireplace from side to side and front to back.

Shim the fireplace with non-combustible material, such as sheet metal, as necessary.

Secure the fireplace to the framing by nailing or screwing.

Heat & Glo • GEM36 • 370-900 Rev. O • 2/05

21

Page 21
Image 21
Heat & Glo LifeStyle GEM36 manual Positioning, Leveling and Securing the Fireplace, Leveling and Securing of a Fireplace

GEM36 specifications

The Heat & Glo LifeStyle GEM36 is a stunning gas fireplace that harmoniously blends design, functionality, and technology. This contemporary vented fireplace is designed to be the centerpiece of any room, providing warmth while enhancing the aesthetic appeal of spaces ranging from modern living rooms to cozy dens.

One of the standout features of the GEM36 is its impressive viewing area. With a large glass front, this fireplace maximizes visibility, allowing you to enjoy the mesmerizing flames from various angles. The clear, clean lines of the design make it a perfect fit for any décor style, while the customizable options allow homeowners to personalize the look to match their preferences.

The GEM36 incorporates innovative technologies that enhance its performance and user-friendliness. One notable technology is the IntelliFire™ ignition system, which provides reliable and efficient operation. This system offers the convenience of remote control, making it easy to ignite the fire from a distance, ensuring a warm welcome every time you walk into the room.

In terms of efficiency, the GEM36 boasts an impressive heat output, ensuring spaces are not only stylish but also comfortable year-round. The adjustable flame height provides control over the ambiance, allowing users to create the perfect setting for any occasion. This efficiency is complemented by the advanced combustion technology designed to ensure cleaner burning and improved heat management.

Moreover, the LifeStyle GEM36 offers various decorative media options to suit individual tastes. Homeowners can choose from traditional log sets to modern glass or stone accents, allowing for a customized look that enhances the overall aesthetic of the fireplace.

Safety is also a priority with the GEM36, which incorporates features designed to minimize risk. The fireplace is equipped with safety sensors that monitor gas levels and ensure safe operation, providing peace of mind for users.

In summary, the Heat & Glo LifeStyle GEM36 is more than just a fireplace; it is a statement piece that combines elegance, innovation, and safety. With its impressive features, including IntelliFire™ ignition, customizable aesthetics, and high-efficiency performance, the GEM36 is an excellent choice for those looking to elevate their living spaces and enjoy the warmth and comfort of a gas fireplace.