Step 11. Installing Trim, Logs,

and Ember Material

Installing the Trim

Combustible materials may be brought up to the specified clearances on the side and top front edges of the fireplace, but MUST NEVER overlap onto the front face. The joints between the finished wall and the fireplace top and sides can only be sealed with a 300° F. (149° C) minimum sealant.

WARNING: WHEN FINISHING THE FIREPLACE,

!

NEVER OBSTRUCT OR MODIFY THE AIR INLET/ OUTLET GRILLES IN ANY MANNER.

Install optional marble and brass trim surround kits as desired. Marble, brass, brick, tile, or other non-combustible materials can be used to cover up the gap between the sheet rock and the fireplace.

Do not obstruct or modify the air inlet/outlet grilles. When overlapping on both sides, leave enough space so that the bottom grille can be lowered and the trim door removed.

Positioning the Logs

If the gas logs have been factory installed they should not need to be positioned. If the logs have been packaged separately, refer to the instructions that accompany the logs. Save the log instructions with this manual.

If sooting occurs, the logs might need to be repositioned slightly to avoid excessive flame impingement.

Placing the Ember Material

Ember material is shipped with this gas fireplace. To place the ember material:

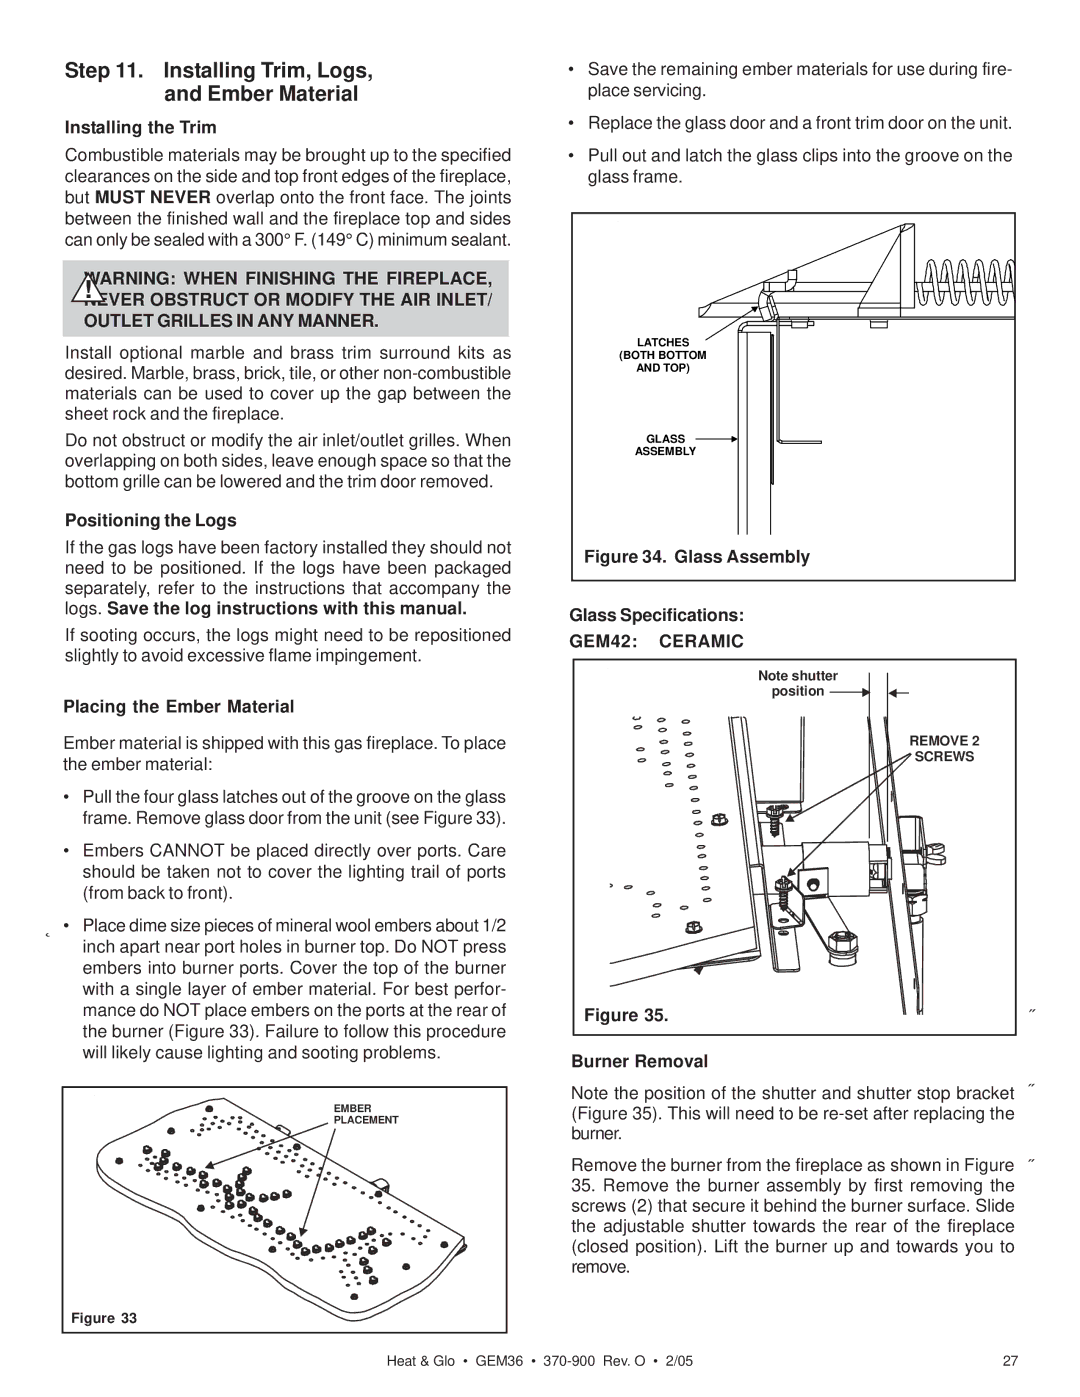
Pull the four glass latches out of the groove on the glass frame. Remove glass door from the unit (see Figure 33).

Embers CANNOT be placed directly over ports. Care should be taken not to cover the lighting trail of ports (from back to front).

Ε Place dime size pieces of mineral wool embers about 1/2 inch apart near port holes in burner top. Do NOT press embers into burner ports. Cover the top of the burner with a single layer of ember material. For best perfor- mance do NOT place embers on the ports at the rear of the burner (Figure 33). Failure to follow this procedure will likely cause lighting and sooting problems.

EMBER

PLACEMENT

Figure 33

Save the remaining ember materials for use during fire- place servicing.

Replace the glass door and a front trim door on the unit.

Pull out and latch the glass clips into the groove on the glass frame.

LATCHES

(BOTH BOTTOM

AND TOP)

GLASS

ASSEMBLY

Figure 34. Glass Assembly

Glass Specifications:

GEM42: CERAMIC


Note shutter


position


REMOVE 2


SCREWS

Figure 35.

Í

Burner Removal

Note the position of the shutter and shutter stop bracket Í (Figure 35). This will need to be re-set after replacing the burner.

Remove the burner from the fireplace as shown in Figure Í

35.Remove the burner assembly by first removing the screws (2) that secure it behind the burner surface. Slide the adjustable shutter towards the rear of the fireplace (closed position). Lift the burner up and towards you to remove.

Heat & Glo • GEM36 • 370-900 Rev. O • 2/05

27

Page 27
Image 27
Heat & Glo LifeStyle GEM36 manual Installing Trim, Logs Ember Material, GEM42 Ceramic

GEM36 specifications

The Heat & Glo LifeStyle GEM36 is a stunning gas fireplace that harmoniously blends design, functionality, and technology. This contemporary vented fireplace is designed to be the centerpiece of any room, providing warmth while enhancing the aesthetic appeal of spaces ranging from modern living rooms to cozy dens.

One of the standout features of the GEM36 is its impressive viewing area. With a large glass front, this fireplace maximizes visibility, allowing you to enjoy the mesmerizing flames from various angles. The clear, clean lines of the design make it a perfect fit for any décor style, while the customizable options allow homeowners to personalize the look to match their preferences.

The GEM36 incorporates innovative technologies that enhance its performance and user-friendliness. One notable technology is the IntelliFire™ ignition system, which provides reliable and efficient operation. This system offers the convenience of remote control, making it easy to ignite the fire from a distance, ensuring a warm welcome every time you walk into the room.

In terms of efficiency, the GEM36 boasts an impressive heat output, ensuring spaces are not only stylish but also comfortable year-round. The adjustable flame height provides control over the ambiance, allowing users to create the perfect setting for any occasion. This efficiency is complemented by the advanced combustion technology designed to ensure cleaner burning and improved heat management.

Moreover, the LifeStyle GEM36 offers various decorative media options to suit individual tastes. Homeowners can choose from traditional log sets to modern glass or stone accents, allowing for a customized look that enhances the overall aesthetic of the fireplace.

Safety is also a priority with the GEM36, which incorporates features designed to minimize risk. The fireplace is equipped with safety sensors that monitor gas levels and ensure safe operation, providing peace of mind for users.

In summary, the Heat & Glo LifeStyle GEM36 is more than just a fireplace; it is a statement piece that combines elegance, innovation, and safety. With its impressive features, including IntelliFire™ ignition, customizable aesthetics, and high-efficiency performance, the GEM36 is an excellent choice for those looking to elevate their living spaces and enjoy the warmth and comfort of a gas fireplace.