SETUP

Set The Inputs

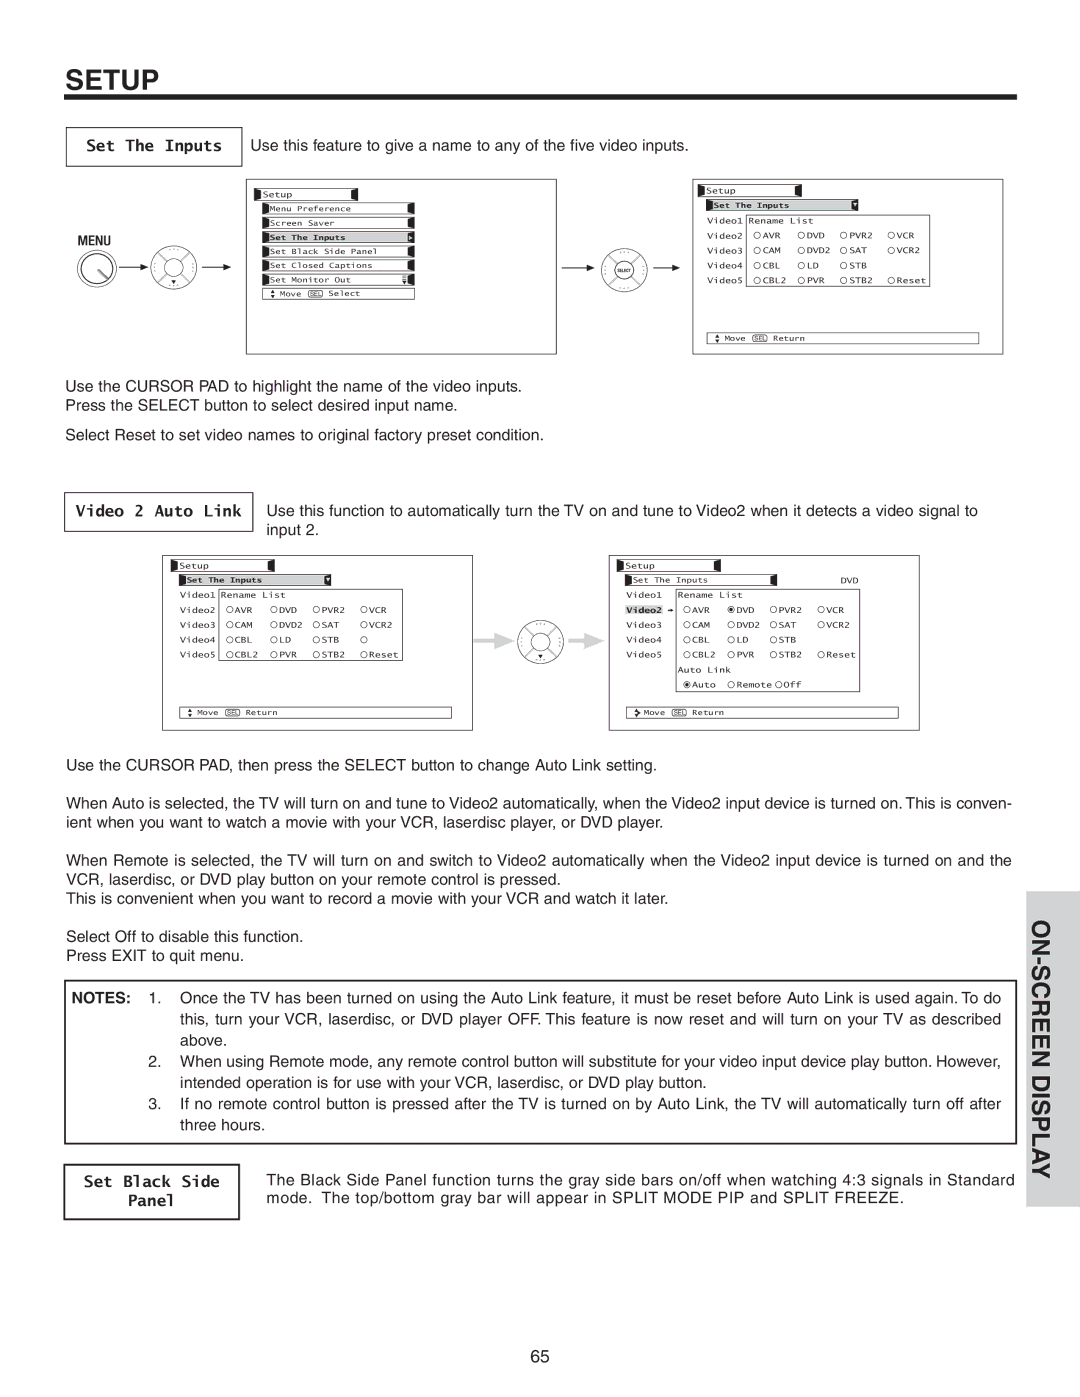
Use this feature to give a name to any of the five video inputs.

Setup

Menu Preference

Screen Saver

Set The Inputs

Set Black Side Panel

Set Closed Captions

Set Monitor Out

Move SEL Select

Setup


Set The Inputs


Video1

Rename List


Video2

AVR

DVD

PVR2

VCR

Video3

CAM

DVD2

SAT

VCR2

Video4

CBL

LD

STB


Video5

CBL2

PVR

STB2

Reset

Move

SEL Return


Use the CURSOR PAD to highlight the name of the video inputs.

Press the SELECT button to select desired input name.

Select Reset to set video names to original factory preset condition.

Video 2 Auto Link Use this function to automatically turn the TV on and tune to Video2 when it detects a video signal to input 2.

Setup


Set The Inputs


Video1

Rename List


Video2

AVR

DVD

PVR2

VCR

Video3

CAM

DVD2

SAT

VCR2

Video4

CBL

LD

STB


Video5

CBL2

PVR

STB2

Reset

Move

SEL Return


Setup


DVD

Set The Inputs


Video1

Rename List


Video2


AVR

DVD

PVR2

VCR

Video3


CAM

DVD2

SAT

VCR2

Video4


CBL

LD

STB


Video5


CBL2

PVR

STB2

Reset


Auto Link


Auto

Remote

Off


Move

SEL

Return


Use the CURSOR PAD, then press the SELECT button to change Auto Link setting.

When Auto is selected, the TV will turn on and tune to Video2 automatically, when the Video2 input device is turned on. This is conven- ient when you want to watch a movie with your VCR, laserdisc player, or DVD player.

When Remote is selected, the TV will turn on and switch to Video2 automatically when the Video2 input device is turned on and the VCR, laserdisc, or DVD play button on your remote control is pressed.

This is convenient when you want to record a movie with your VCR and watch it later.

Select Off to disable this function.

Press EXIT to quit menu.

NOTES: 1. Once the TV has been turned on using the Auto Link feature, it must be reset before Auto Link is used again. To do this, turn your VCR, laserdisc, or DVD player OFF. This feature is now reset and will turn on your TV as described above.

2.When using Remote mode, any remote control button will substitute for your video input device play button. However, intended operation is for use with your VCR, laserdisc, or DVD play button.

3.If no remote control button is pressed after the TV is turned on by Auto Link, the TV will automatically turn off after three hours.


Set Black Side

The Black Side Panel function turns the gray side bars on/off when watching 4:3 signals in Standard

Panel

mode. The top/bottom gray bar will appear in SPLIT MODE PIP and SPLIT FREEZE.

ON-SCREEN DISPLAY

65

Page 65
Image 65
Hitachi 60VS810A, 70VS810 important safety instructions Set The Inputs, Set Black Side, Panel

60VS810A, 70VS810 specifications

The Hitachi 60VS810A and 70VS810 are advanced LCD televisions designed to provide immersive viewing experiences with their superior technologies and sleek designs. Both models fall under the category of flat-panel TVs, making them suitable for a variety of living space setups.

One of the standout features of the Hitachi 60VS810A and 70VS810 is their high-resolution display, which offers stunning picture quality. These models come equipped with Full HD 1080p resolution, ensuring that viewers enjoy clear and vibrant images. The incorporation of a wide color gamut enhances the color accuracy and depth, bringing life to every scene and detail.

The televisions utilize advanced processing technologies that help in reducing motion blur, making them particularly suitable for watching fast-paced sports or action movies. The 120Hz refresh rate is a significant advantage, allowing for smoother motion and clearer images during dynamic sequences. Additionally, the integrated 3D capabilities elevate the viewing experience, enabling users to dive into the content like never before when paired with 3D glasses.

Connectivity is another area where the Hitachi 60VS810A and 70VS810 shine. Both models are equipped with multiple HDMI ports, allowing users to connect various devices such as gaming consoles, Blu-ray players, and streaming boxes effortlessly. The inclusion of USB ports also provides the convenience of viewing media files directly from external drives.

The audio experience is equally noteworthy, with built-in speakers designed to produce rich sound quality. The incorporation of Dolby Digital technologies ensures an immersive audio experience, complementing the stunning visuals. For those who seek a more engaging sound experience, there is the option to connect external sound systems via the audio output options available.

In terms of design, the Hitachi 60VS810A and 70VS810 feature sleek and modern aesthetics that seamlessly blend with any contemporary home décor. The ultra-slim bezels maximize the screen-to-body ratio, allowing for a more expansive viewing area.

Overall, the Hitachi 60VS810A and 70VS810 televisions represent an excellent fusion of modern technology and user-oriented features, making them a compelling choice for anyone looking to upgrade their home entertainment systems. Their combination of high-quality display, advanced sound technologies, and comprehensive connectivity options ensures a captivating viewing experience that caters to diverse preferences and needs.