How To Install Your New Hitachi LCD Television
WALL MOUNTING SETUP
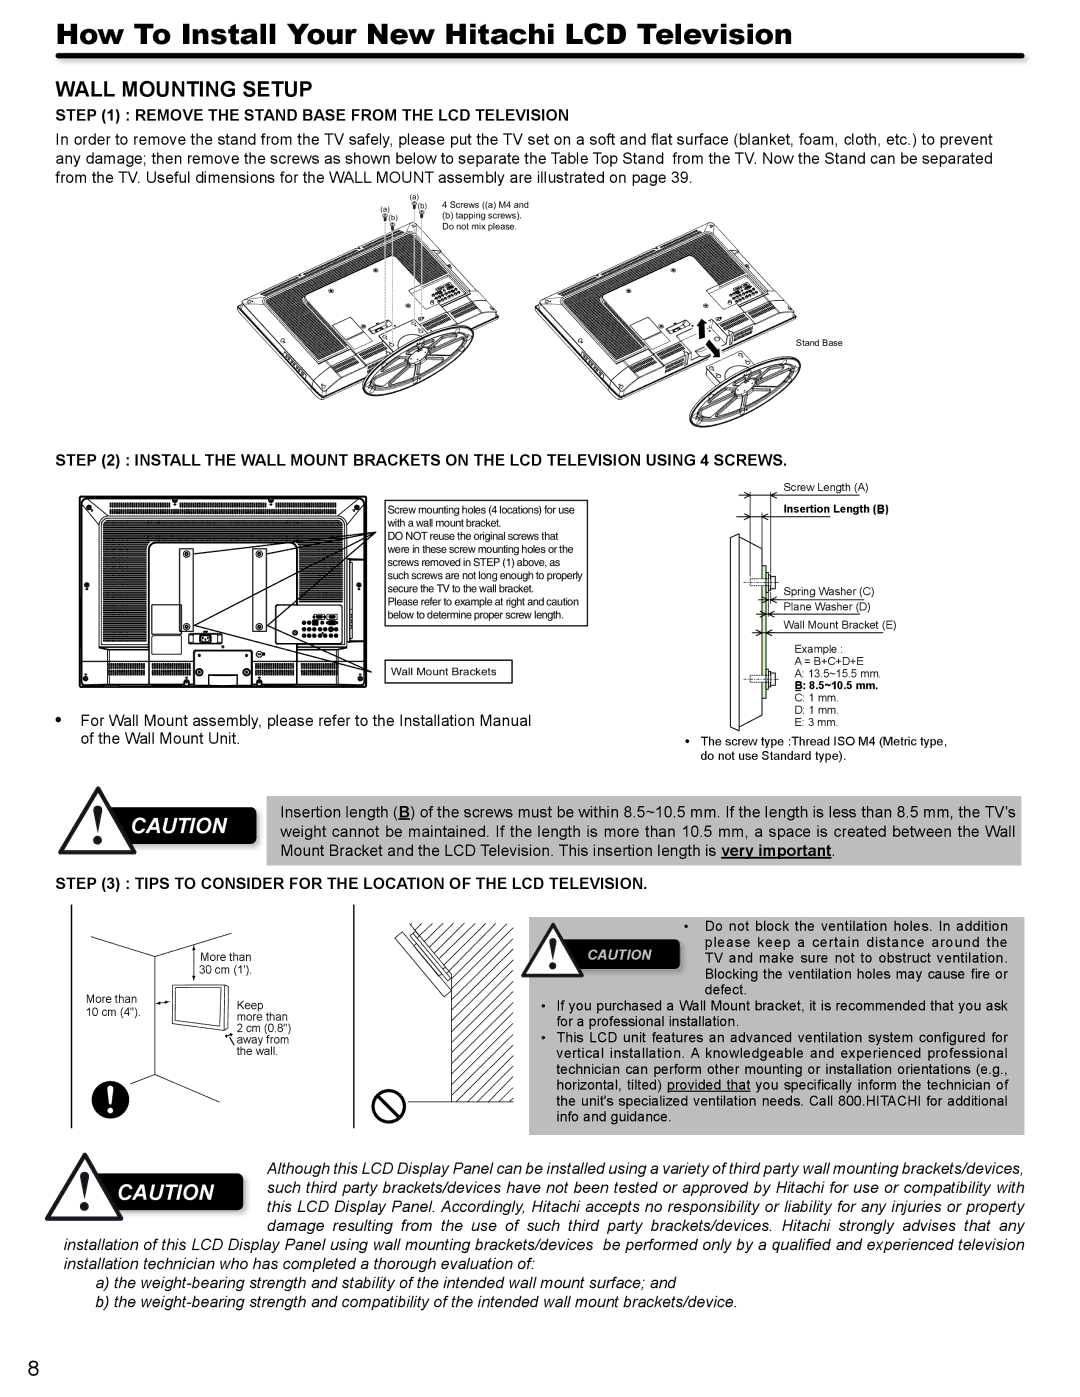
STEP (1) : REMOVE THE STAND BASE FROM THE LCD TELEVISION
In order to remove the stand from the TV safely, please put the TV set on a soft and flat surface (blanket, foam, cloth, etc.) to prevent any damage; then remove the screws as shown below to separate the Table Top Stand from the TV. Now the Stand can be separated from the TV. Useful dimensions for the WALL MOUNT assembly are illustrated on page 39.
| (a) | 4 Screws ((a) M4 and |
(a) | (b) | |
| (b) tapping screws). | |
(b) |
| |
|
| Do not mix please. |
Stand Base
STEP (2) : INSTALL THE WALL MOUNT BRACKETS ON THE LCD TELEVISION USING 4 SCREWS.
Screw mounting holes (4 locations) for use with a wall mount bracket.
DO NOT reuse the original screws that were in these screw mounting holes or the screws removed in STEP (1) above, as such screws are not long enough to properly secure the TV to the wall bracket.
Please refer to example at right and caution below to determine proper screw length.
Wall Mount Brackets
For Wall Mount assembly, please refer to the Installation Manual of the Wall Mount Unit.
Screw Length (A)
Insertion Length (B) |
Spring Washer (C) |
Plane Washer (D) |
Wall Mount Bracket (E) |
Example : |
A = B+C+D+E |
A: 13.5~15.5 mm. |
B: 8.5~10.5 mm. |
C: 1 mm. |
D: 1 mm. |
E: 3 mm. |
The screw type :Thread ISO M4 (Metric type, do not use Standard type).
CAUTION
Insertion length (B) of the screws must be within 8.5~10.5 mm. If the length is less than 8.5 mm, the TV's weight cannot be maintained. If the length is more than 10.5 mm, a space is created between the Wall Mount Bracket and the LCD Television. This insertion length is very important.
STEP (3) : TIPS TO CONSIDER FOR THE LOCATION OF THE LCD TELEVISION.
|
|
| More than | |
|
|
| 30 cm (1'). | |
More than | Keep | |||
10 cm (4"). | ||||
more than | ||||
|
|
| 2 cm (0.8") | |
|
|
| away from | |
|
|
| the wall. | |
|
|
|
| |
|
|
|
| |
•Do not block the ventilation holes. In addition
please keep a certain distance around the
CAUTION TV and make sure not to obstruct ventilation. Blocking the ventilation holes may cause fire or defect.
•If you purchased a Wall Mount bracket, it is recommended that you ask for a professional installation.
•This LCD unit features an advanced ventilation system configured for vertical installation. A knowledgeable and experienced professional technician can perform other mounting or installation orientations (e.g., horizontal, tilted) provided that you specifically inform the technician of the unit's specialized ventilation needs. Call 800.HITACHI for additional info and guidance.
| Although this LCD Display Panel can be installed using a variety of third party wall mounting brackets/devices, |
CAUTION | such third party brackets/devices have not been tested or approved by Hitachi for use or compatibility with |
| this LCD Display Panel. Accordingly, Hitachi accepts no responsibility or liability for any injuries or property |
| damage resulting from the use of such third party brackets/devices. Hitachi strongly advises that any |
installation of this LCD Display Panel using wall mounting brackets/devices be performed only by a qualified and experienced television installation technician who has completed a thorough evaluation of:
a)the
b)the
8